User Guide

How to use Oregon Providers

A quick walk-through for clients finding a therapist, independent providers managing their listing, and practice administrators running a solo, small, or multi-provider practice.

For Clients: Finding a Therapist

Reaching out for the first time is hard enough — finding the right person shouldn't be. There are three ways in: search directly if you know what you want, take the guided match quiz if you'd rather be asked, or browse our curated hub pages by topic. Pick whichever feels easiest right now.

  1. Start with the search bar

    Type what's on your mind — a concern ("anxiety"), a city ("Portland"), your insurance plan ("OHP"), or a specific approach ("EMDR"). Autocomplete suggests the most relevant matches as you go, and pressing Enter opens the full list of providers filtered to your search. You don't need the perfect word; close enough still works.

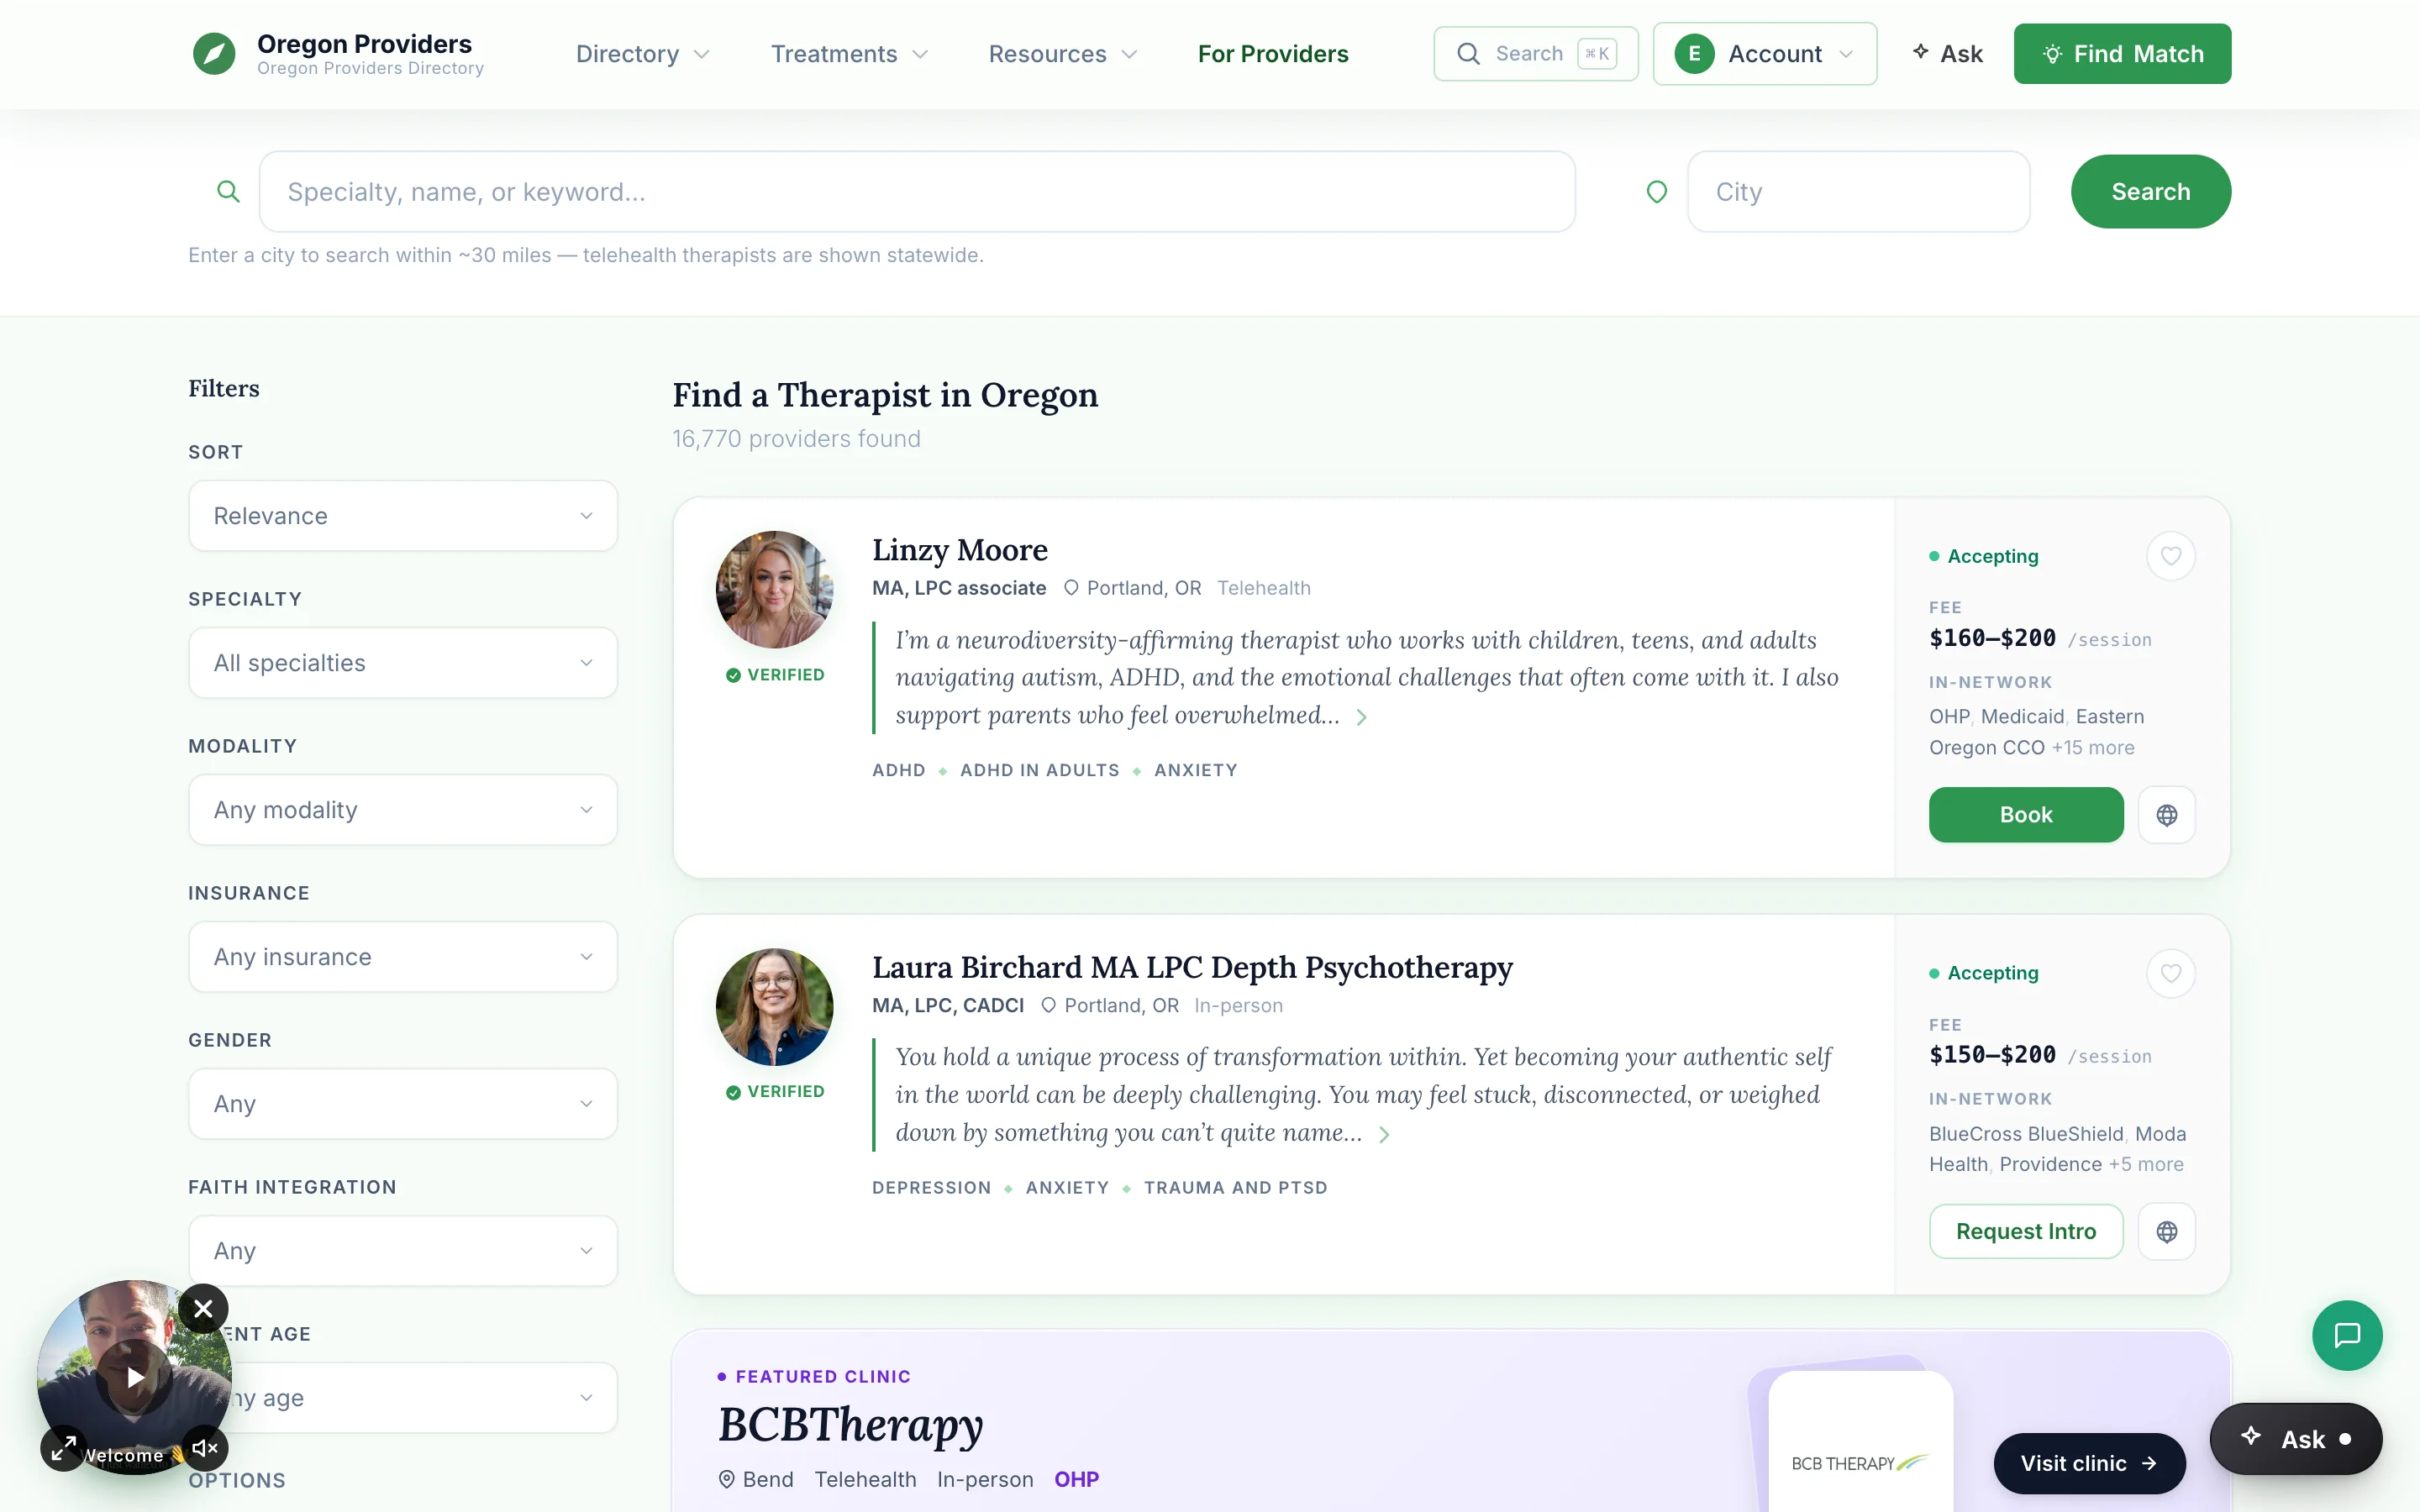
    Provider search results page showing therapist cards with photos, specialties, insurance accepted, and filter options
    Search results. Each card shows a provider's photo, credentials, specialties, location, and whether they're accepting new clients.
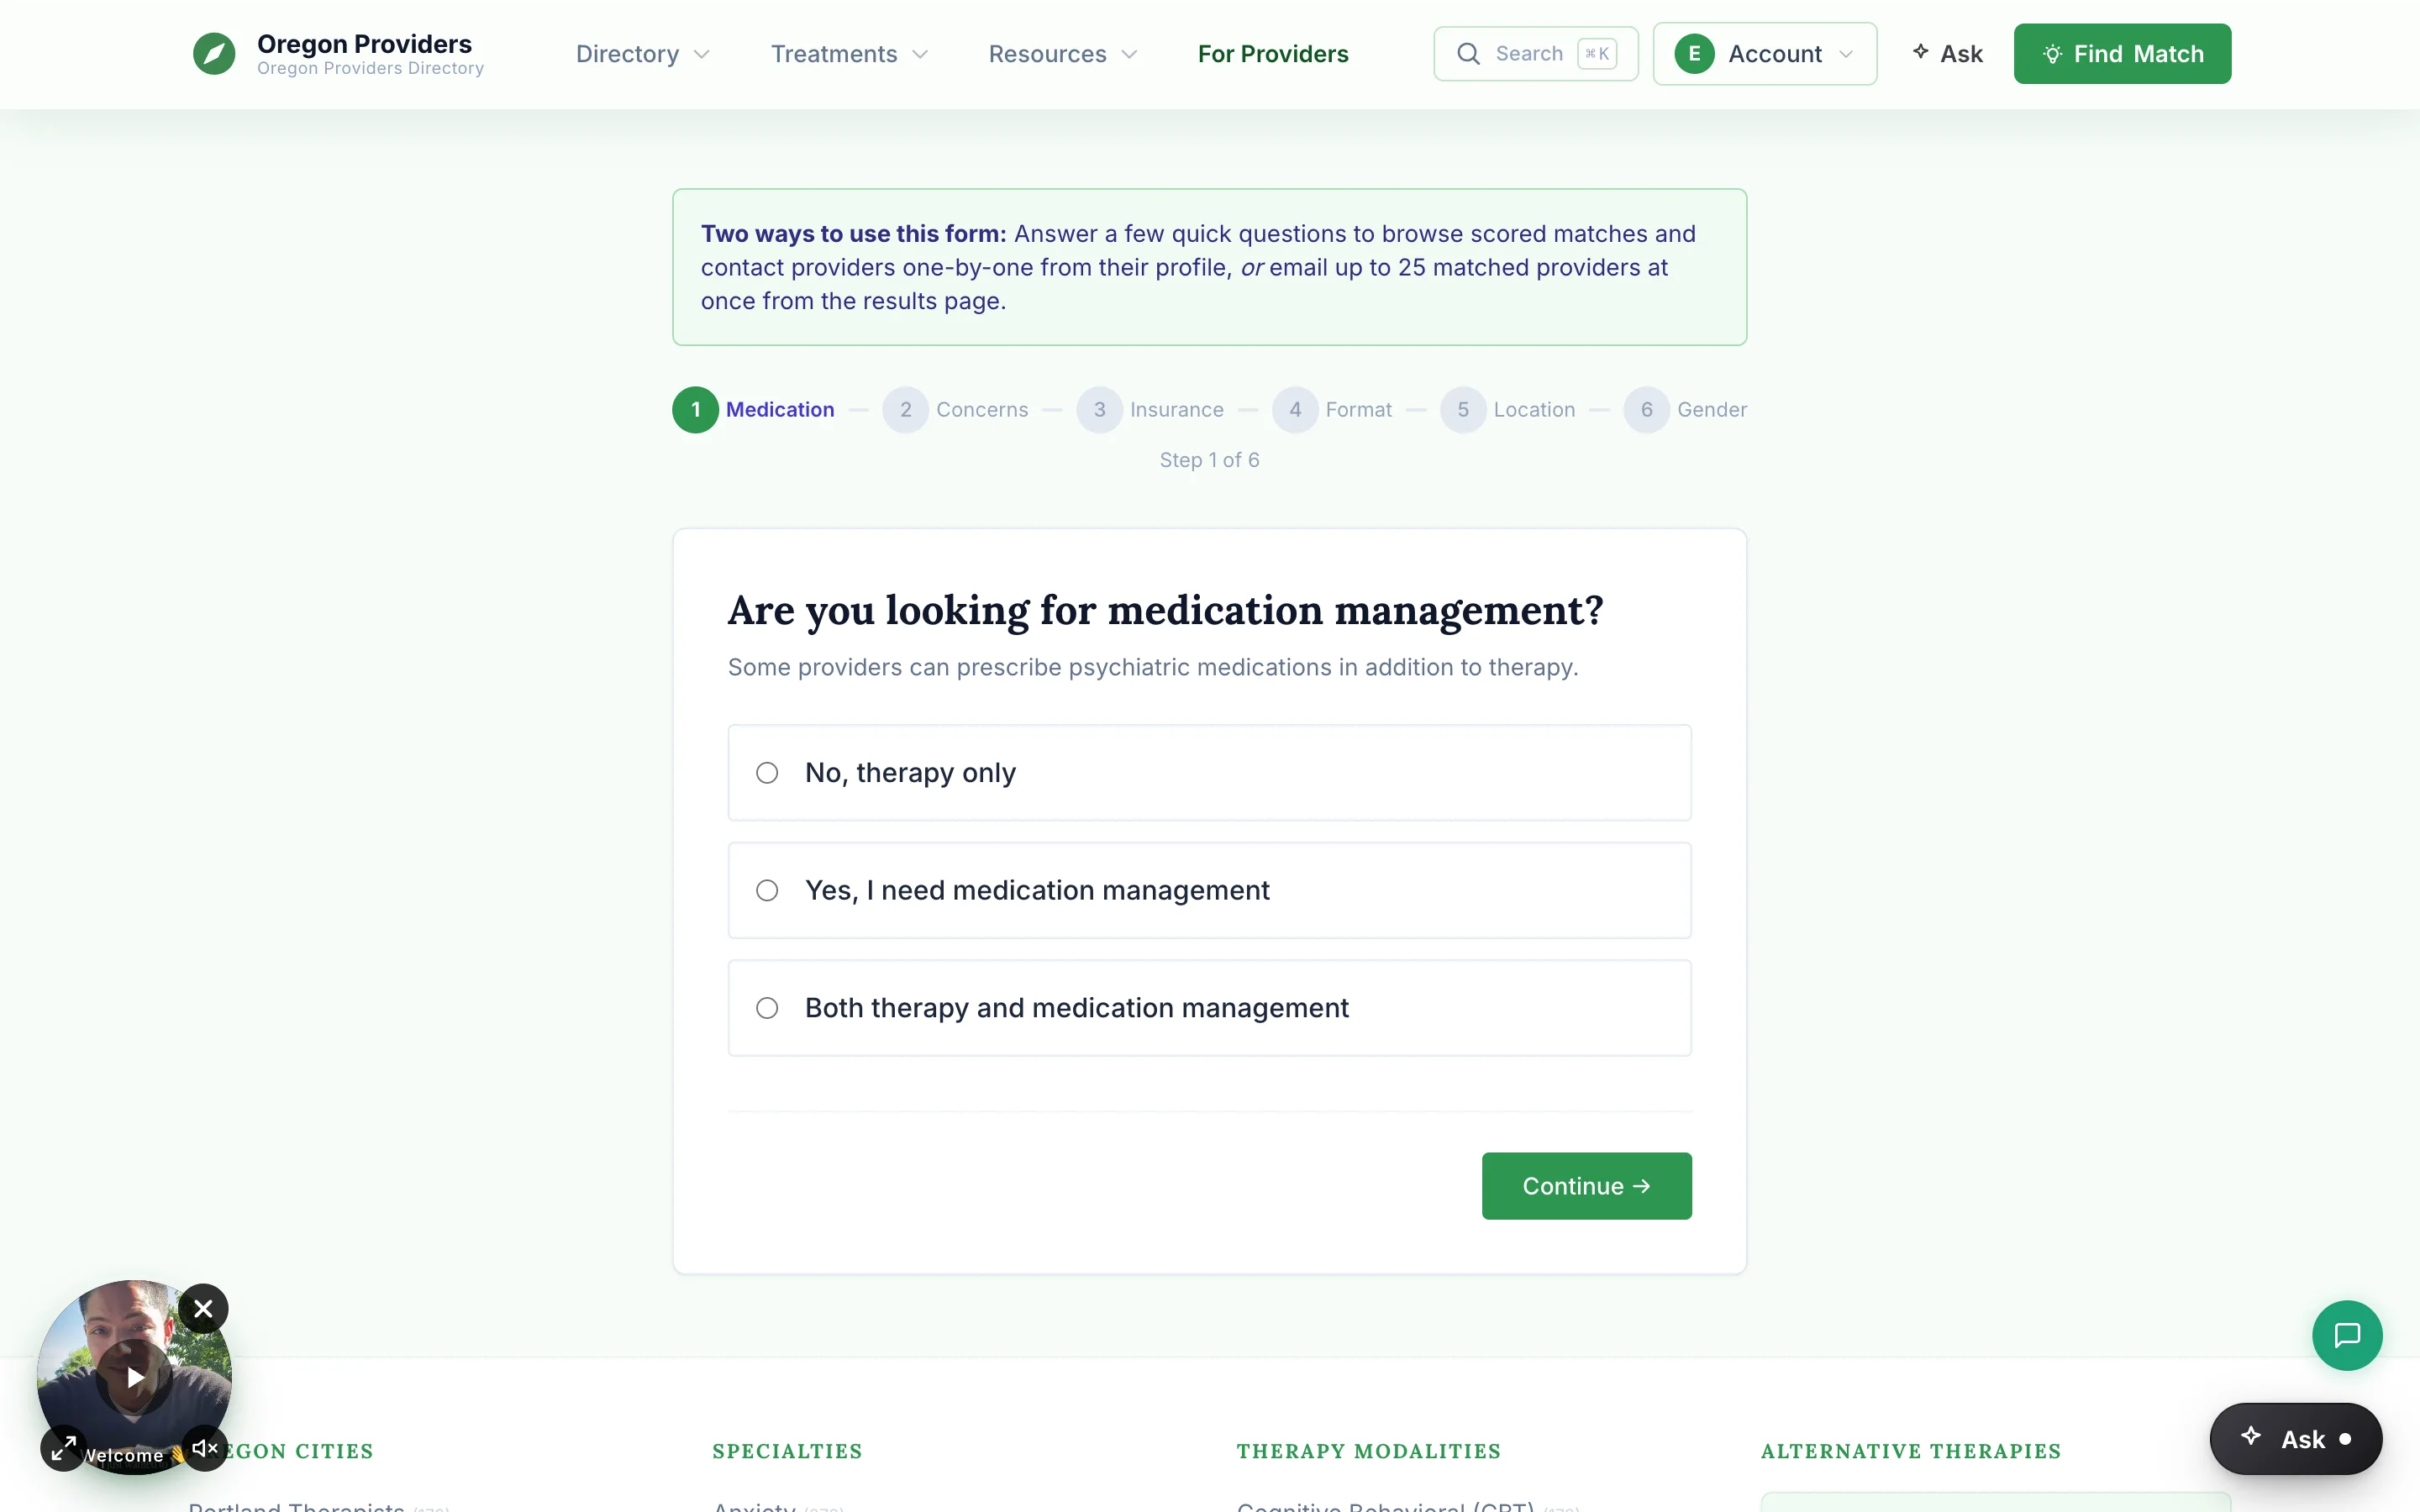
  2. Take the match quiz

    /match asks a few short questions — where you are, what you're working through, and your insurance situation — then hands back a small shortlist of providers who fit. It's free, takes about a minute, and there's no account to create. Nothing personal is stored unless you choose to send a message.

    The guided match quiz asking the client what kind of support they're looking for, with simple choice buttons
    The match quiz walks you through a few plain-language questions, one at a time.
  3. Narrow with filters

    On /providers and every hub page you can refine the results until they fit:

    • Telehealth — online-only providers (video / phone)
    • OHP / Medicaid — providers who accept Oregon Health Plan
    • Accepting clients — only providers with confirmed openings
    • Specialty — anxiety, trauma, ADHD, grief, and more
    • Modality — CBT, EMDR, IFS, Somatic, and others
    • Insurance — 194+ plans supported (including every OHP alias)
    • Sliding scale — fee-adjustable providers
  4. Read a profile

    Every provider card opens a full profile — bio, credentials, specialties, modalities, fees, location, telehealth status, insurance list, and (for Pro providers) a video intro. Every profile links directly to the provider's booking or contact page.

  5. Contact directly, no middleman

    We take no referral fee and never insert ourselves between you and the provider. Reach out through the provider's website, email, or phone number when you're ready.

For Providers: Managing Your Listing

Whether you're claiming an existing listing or starting from scratch, here's how to get set up and grow your practice.

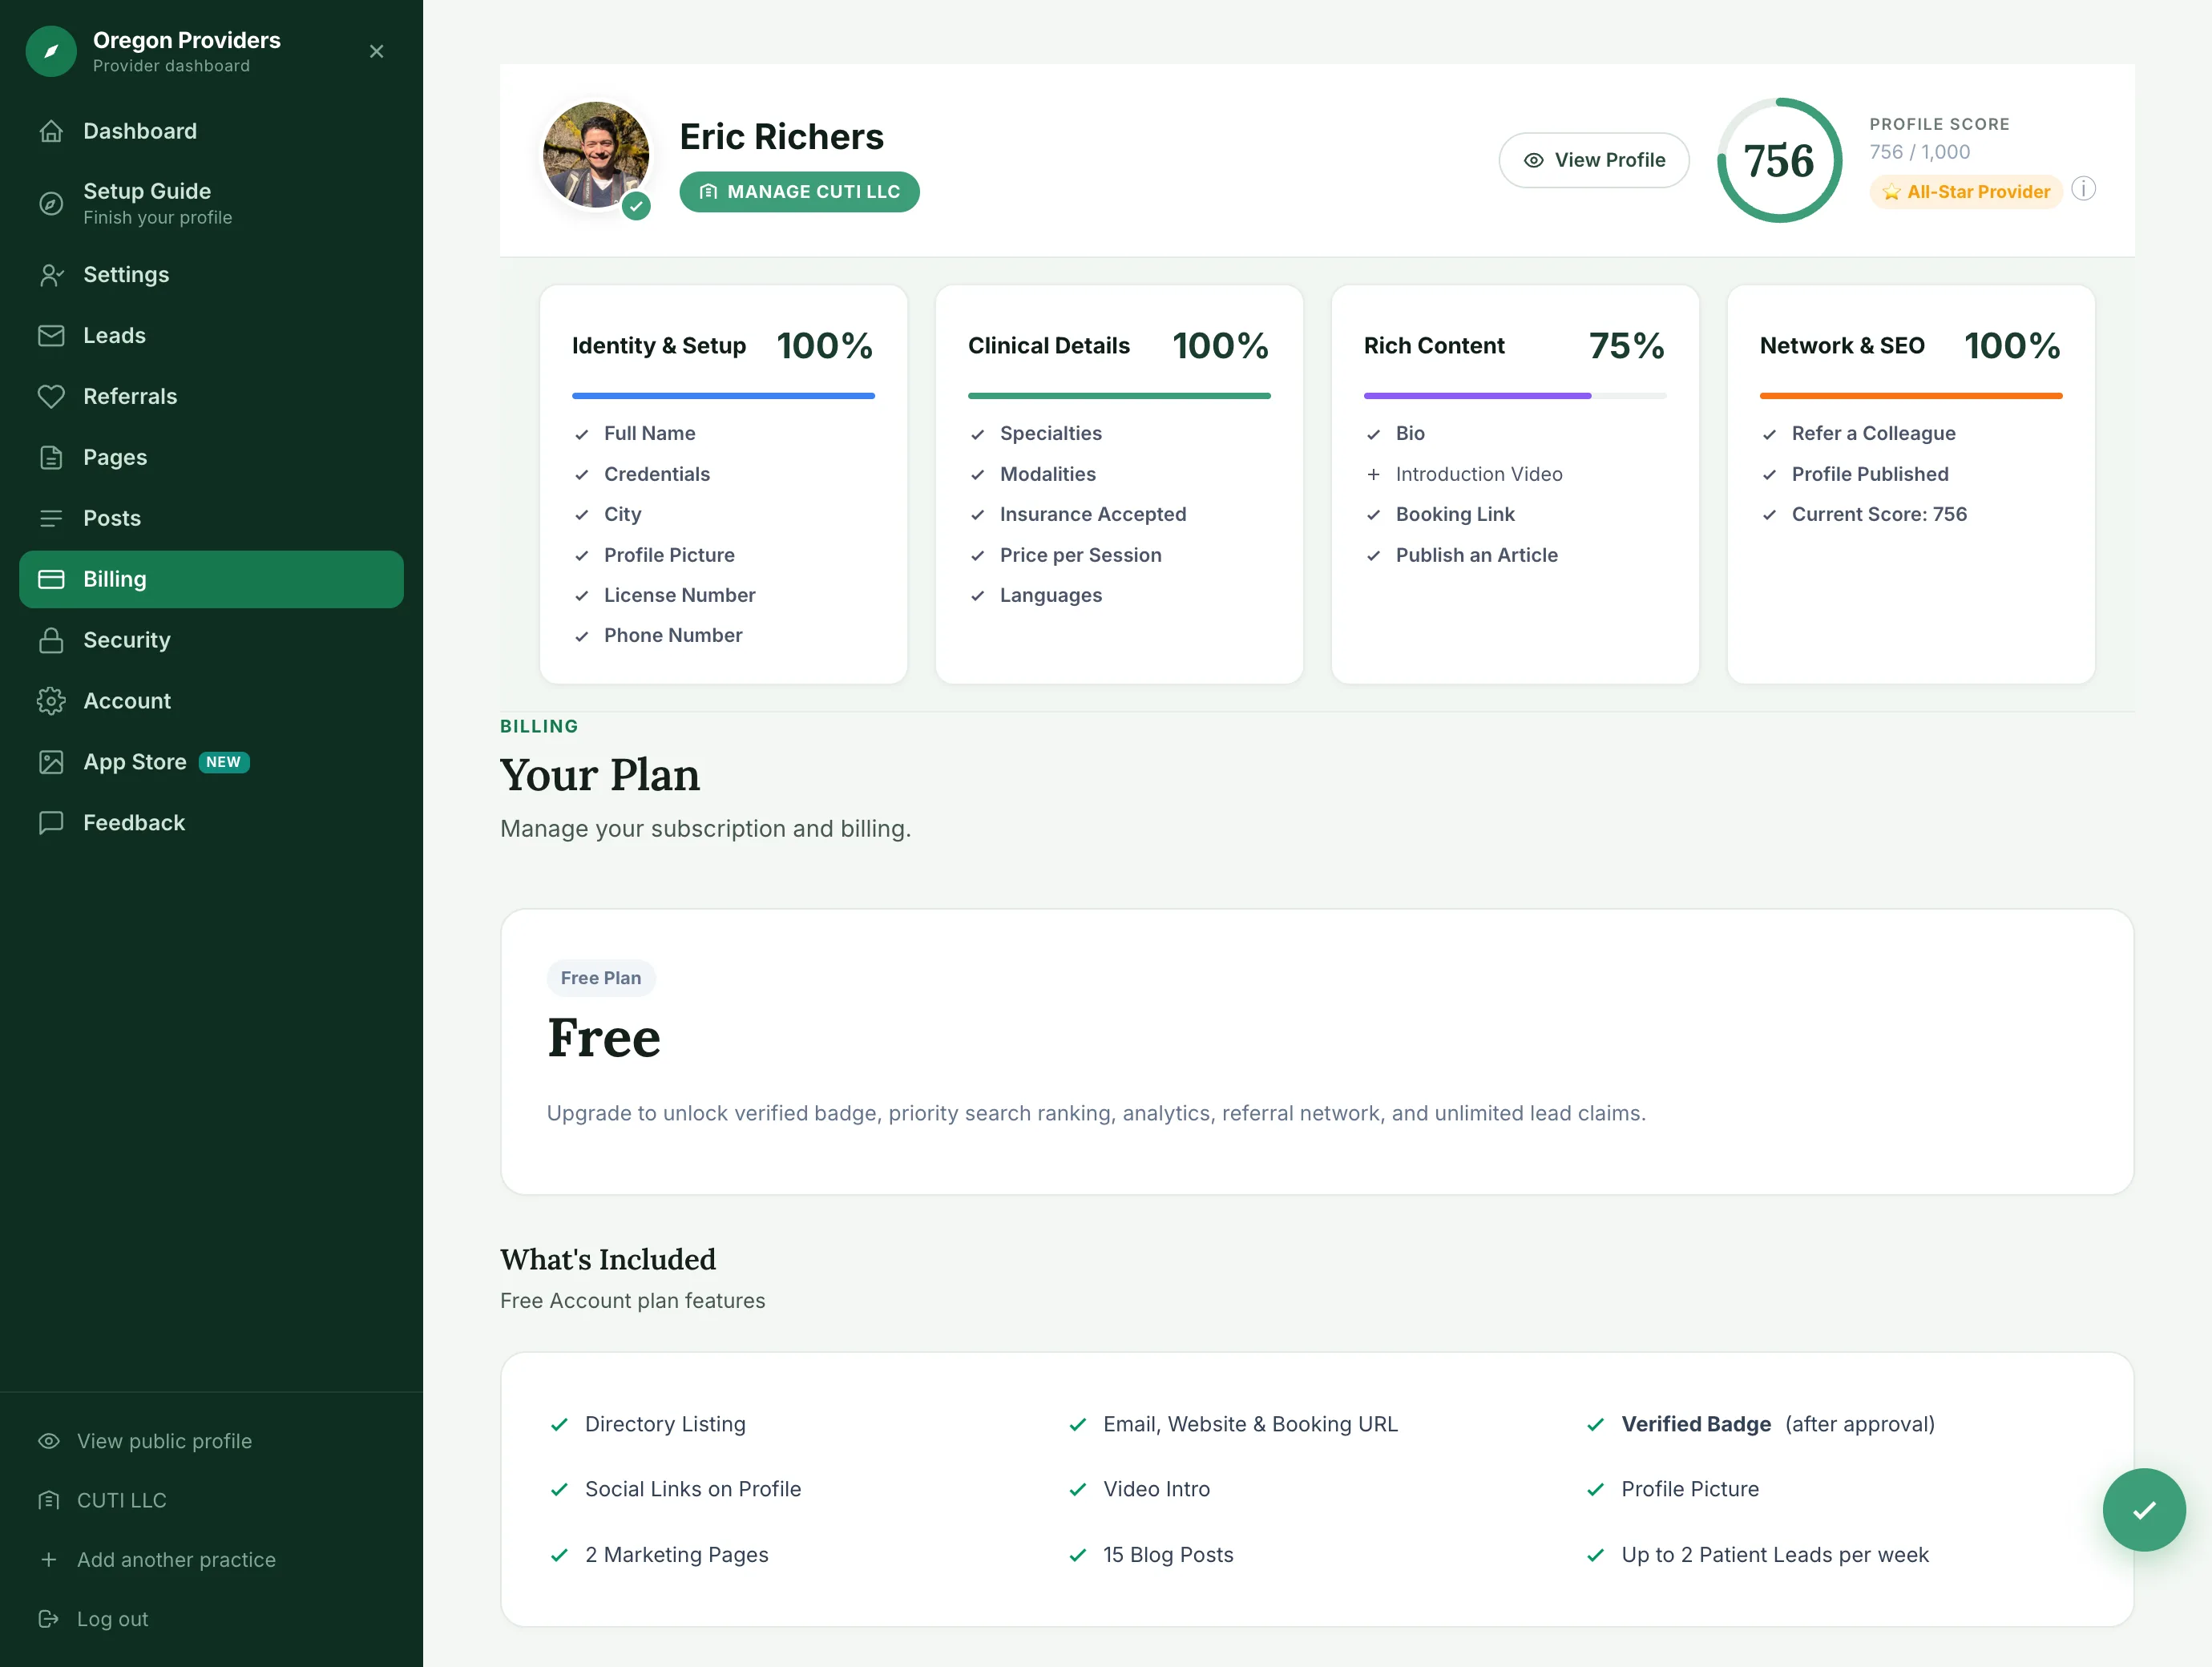
Free tier is fully-featured. Every claimed listing — free or paid — gets the verified badge, social links, a video intro, a profile photo, 2 marketing pages, and 15 blog posts. Paid tiers add more leads, more pages & videos, priority ranking, and SEO.
  1. Check if you're already listed

    We import licensed Oregon providers from public license boards. Search your name at /providers. If you find a listing, claim your profile — it takes about 2 minutes.

  2. Or create a new listing

    If you're not in our database, register a new account. New listings are reviewed within 24 hours before going live and earn the verified badge.

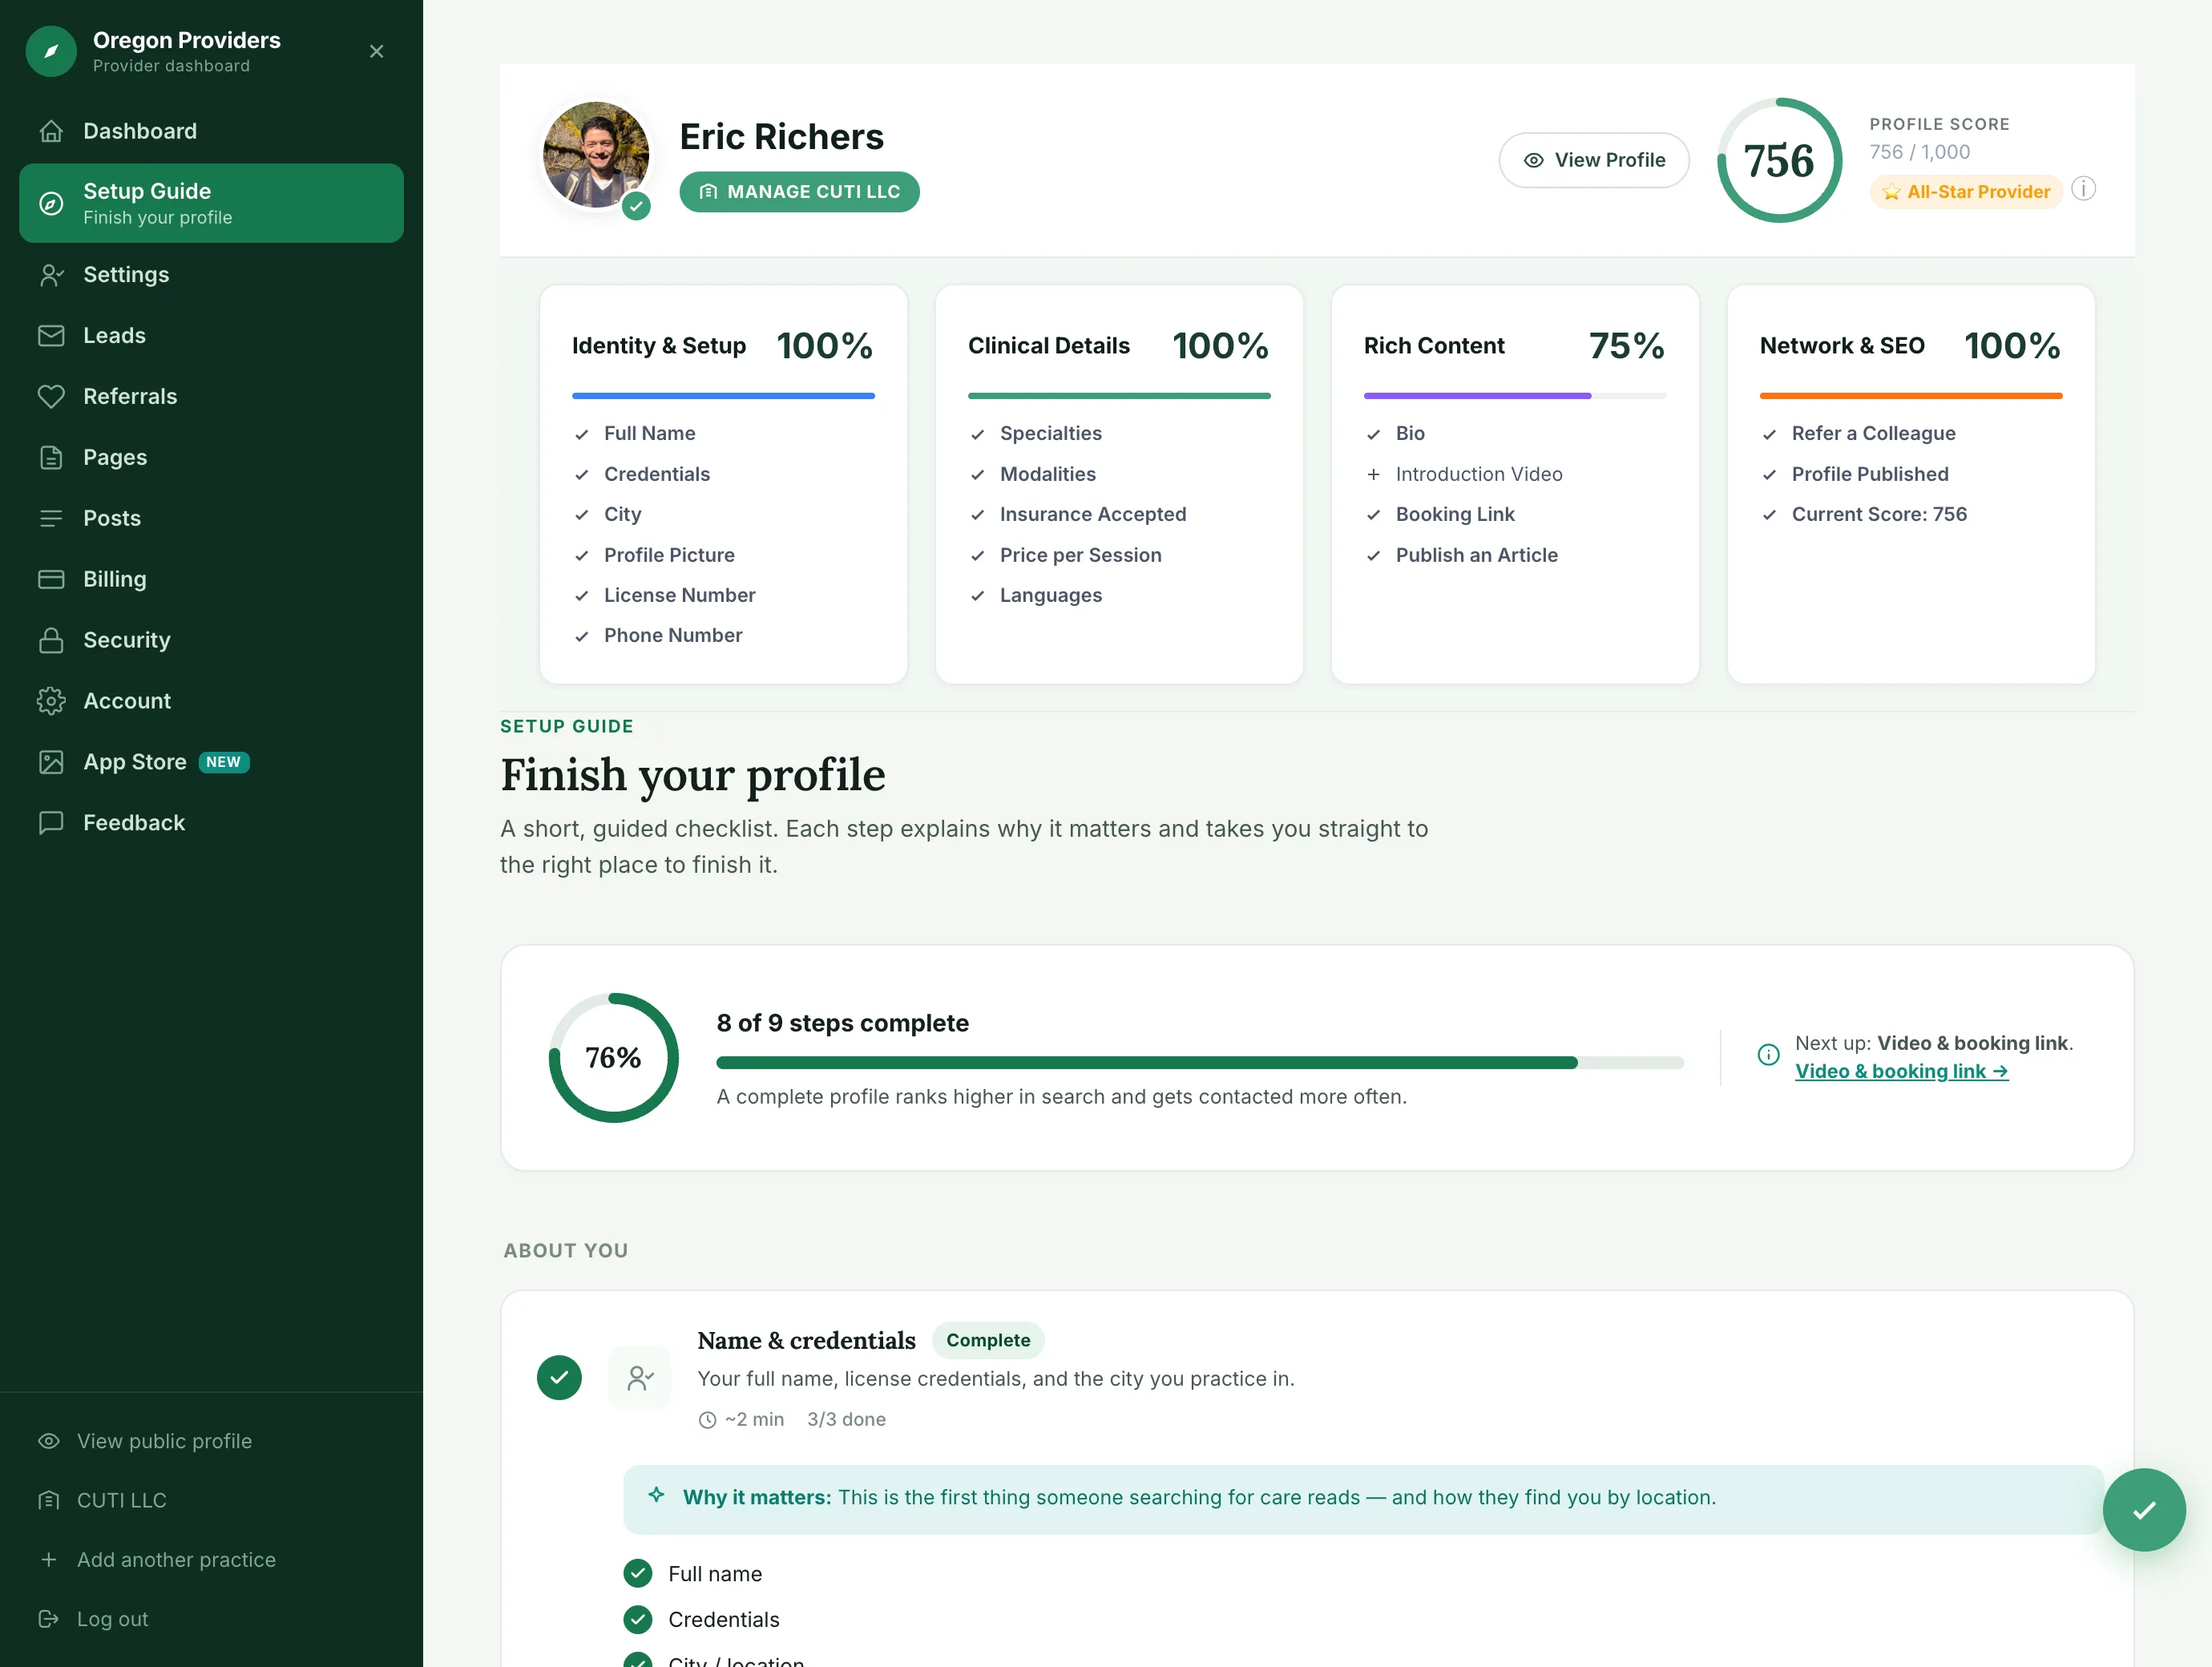
  3. Complete your profile

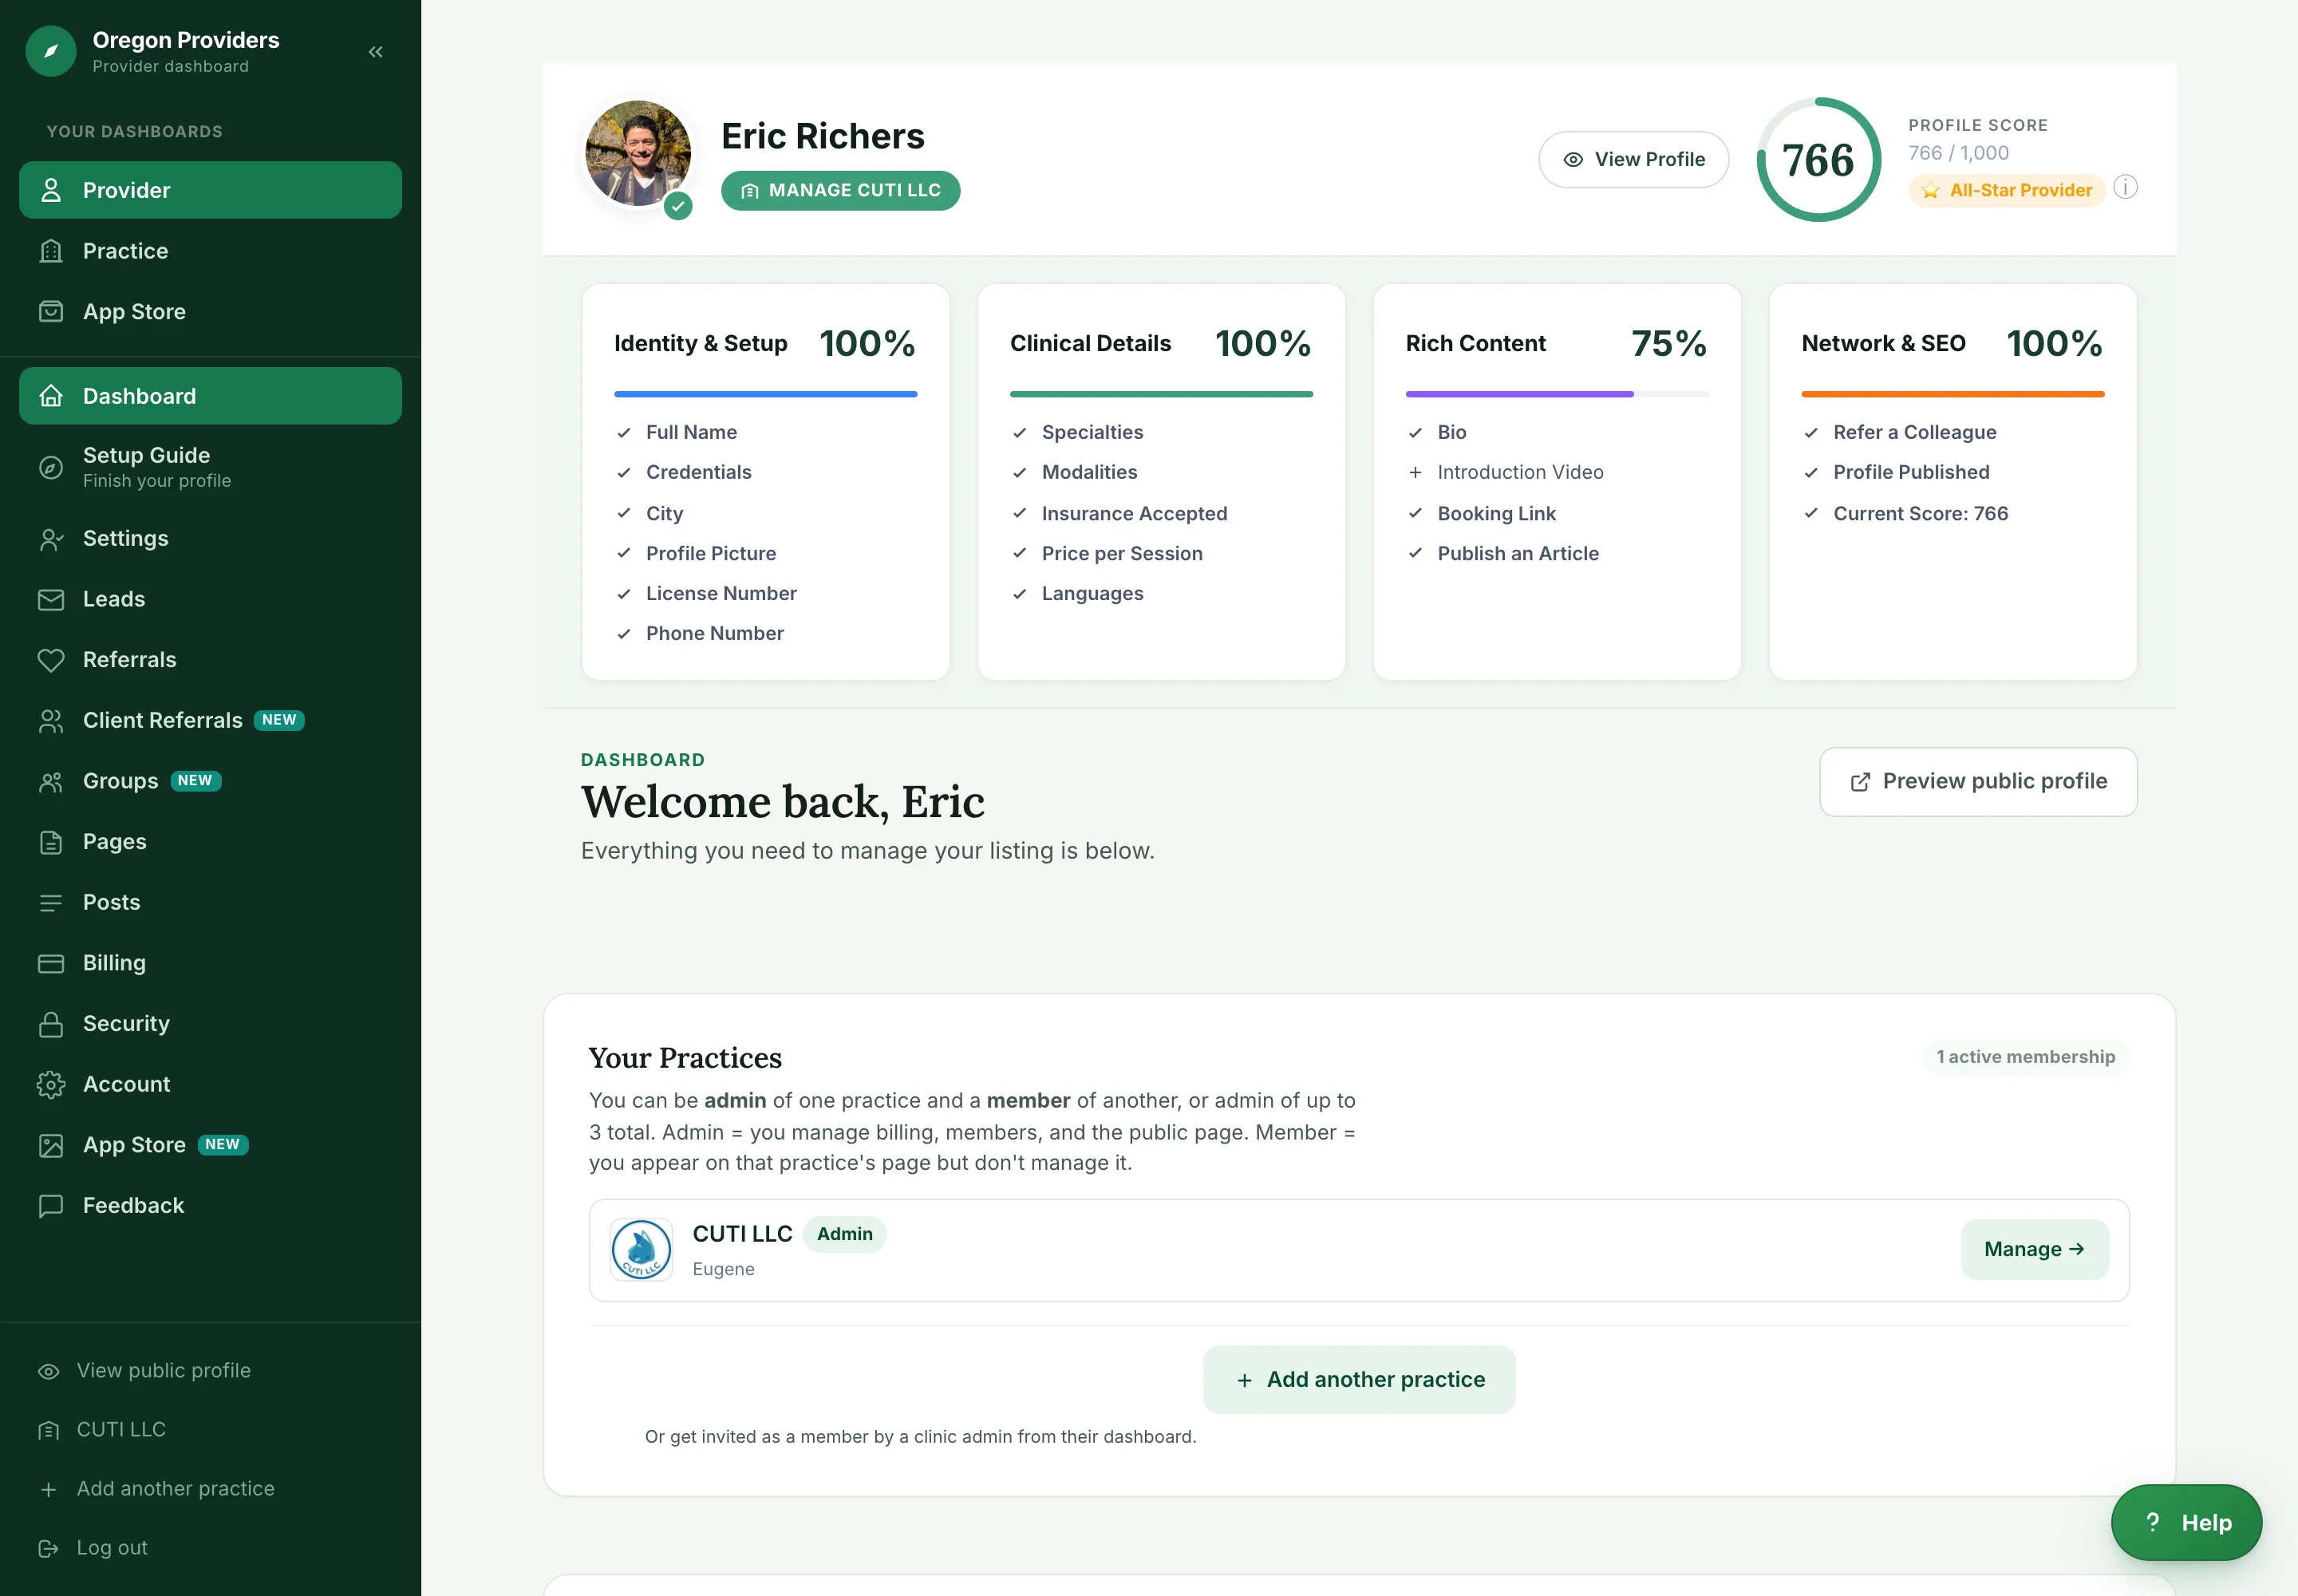
    Every profile has a completeness score out of 1000 points. Your dashboard puts that number front and center and shows exactly which fields earn the next points, grouped into Identity & Setup, Clinical Details, Web Content, and Network & SEO. A more complete profile ranks higher within your tier and gives clients more reasons to reach out. The high-impact fields:

    A solo provider's dashboard showing the profile completeness score out of 1000 and health-score cards pointing to the next fields to fill in
    The provider dashboard. The score and health cards tell you, at a glance, what to fill in next.
    • Profile photo + bio (at least 400 words)
    • Specialties + modalities (every one you actually practice)
    • Insurance list (accurate and current)
    • Session fees + sliding scale availability
    • Telehealth + in-person flags
    • Video intro — available on every tier (1 on Free, 2 on Basic, 5 on Pro)
    • Social links — add your Facebook, Instagram, LinkedIn, website
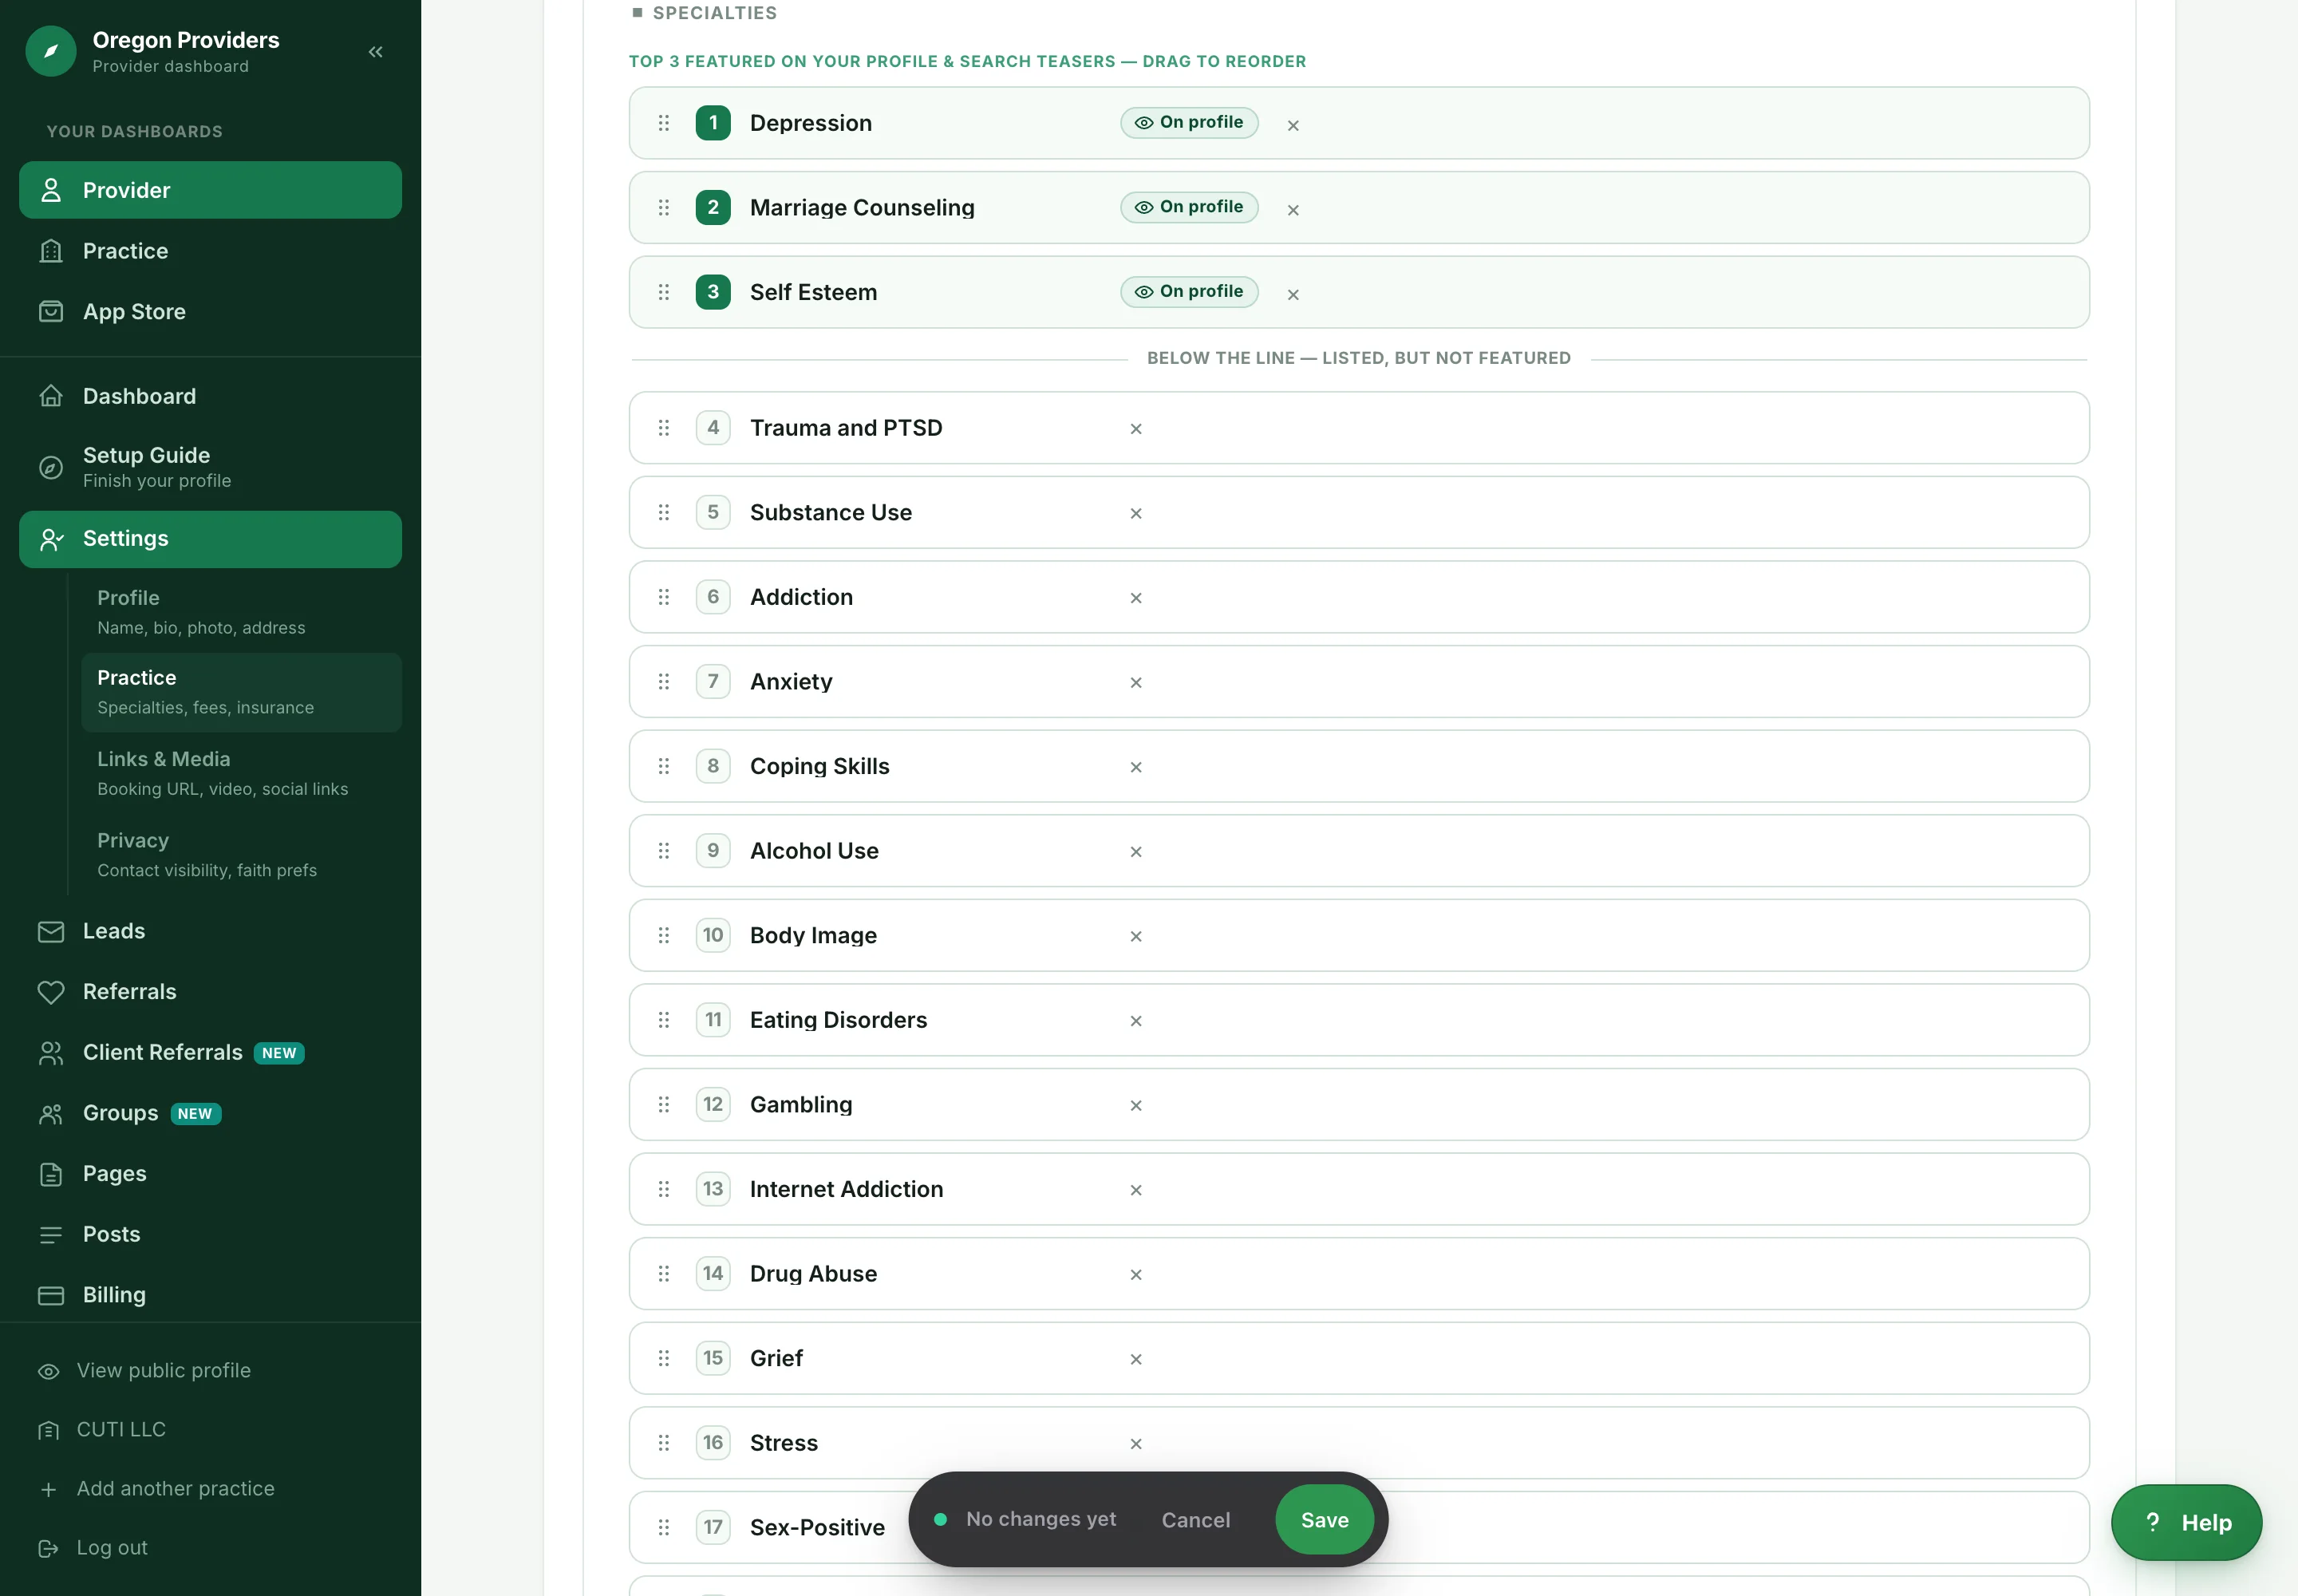
    The Practice tab's specialties editor: a numbered, drag-to-reorder list of therapy specialties with the first three marked as featured on the public profile
    Specialties & therapy methods. Click to add, drag to reorder, and the top three in each list are featured on your profile and in search. Changes save as you type.
  4. Publish blog posts — every tier gets 15

    Blog posts drive search traffic and show clients you're active in your field. Every tier — Free, Basic, and Pro — can publish up to 15 posts. Posts live under /blog/your-slug/post-slug and link back to your profile.

  5. Build marketing pages

    Marketing pages are long-form SEO landing pages about your specialty or approach (e.g. "Trauma therapy in Portland"). Free gets 2 pages, Basic 4, Pro 8. Each is its own URL under /provider/your-slug/page-slug.

  6. Pick a plan (optional)

    Free listings always work. Basic ($10/mo) adds up to 5 leads/week (vs 2), 4 pages (vs 2), 2 videos (vs 1), the referral network, and ranks you above Free listings. Pro ($25/mo) adds priority #1 ranking, SEO dofollow backlinks, up to 25 leads/week, 8 pages, 5 videos, and the "Featured" + "Pro" badges. Full breakdown at /pricing.

  7. Update availability anytime

    In your dashboard, toggle "Accepting Clients" on or off. Changes propagate to search results immediately.

  8. Respond to leads fast

    Every provider gets lead emails. Responding within 24 hours dramatically improves conversion. Your leads dashboard tracks status for every match. Basic and Pro tiers get higher weekly quotas.

Detailed dashboard walkthrough — every screen explained 11 screens
1

Dashboard Home

/dashboard
Dashboard Home screenshot

Your command center. Top: your name, profile score (out of 1000), and a link to view your public profile. Four health-score cards show where you can earn the next points — Identity & Setup, Clinical Details, Web Content, Network & SEO. Below: your active practice card, profile strength bar, and tile grid linking to every section (Profile, Practice Details, Leads, Links & Media, Privacy, Pages, Posts, Billing, Security).
2

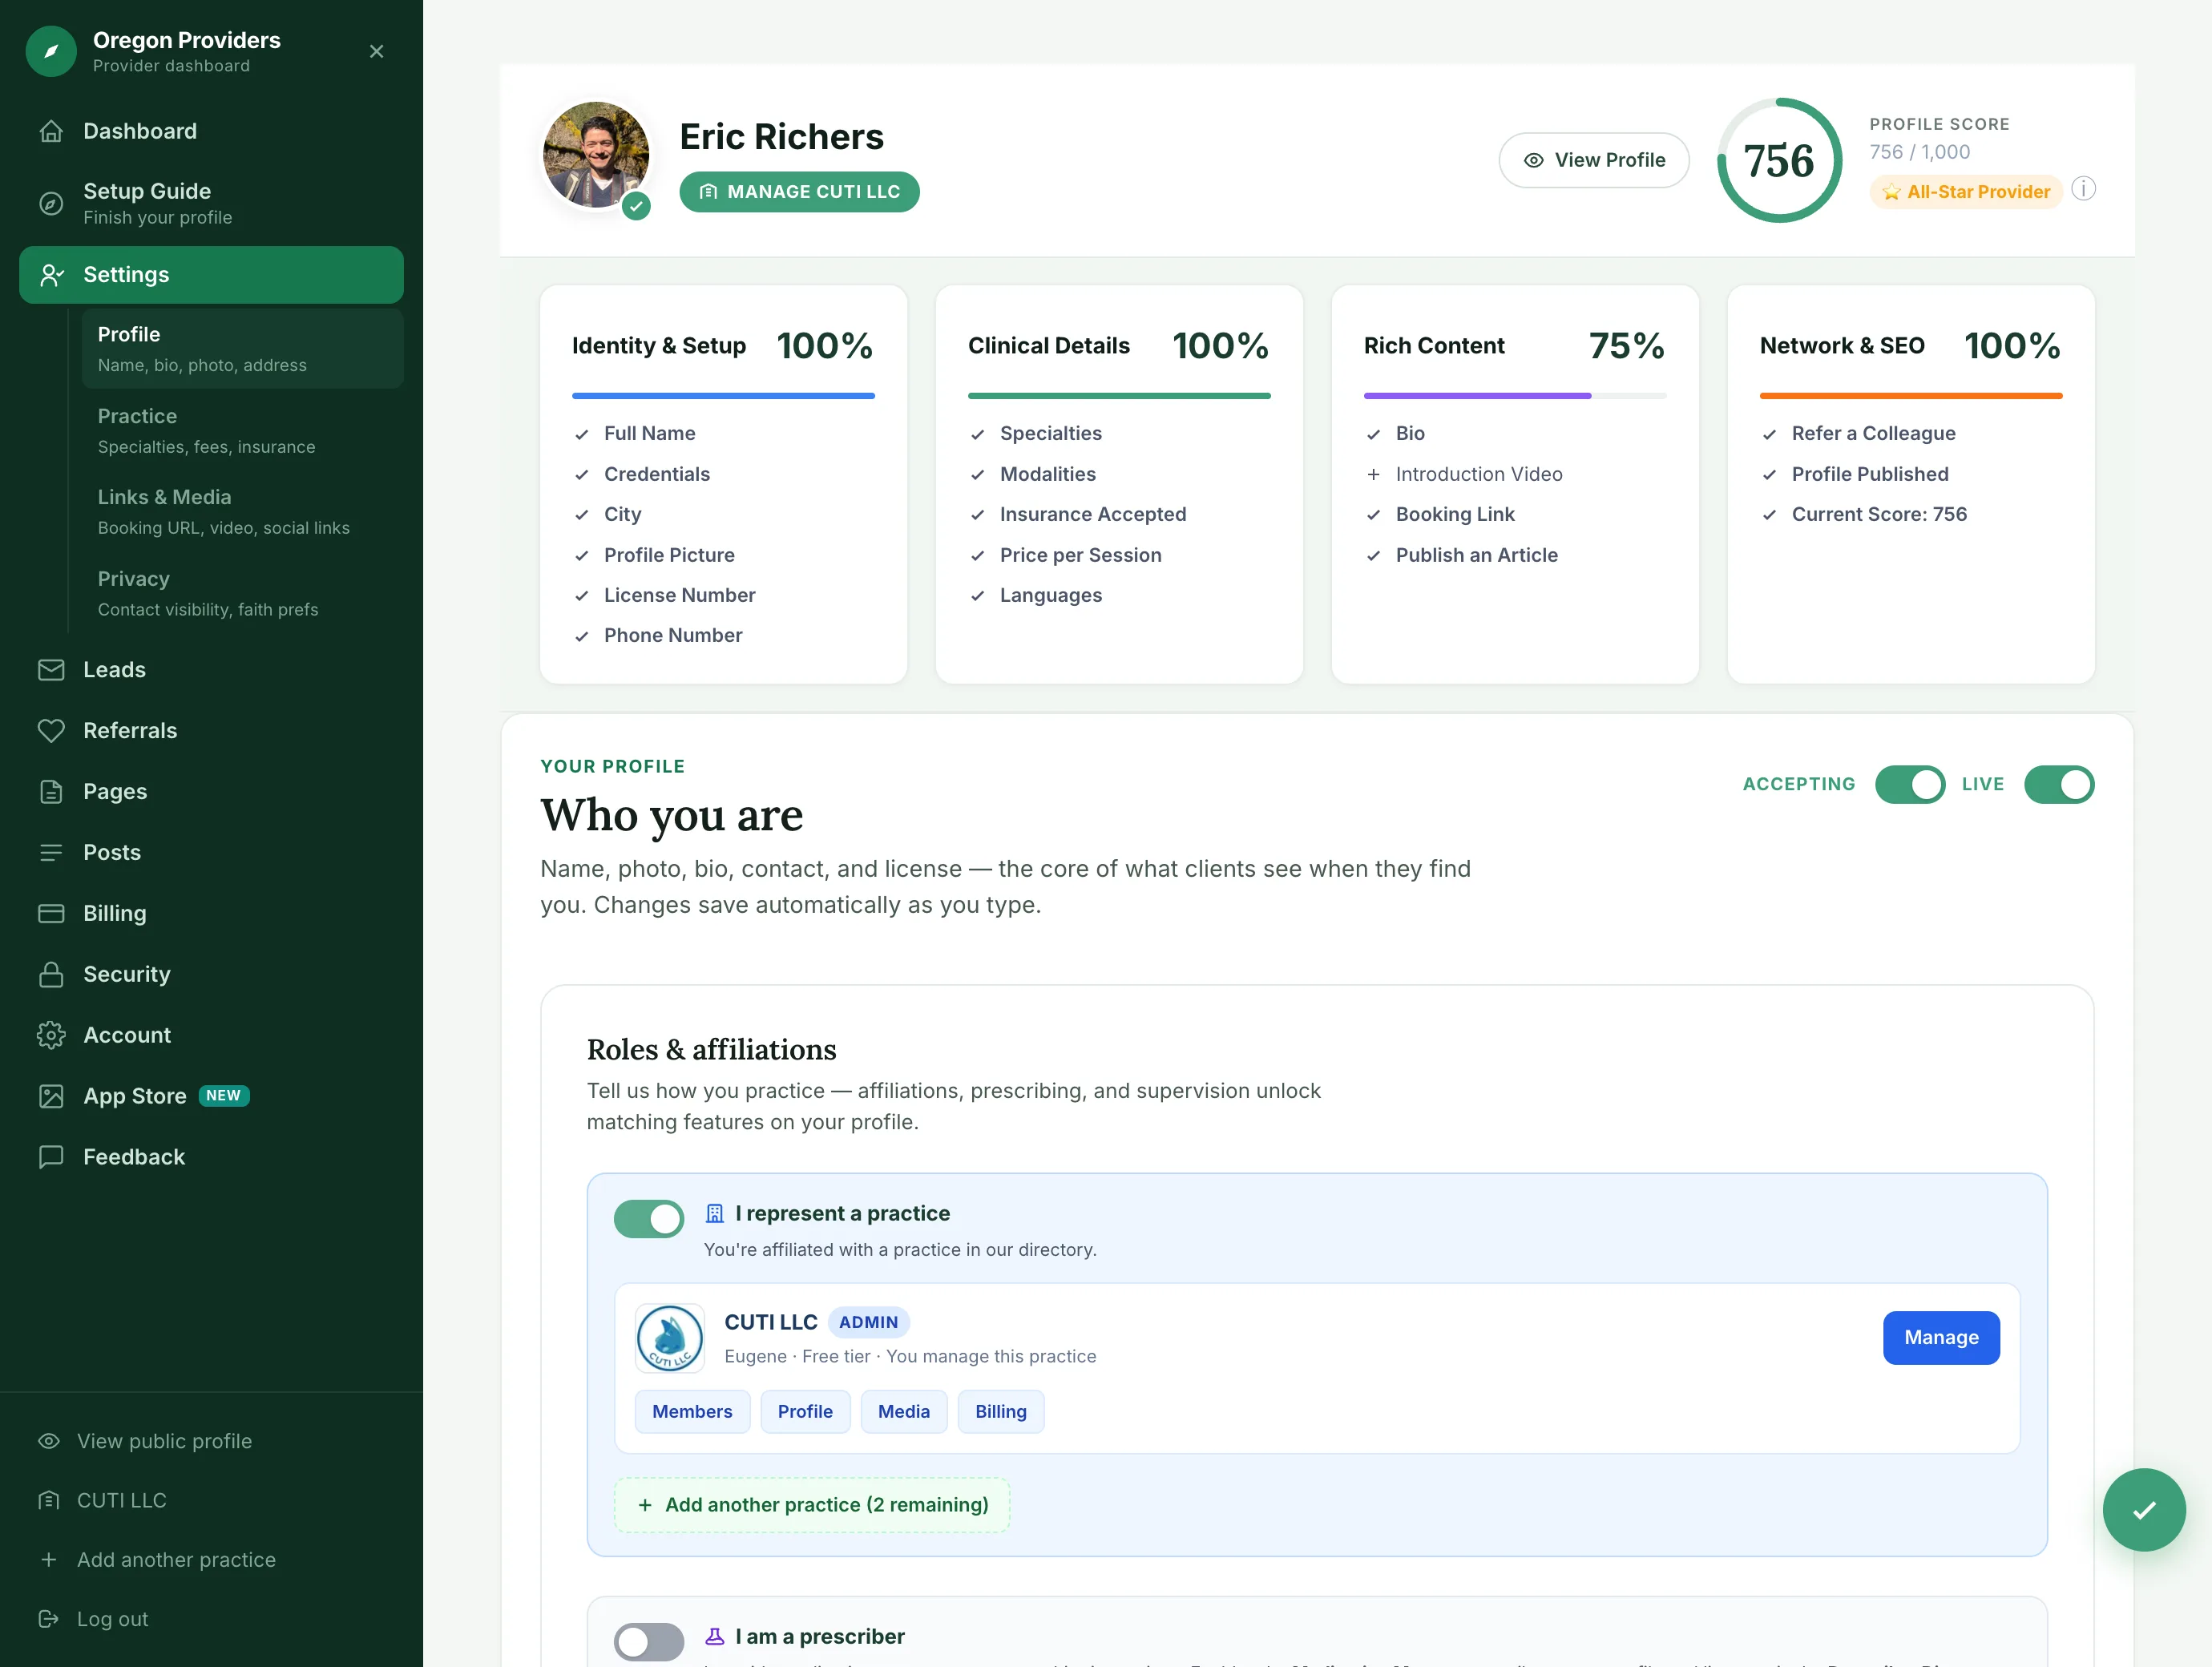
Profile Editor

/dashboard/settings
Profile Editor screenshot

The big one. Everything that appears on your public profile lives here. Sections: identity (name, credentials, license #, pronouns), photo (drag-and-drop upload with blur-protection toggle), contact (email, phone, website, booking URL, social links), bio (WYSIWYG with character counter), specialties / modalities / insurance / languages / ages-served (chip pickers — type to search, drag to reorder), session details (fees, sliding scale, telehealth / in-person), location, and the Accepting Clients toggle. Every field auto-saves on blur — a green check confirms the save. The URLs /dashboard/profile and /dashboard/photos both jump here (photos lands on the photo field).
3

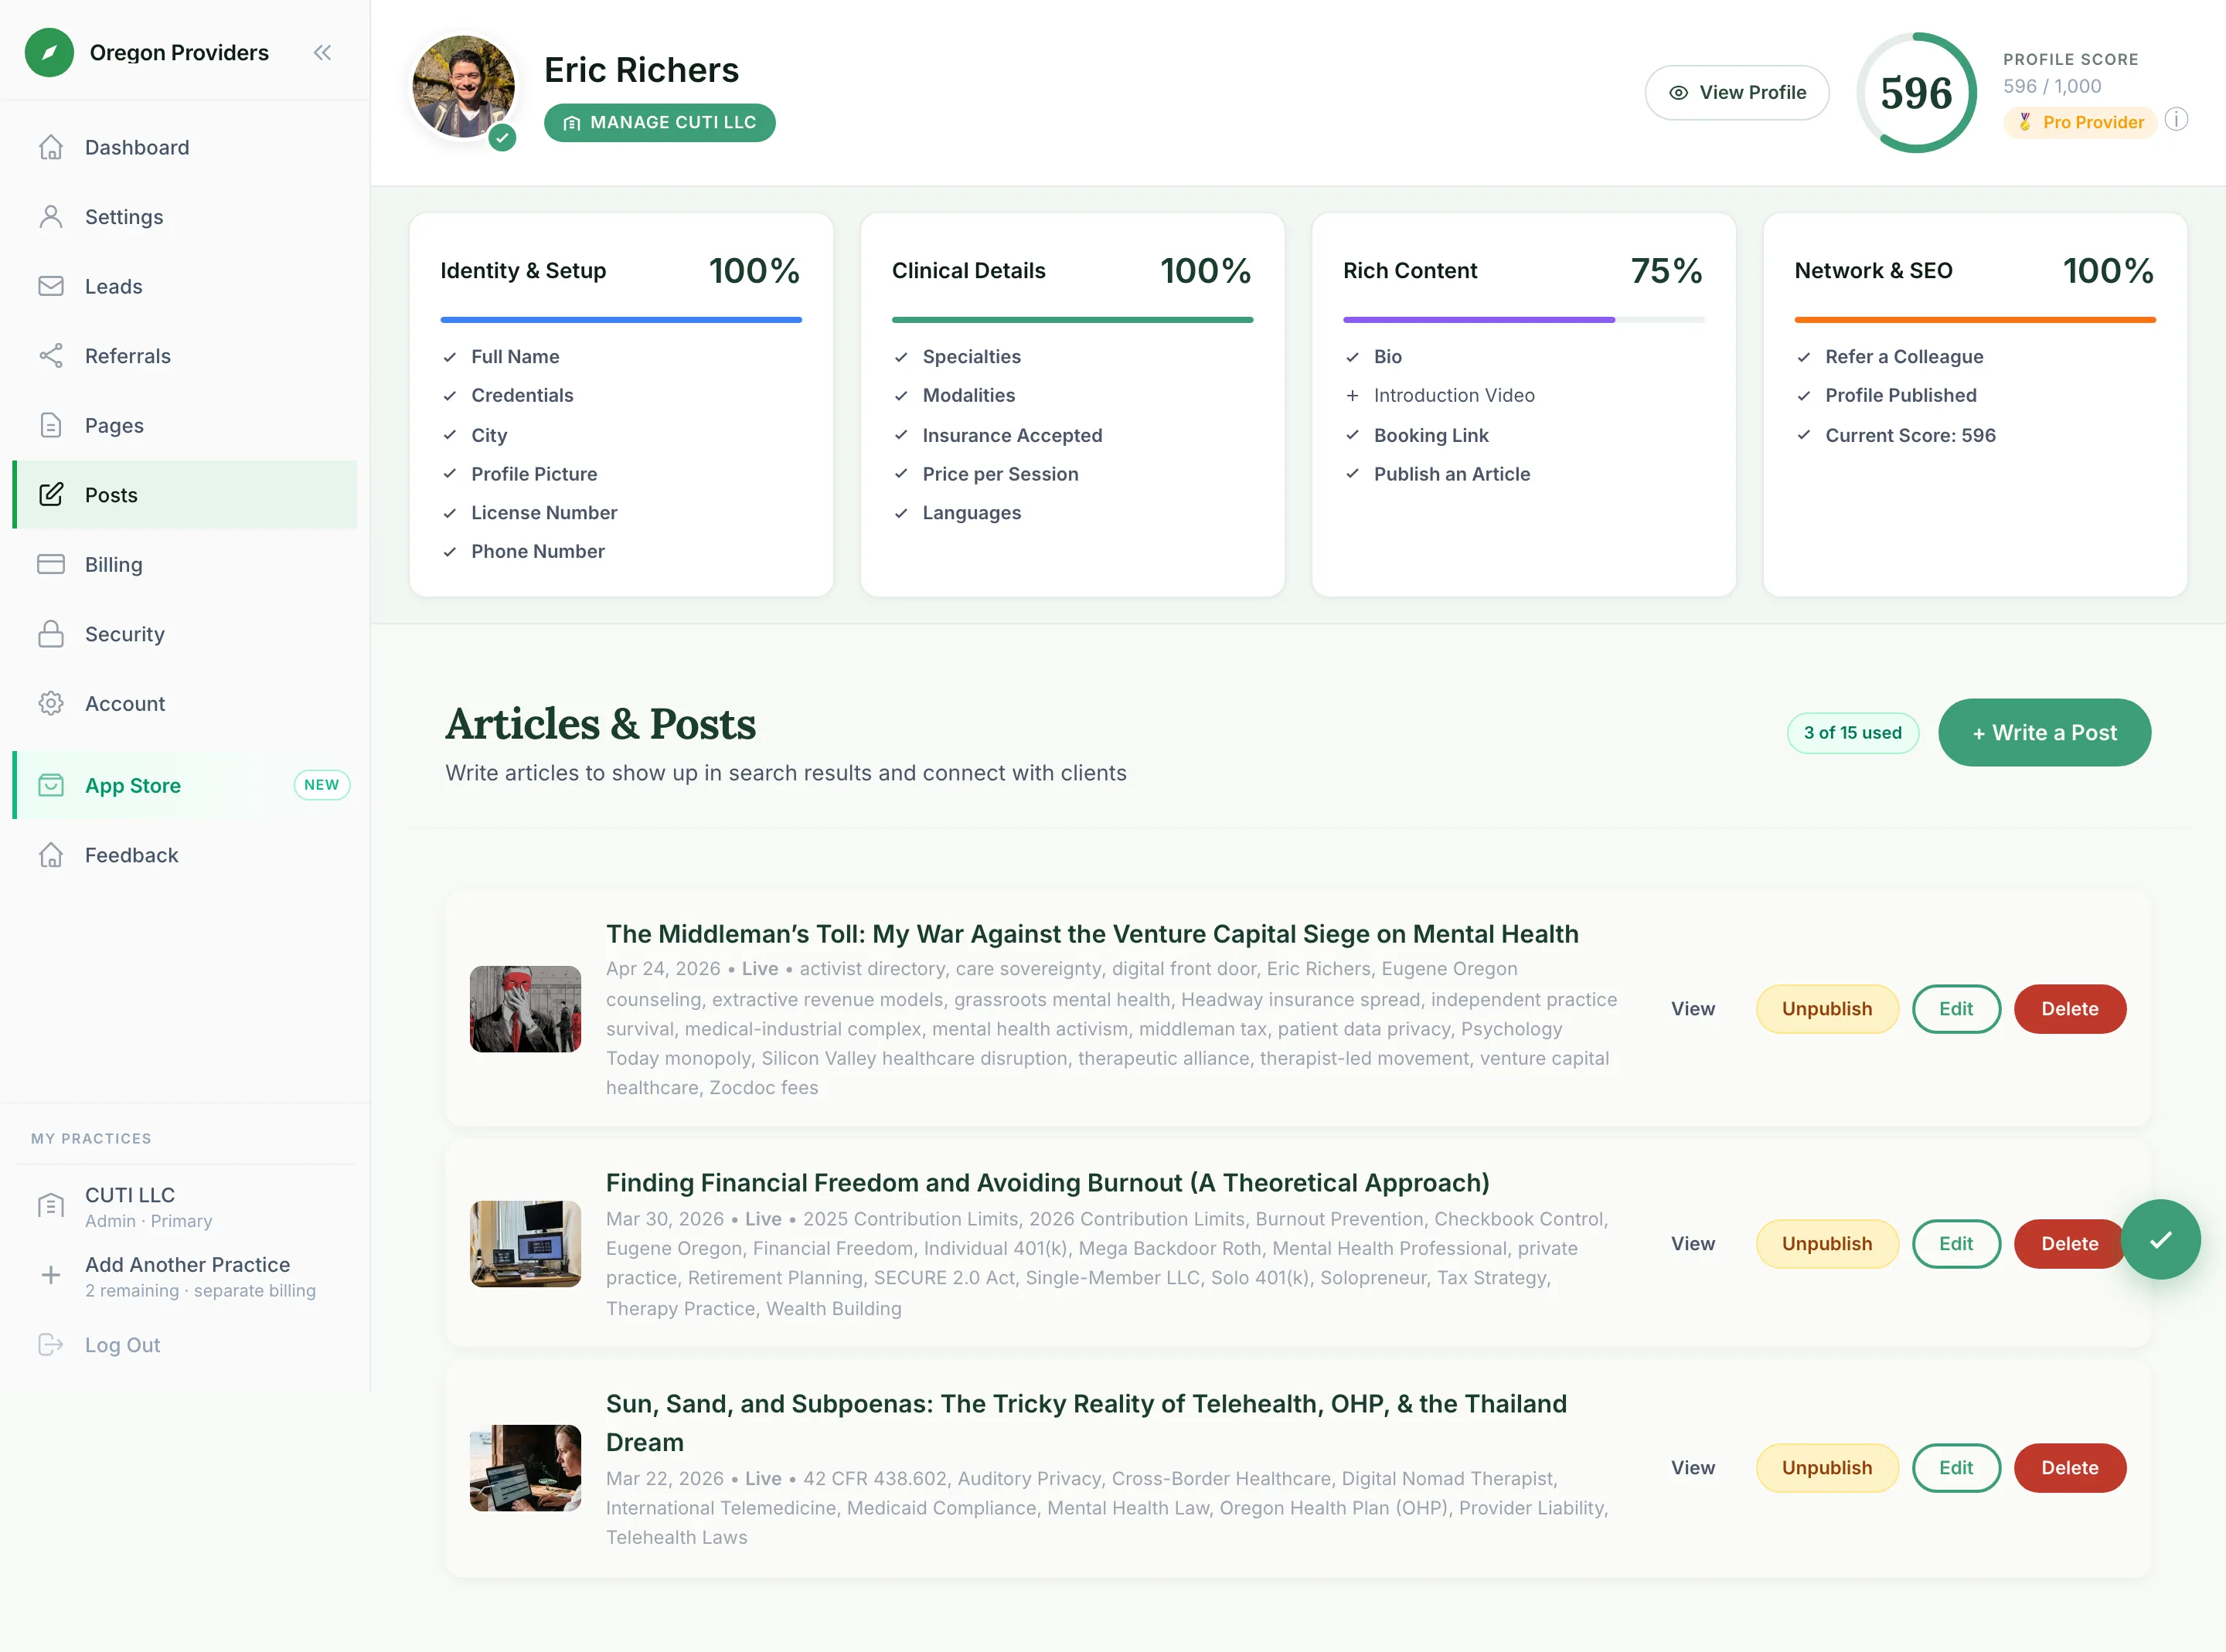
Posts (Blog)

/dashboard/posts
Posts (Blog) screenshot

Publish up to 15 blog posts on every tier. Posts drive search traffic and link back to your profile. Each post has a title, auto-generated slug (editable), summary, full WYSIWYG body, tags (free-text), featured image, and a published toggle. The list shows drafts and published posts side-by-side with view counts.

4

Marketing Pages

/dashboard/pages
Marketing Pages screenshot

Long-form SEO landing pages about your specialty or approach. Free gets 2, Basic 4, Pro 8. Each page lives at /provider/your-slug/page-slug. Best practice: one page per city / specialty combination (e.g. "Trauma therapy in Portland"). Same WYSIWYG editor as posts.
5

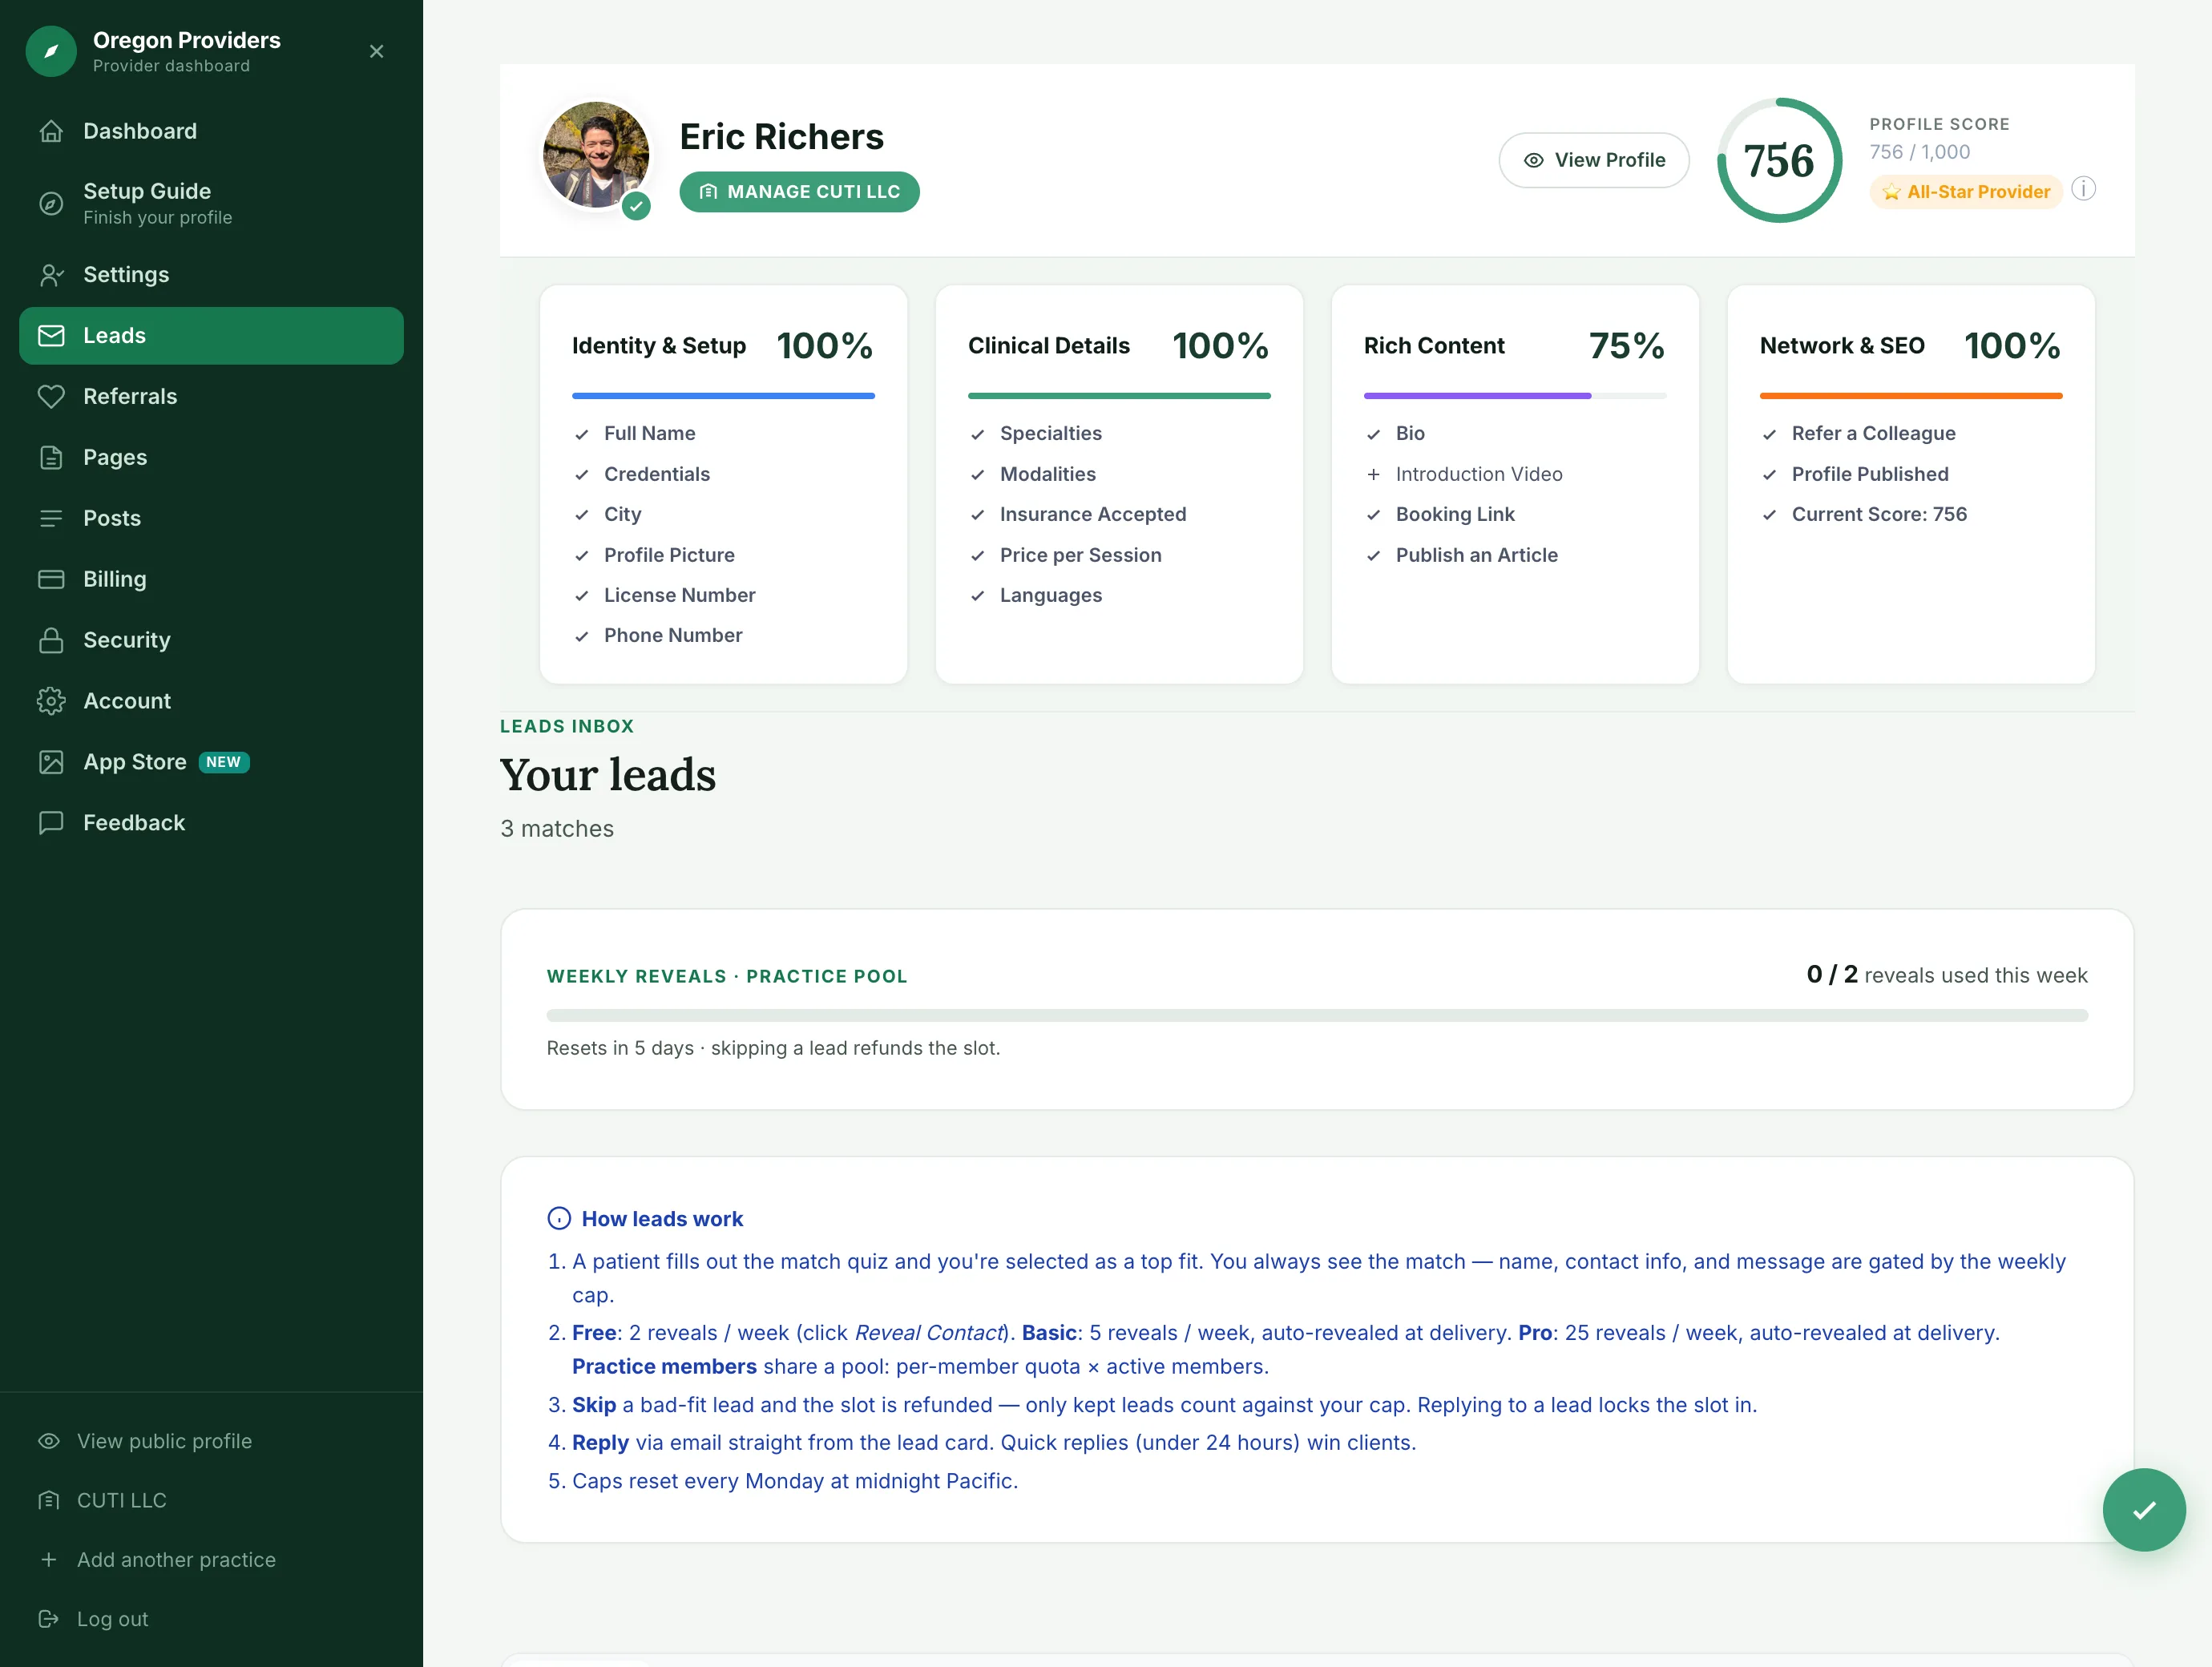
Leads Inbox

/dashboard/leads
Leads Inbox screenshot

Patient match requests delivered from the /match quiz. Each card shows what the patient needs (insurance, modality, session type), their contact info, and a status pill. Mark Contacted / Booked / Closed to track conversion. Weekly quota: Free 2, Basic 5, Pro 25.

6

Billing & Subscription

/dashboard/billing
Billing & Subscription screenshot

Plan picker, current tier, next renewal date, and payment method. Stripe-managed — change card, pause, cancel, view invoices. If you're a member of a paid practice, the practice tier is inherited and you'll see a notice instead of a plan picker.
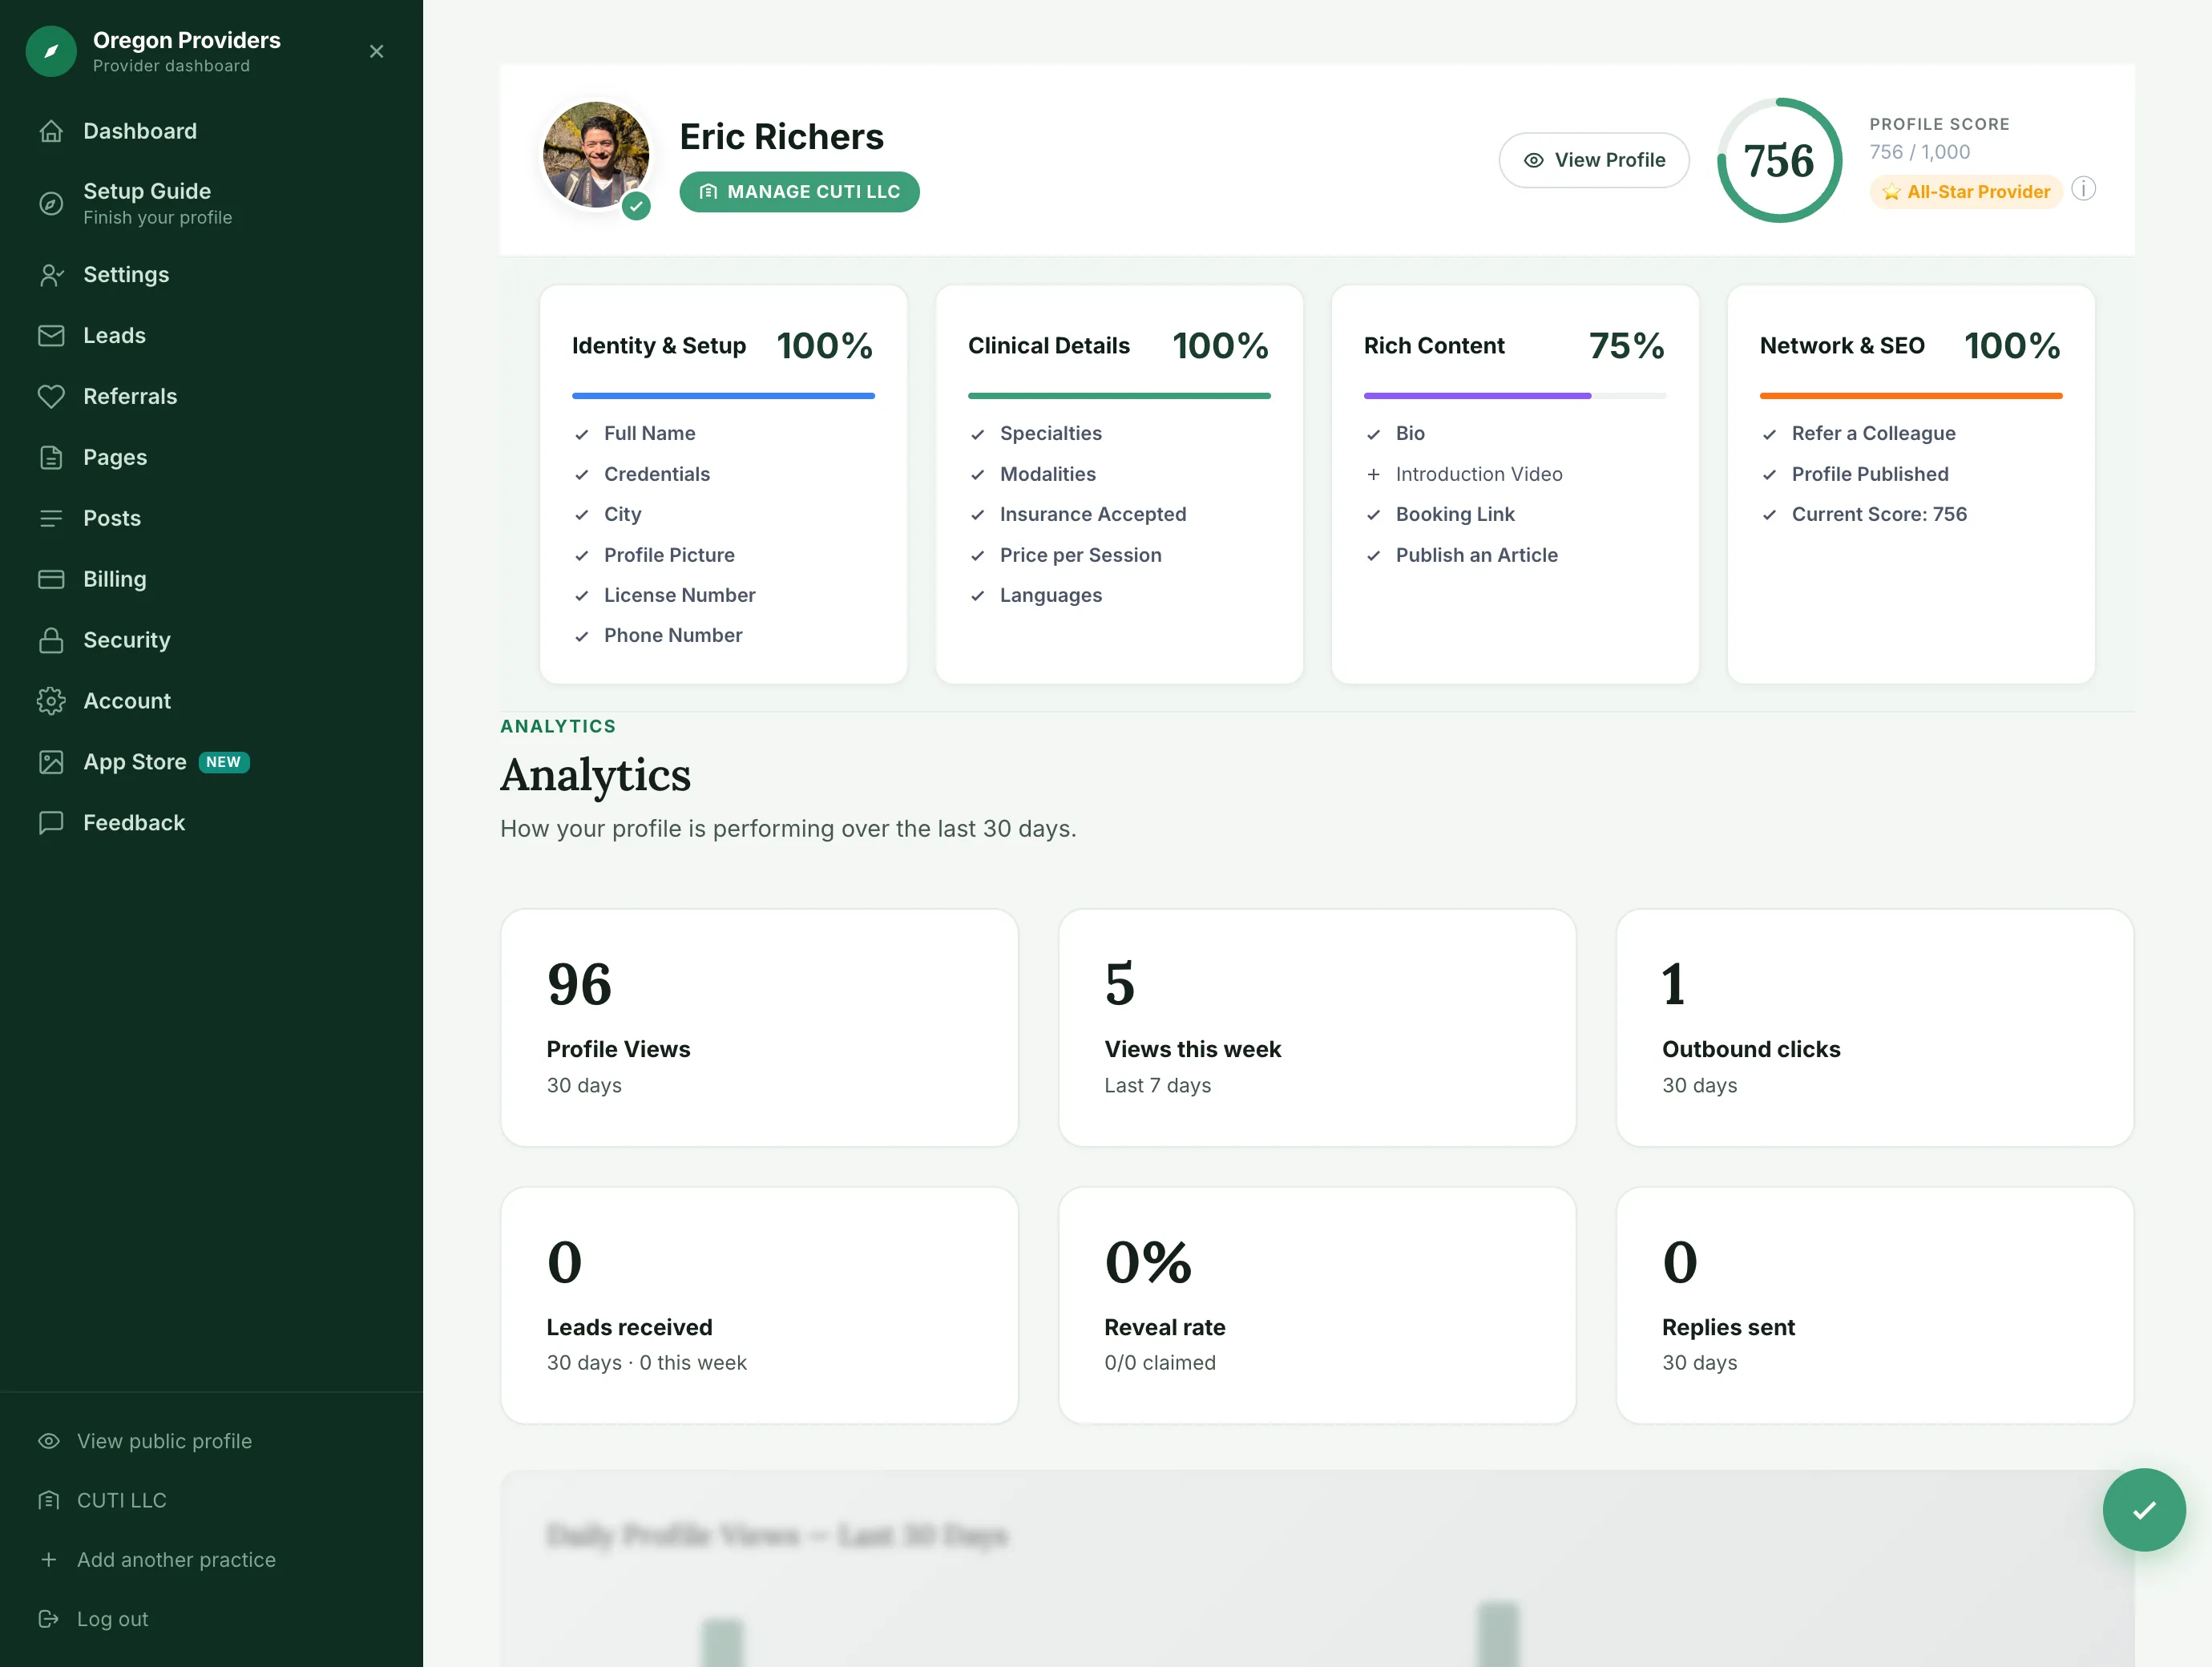
7

Analytics

/dashboard/analytics
Analytics screenshot

Profile views, lead conversion, search rank. Tracks where visits come from — organic search, hub pages, direct, social. View trends over 7 / 30 / 90 day windows.

8

Referral Network

/dashboard/referrals
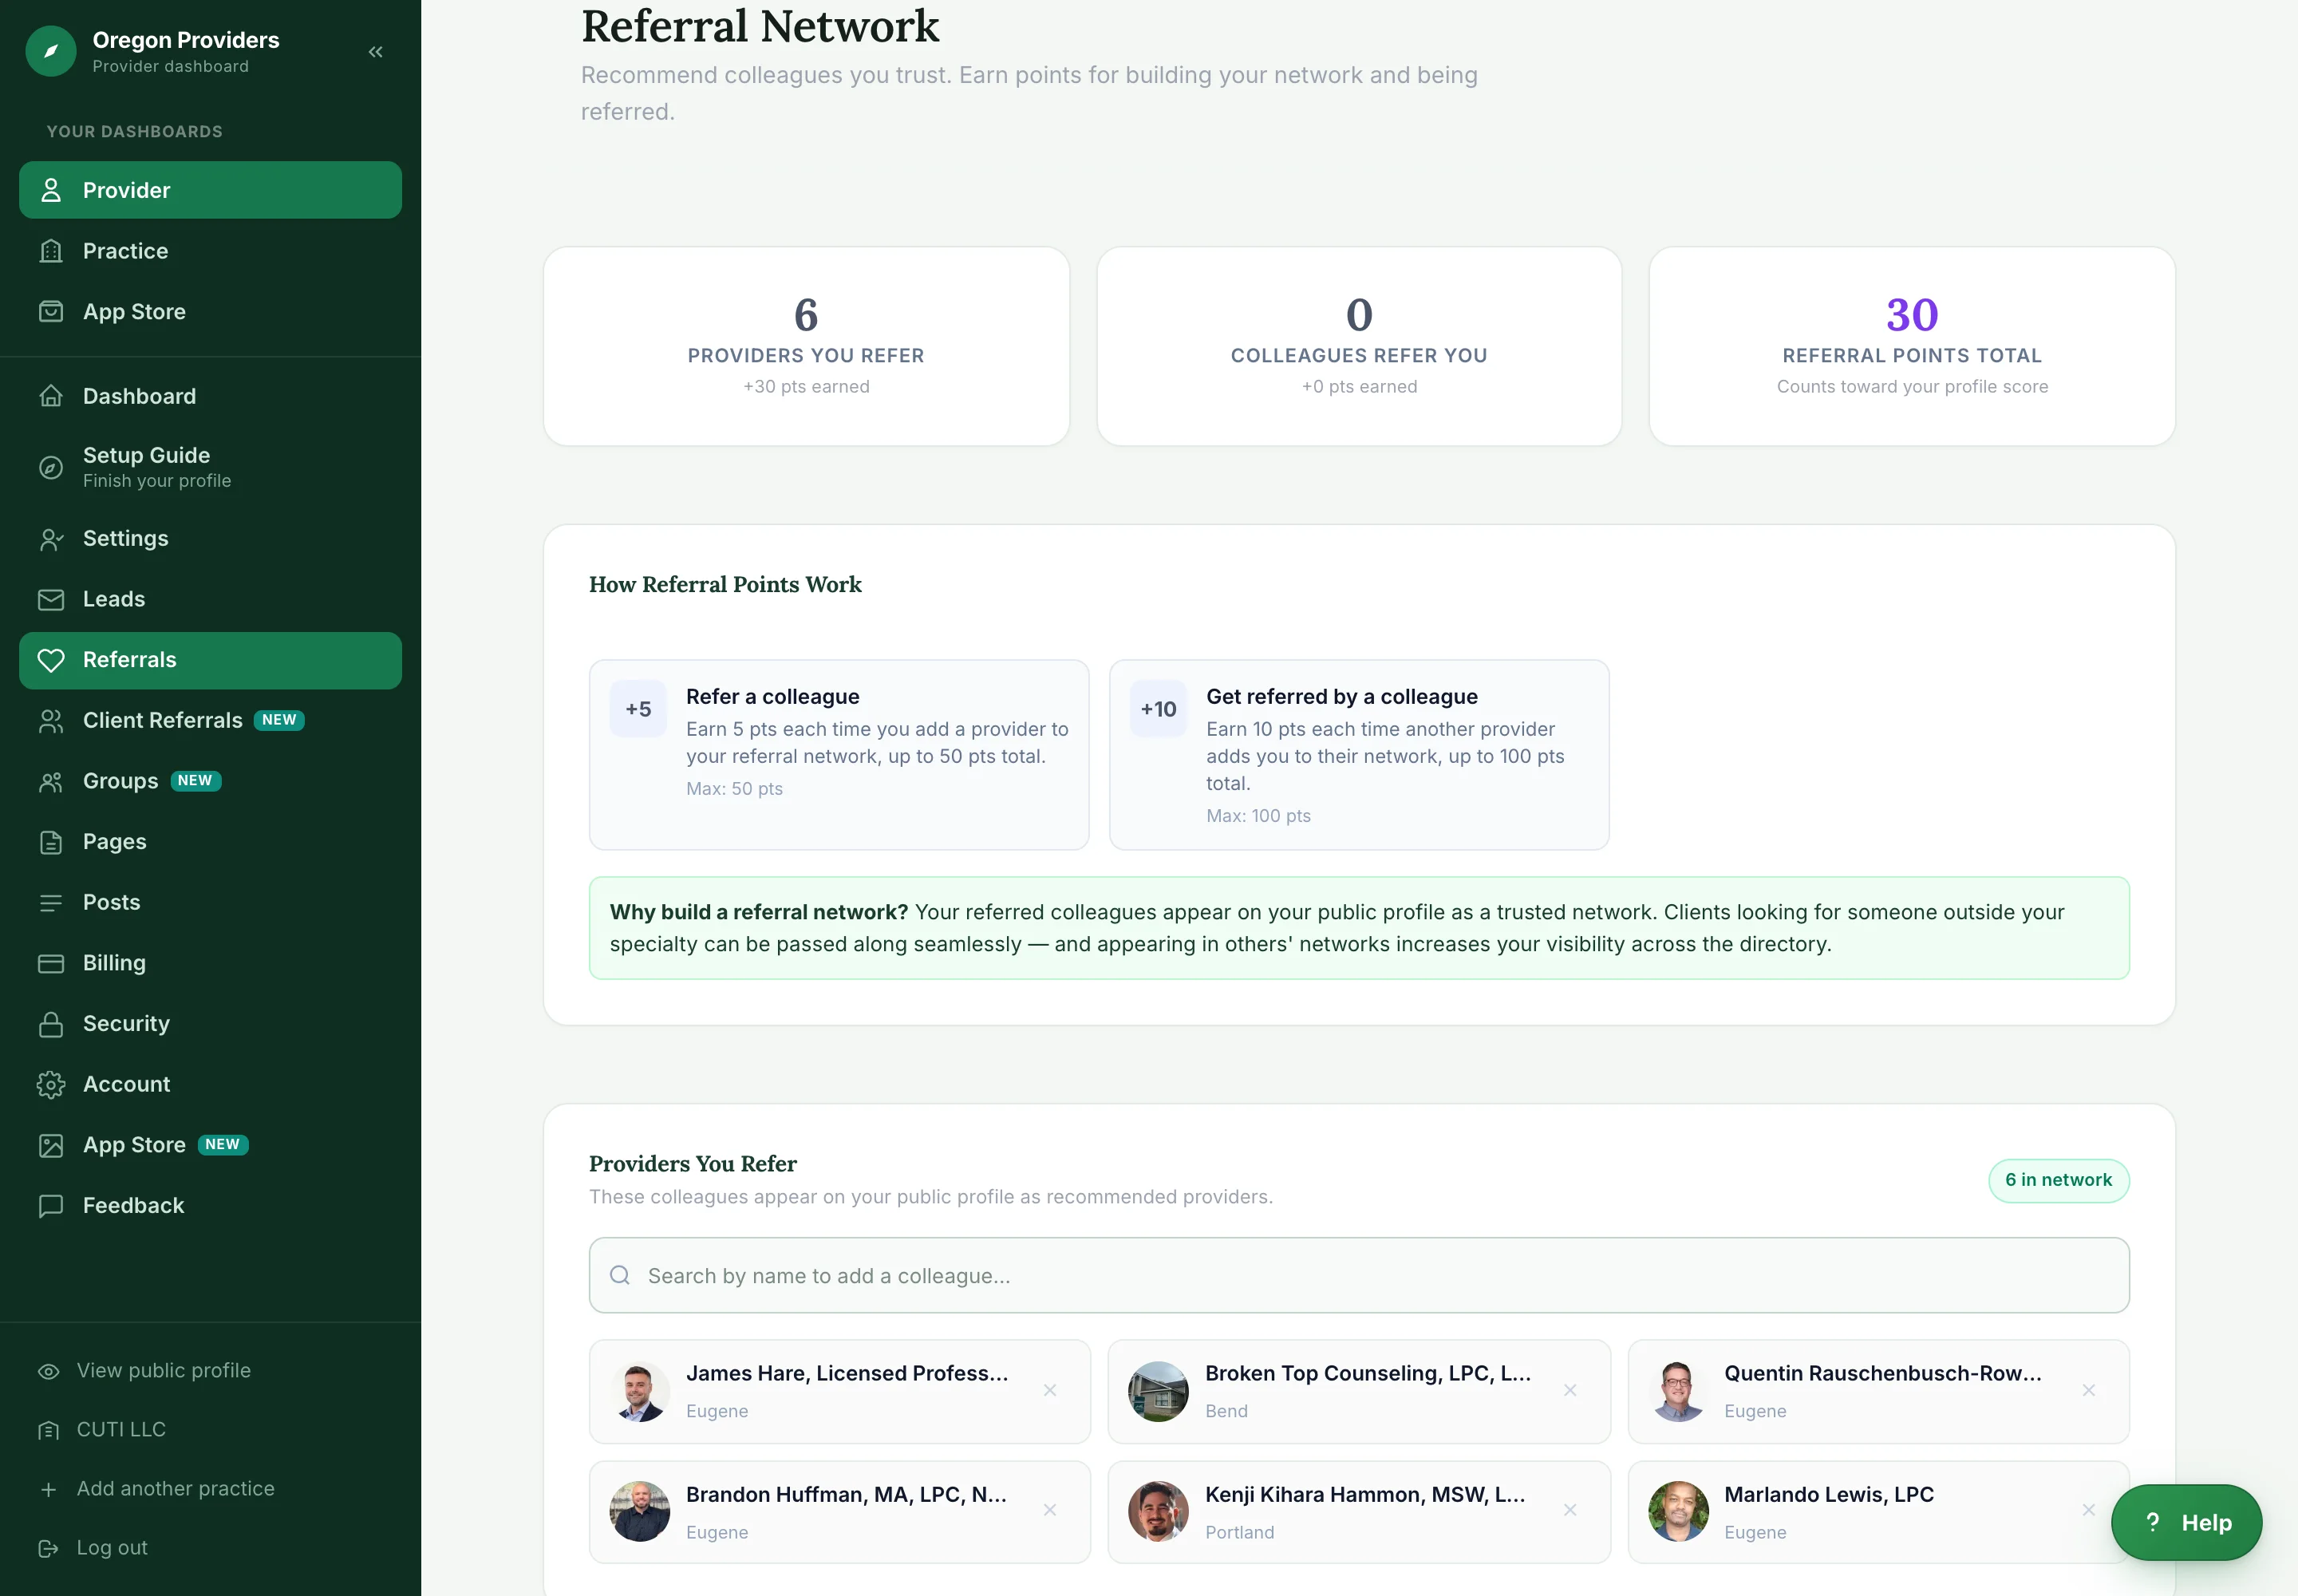
Referral Network screenshot

Save other providers as referral partners. Useful when you can't accept a new client and want to quickly suggest a colleague who can. The heart icon on any provider profile adds them here. Available on Basic and Pro tiers.

9

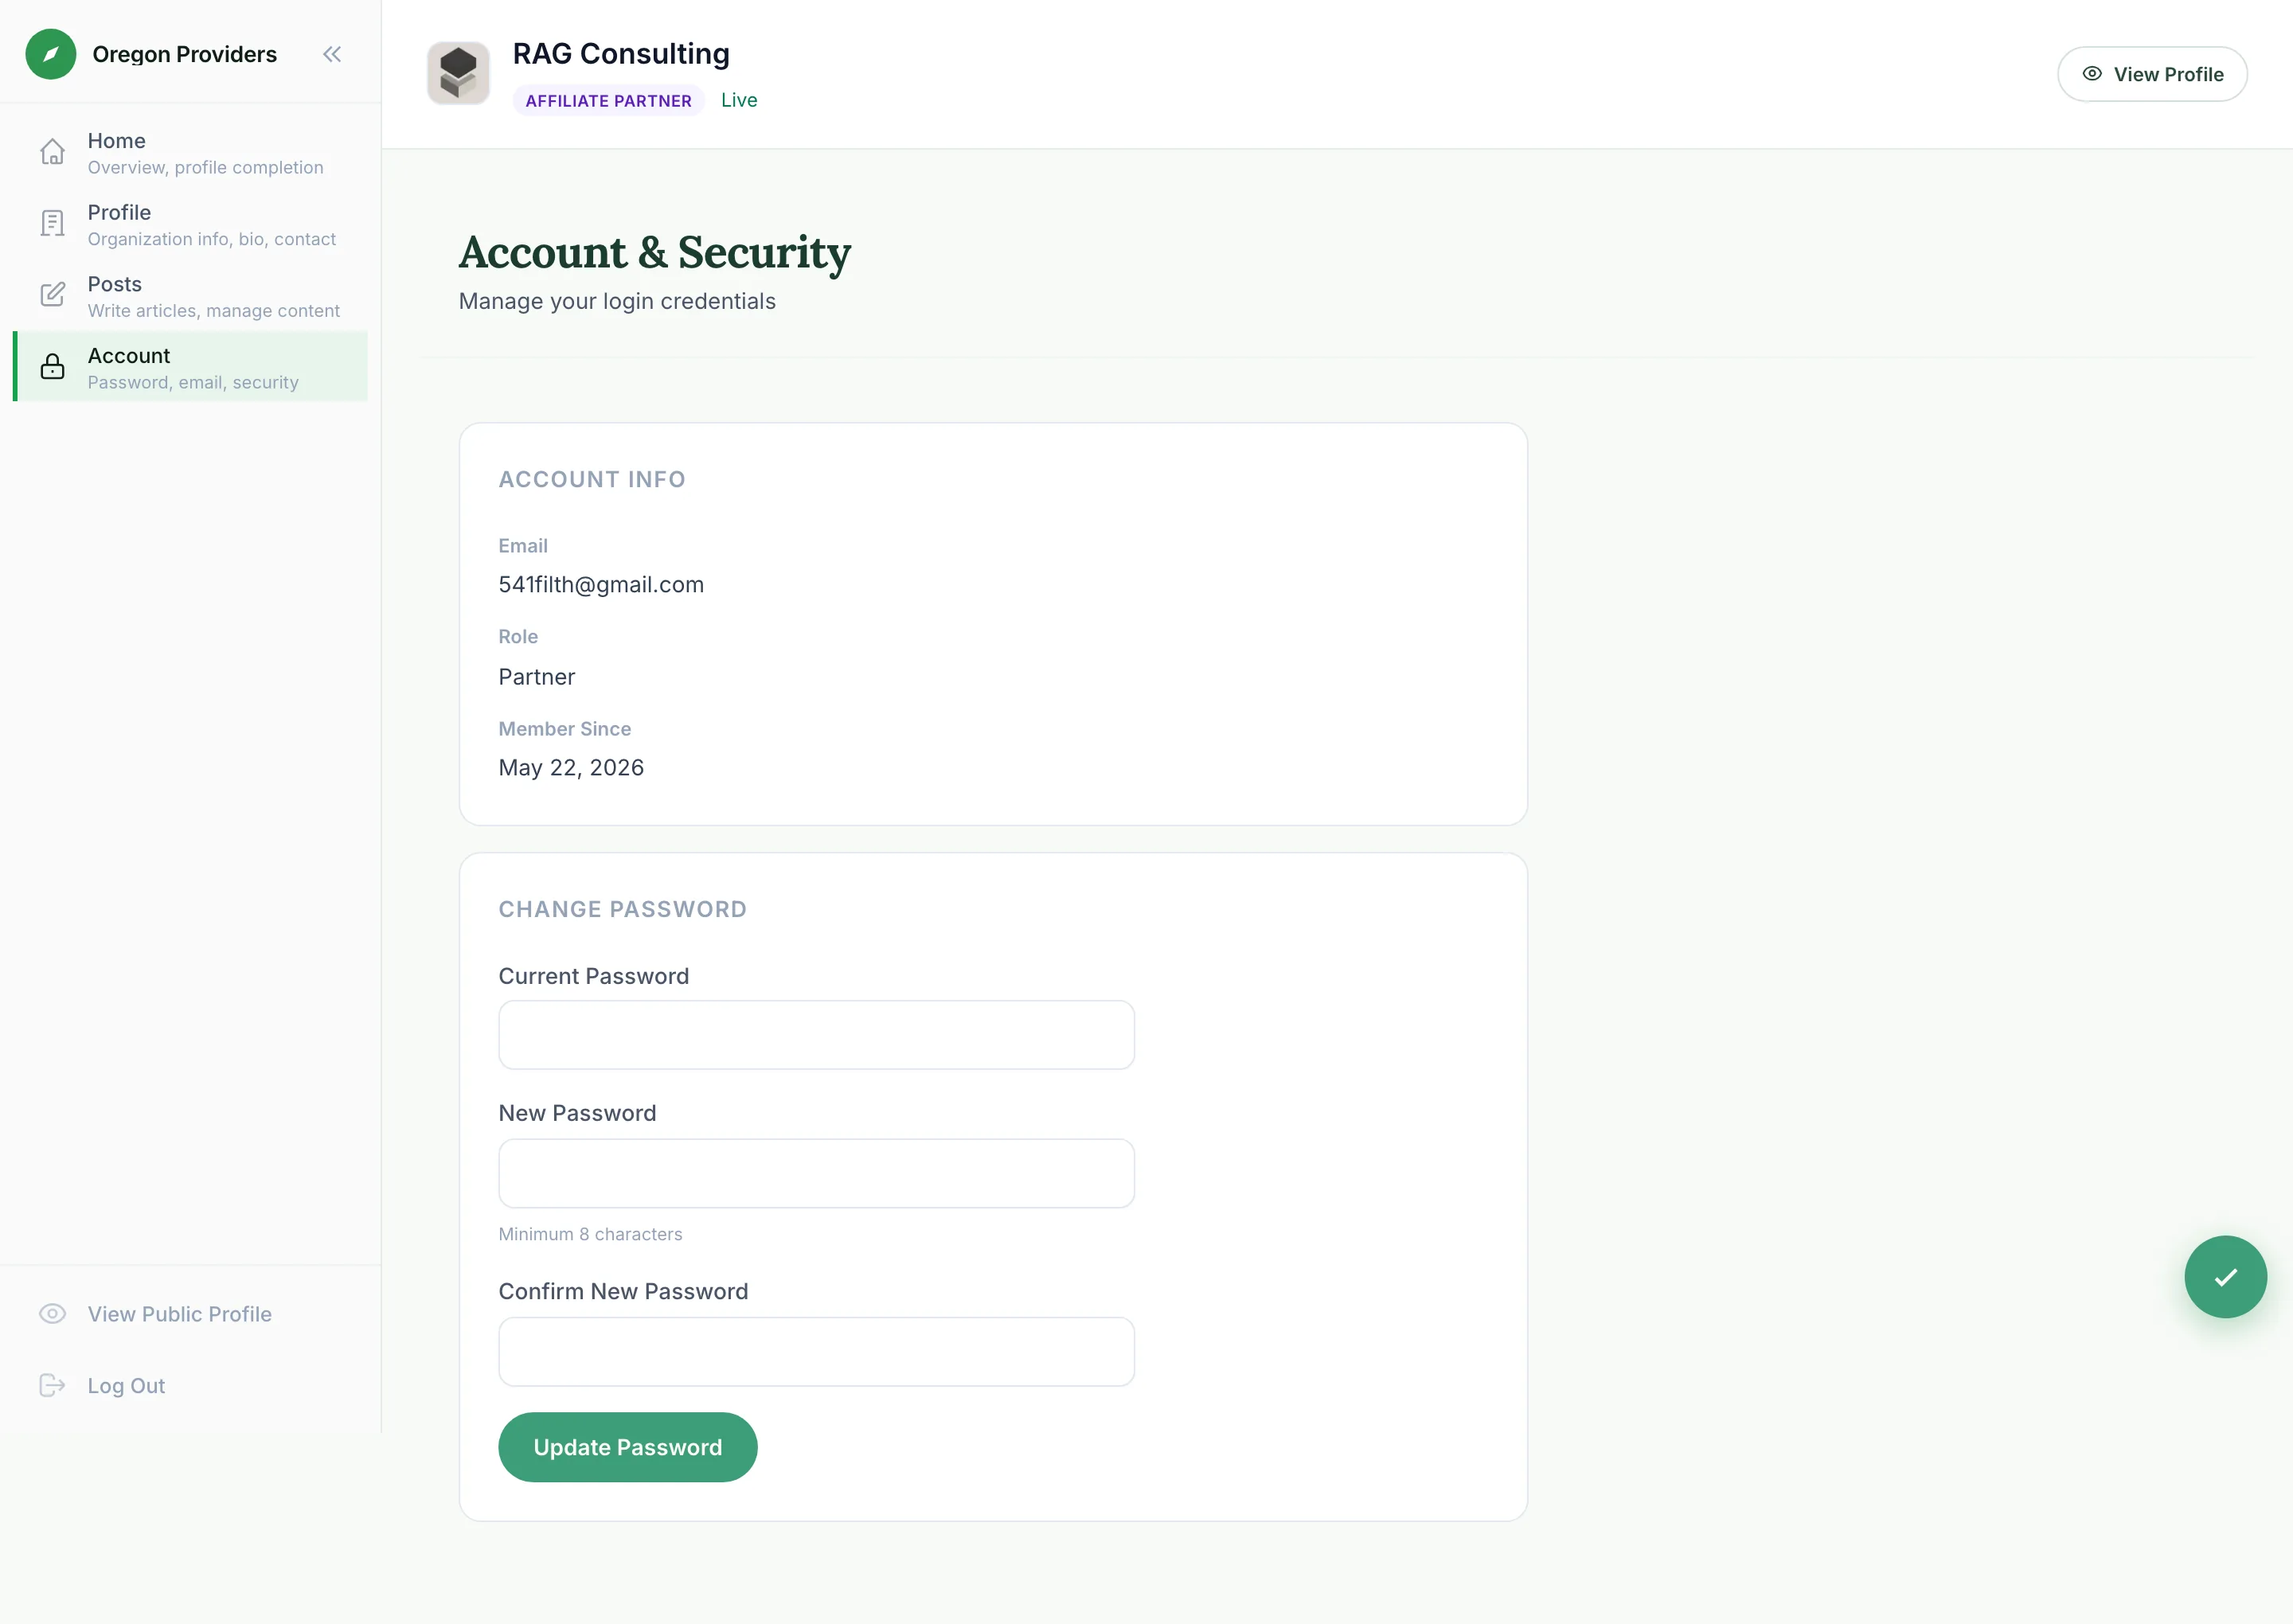
Account Settings

/dashboard/account
Account Settings screenshot

Login email, display name, and notification preferences. This is your user account — different from "Profile", which is your public listing.

10

Security

/dashboard/security
Security screenshot

Change password, review recent sessions, and log out other devices. If you suspect unauthorized access, change your password here and log out everywhere in one click.

11

Onboarding

/dashboard/onboard
Onboarding screenshot

One-time welcome flow shown to new accounts — walks through the profile basics and a first publish. After completion it disappears from the sidebar; you can revisit this URL anytime as a refresher.
Groups: List the Groups You Run

Run a therapy group, a support circle, or a professional consultation group? List it free in the public Groups directory so the right clients and colleagues can find it.

Free for every verified provider. Your groups appear at /groups, each with its own page. When someone signs up, the request emails you directly — you stay in control of who joins.
  1. Open the Groups tab in your dashboard

    Everything lives under Dashboard → Groups. You'll see every group you've listed, with one-click Edit, Close, and Reopen — managed inline, just like your blog posts.

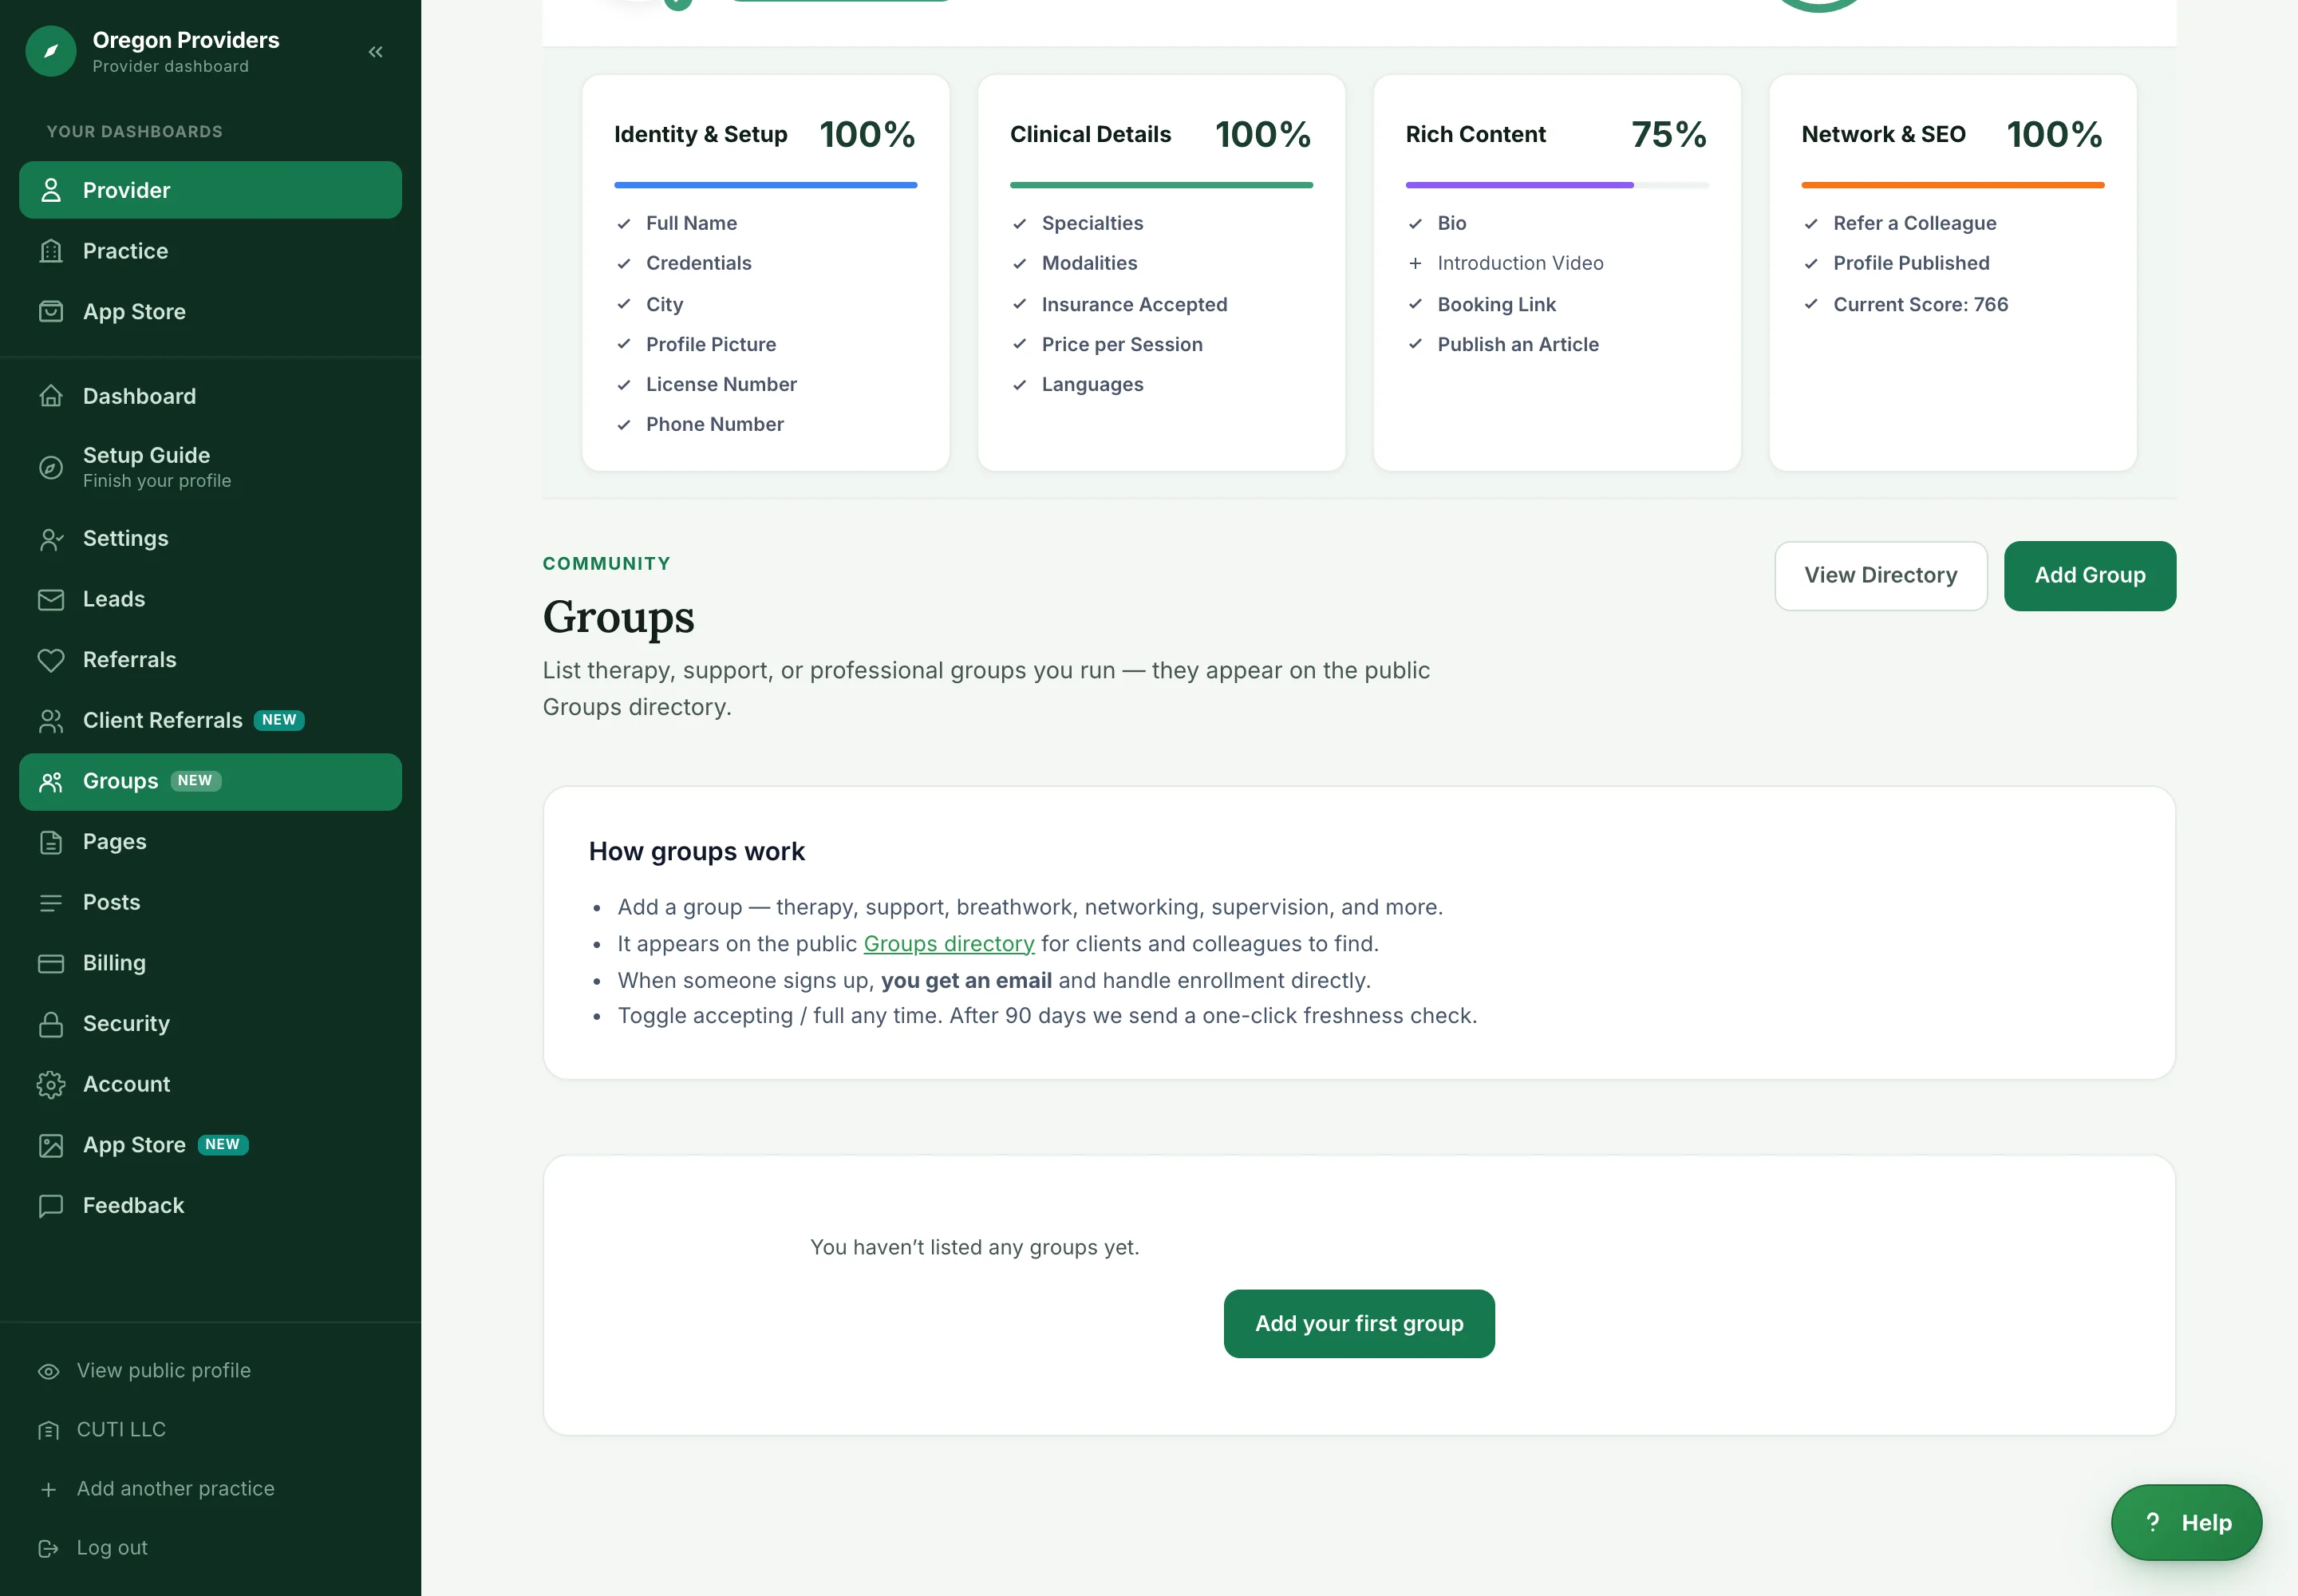
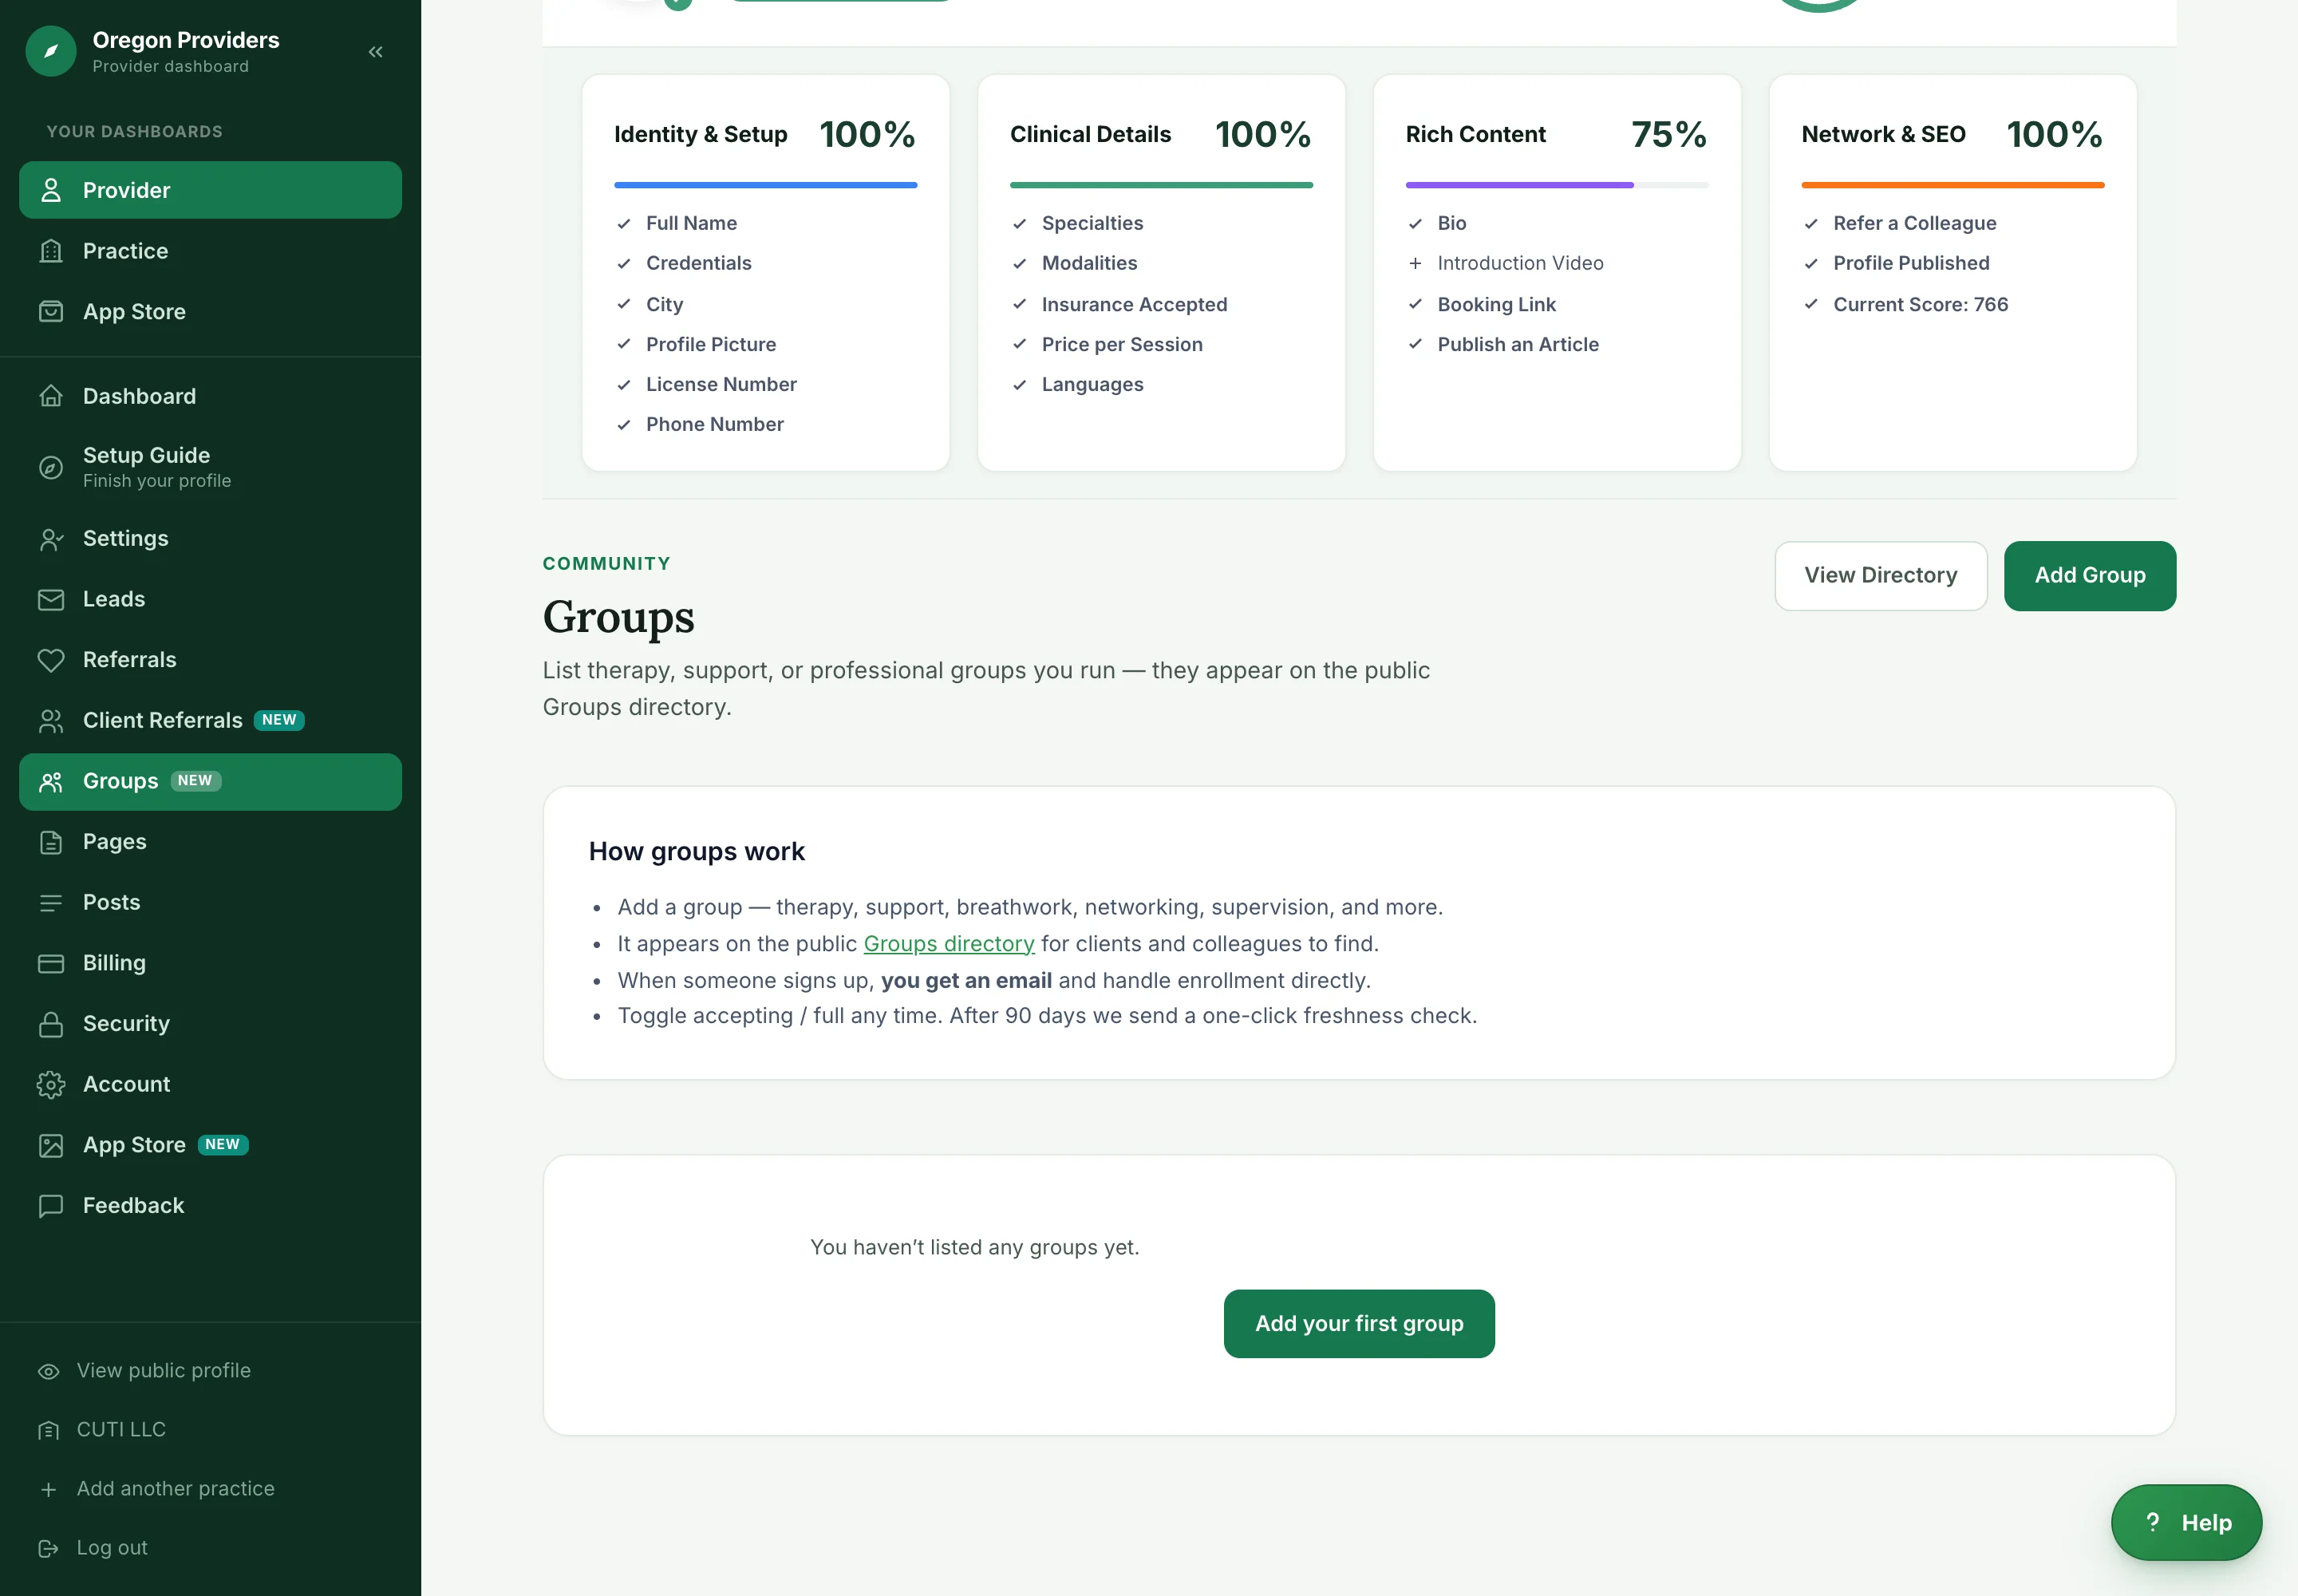
    The Groups tab in the provider dashboard listing the provider's groups with an explainer panel and an Edit button on each
    The Groups tab. Add, edit, and manage every group from one place.
  2. Add a group in a couple of minutes

    Give it a title and description, pick a type (therapy, support, grief, men's, parenting, supervision, and more), then set the structured details: meeting day(s), a 12-hour start and end time, format (virtual, in-person, or hybrid), cost (free, sliding scale, or a set fee), whether you accept insurance, and the city. Toggle Currently accepting new members on or off anytime.

  3. Clients discover it on the public directory

    Active groups appear on /groups, filterable by audience, type, format, cost, and city. Each group gets its own page with all the details and a simple sign-up form that emails the request straight to you.

    The public Groups directory showing a filterable grid of provider-run therapy and support groups
    The public Groups directory at /groups — clean filters, one card per group.
  4. Keep it fresh

    Every 90 days we send a quick freshness check so your listing stays accurate. One click confirms the group is still running; if it has wrapped up, just Close it.

Client Referrals: The Referrals Board

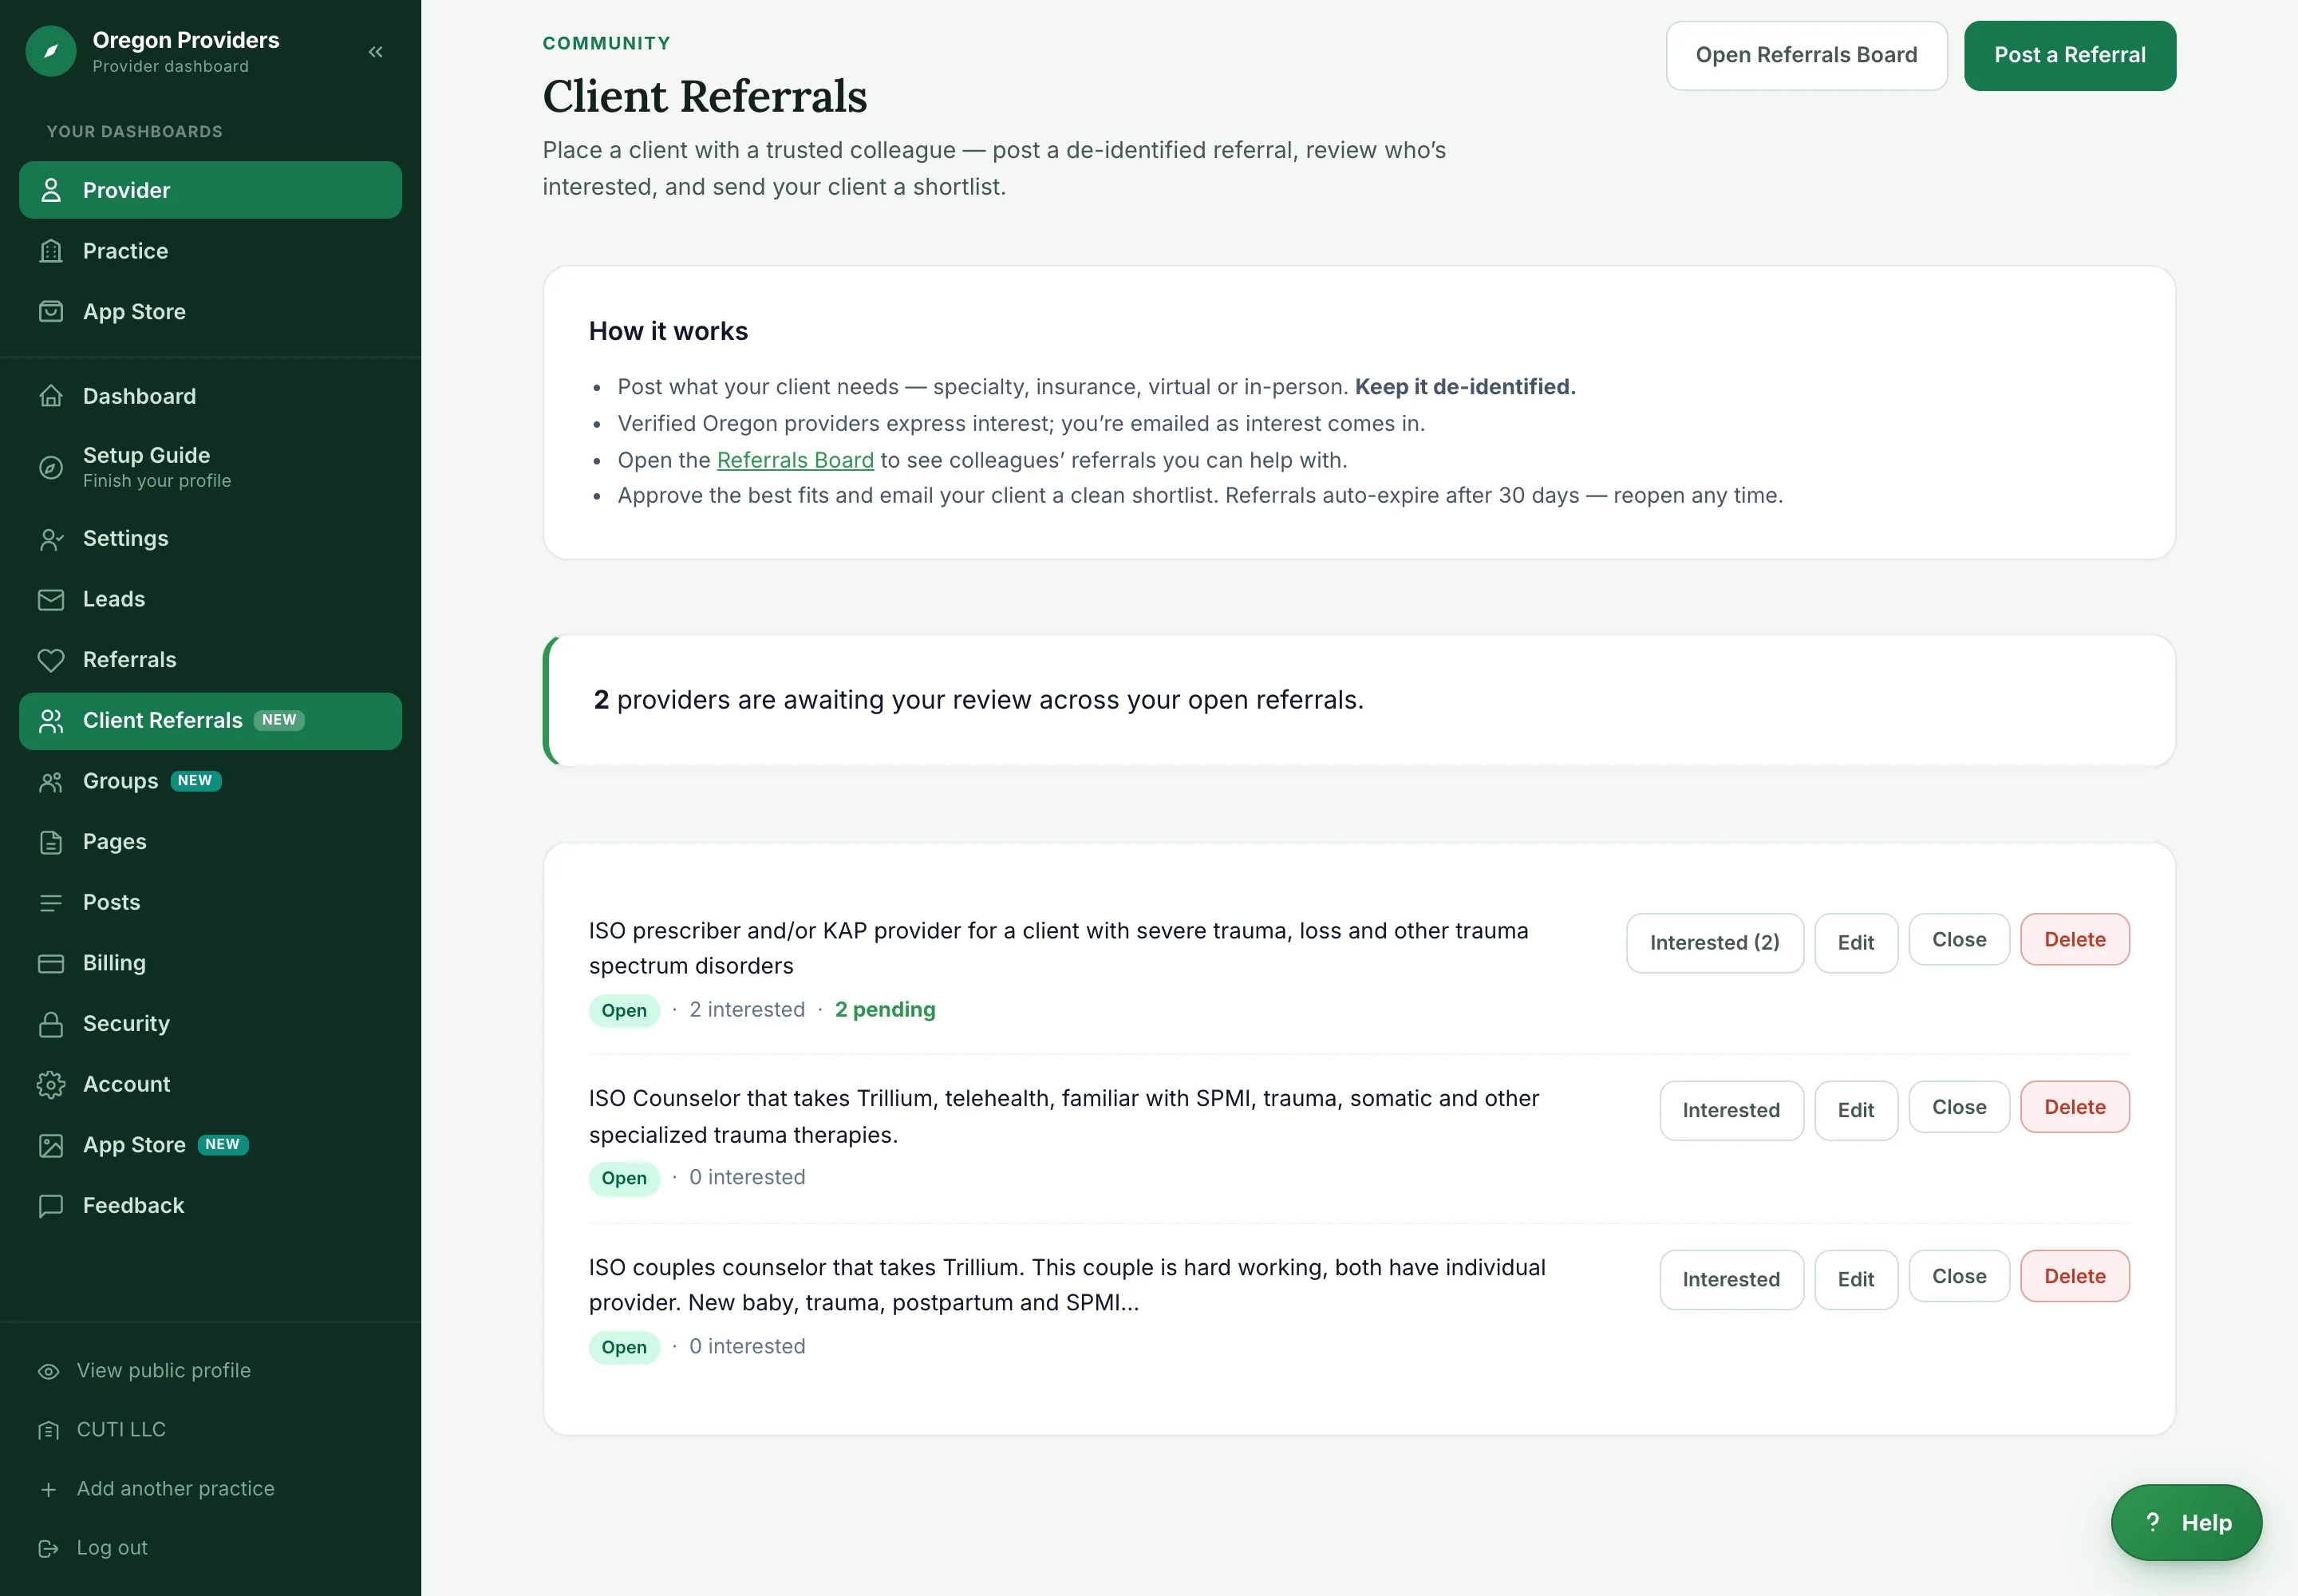
Have a client who isn't the right fit, or get an inquiry you can't take? Post a de-identified referral to the members-only board and let trusted Oregon colleagues raise their hand.

Private by design. The board is visible to verified members only and is never indexed by search engines. No client names are ever shared — you describe only what the client needs.
  1. Post a de-identified referral

    From Dashboard → Client Referrals (or the Referrals Board at /referrals), describe what the client needs — specialty, insurance, and format. Keep it general; no identifying details.

    The members-only Referrals Board showing de-identified client referrals from Oregon providers, each with an I Can Help button
    The Referrals Board — members-only, de-identified, with a three-step explainer up top.
  2. Colleagues raise their hand

    Verified providers who can help click “I Can Help.” You're notified, and every member can see who has expressed interest — so good fits surface quickly.

  3. Review and approve the best fits

    Open Manage on your referral to see every interested colleague with their credentials and contact info. Approve the ones who fit; remove the ones who don't.

    The manage view of a referral showing the interested colleagues with Approve and Remove buttons and an approved column
    Review interested colleagues, then approve the best fits for your client.
  4. Send your client a shortlist — from your own inbox

    Once you've approved a few, enter your client's email and click Preview & Send. We build a clean message with each approved provider's details; you send it from your own Gmail, Outlook, or default mail app (or copy it). Nothing routes through us — it arrives straight from you.

Browse the App Store

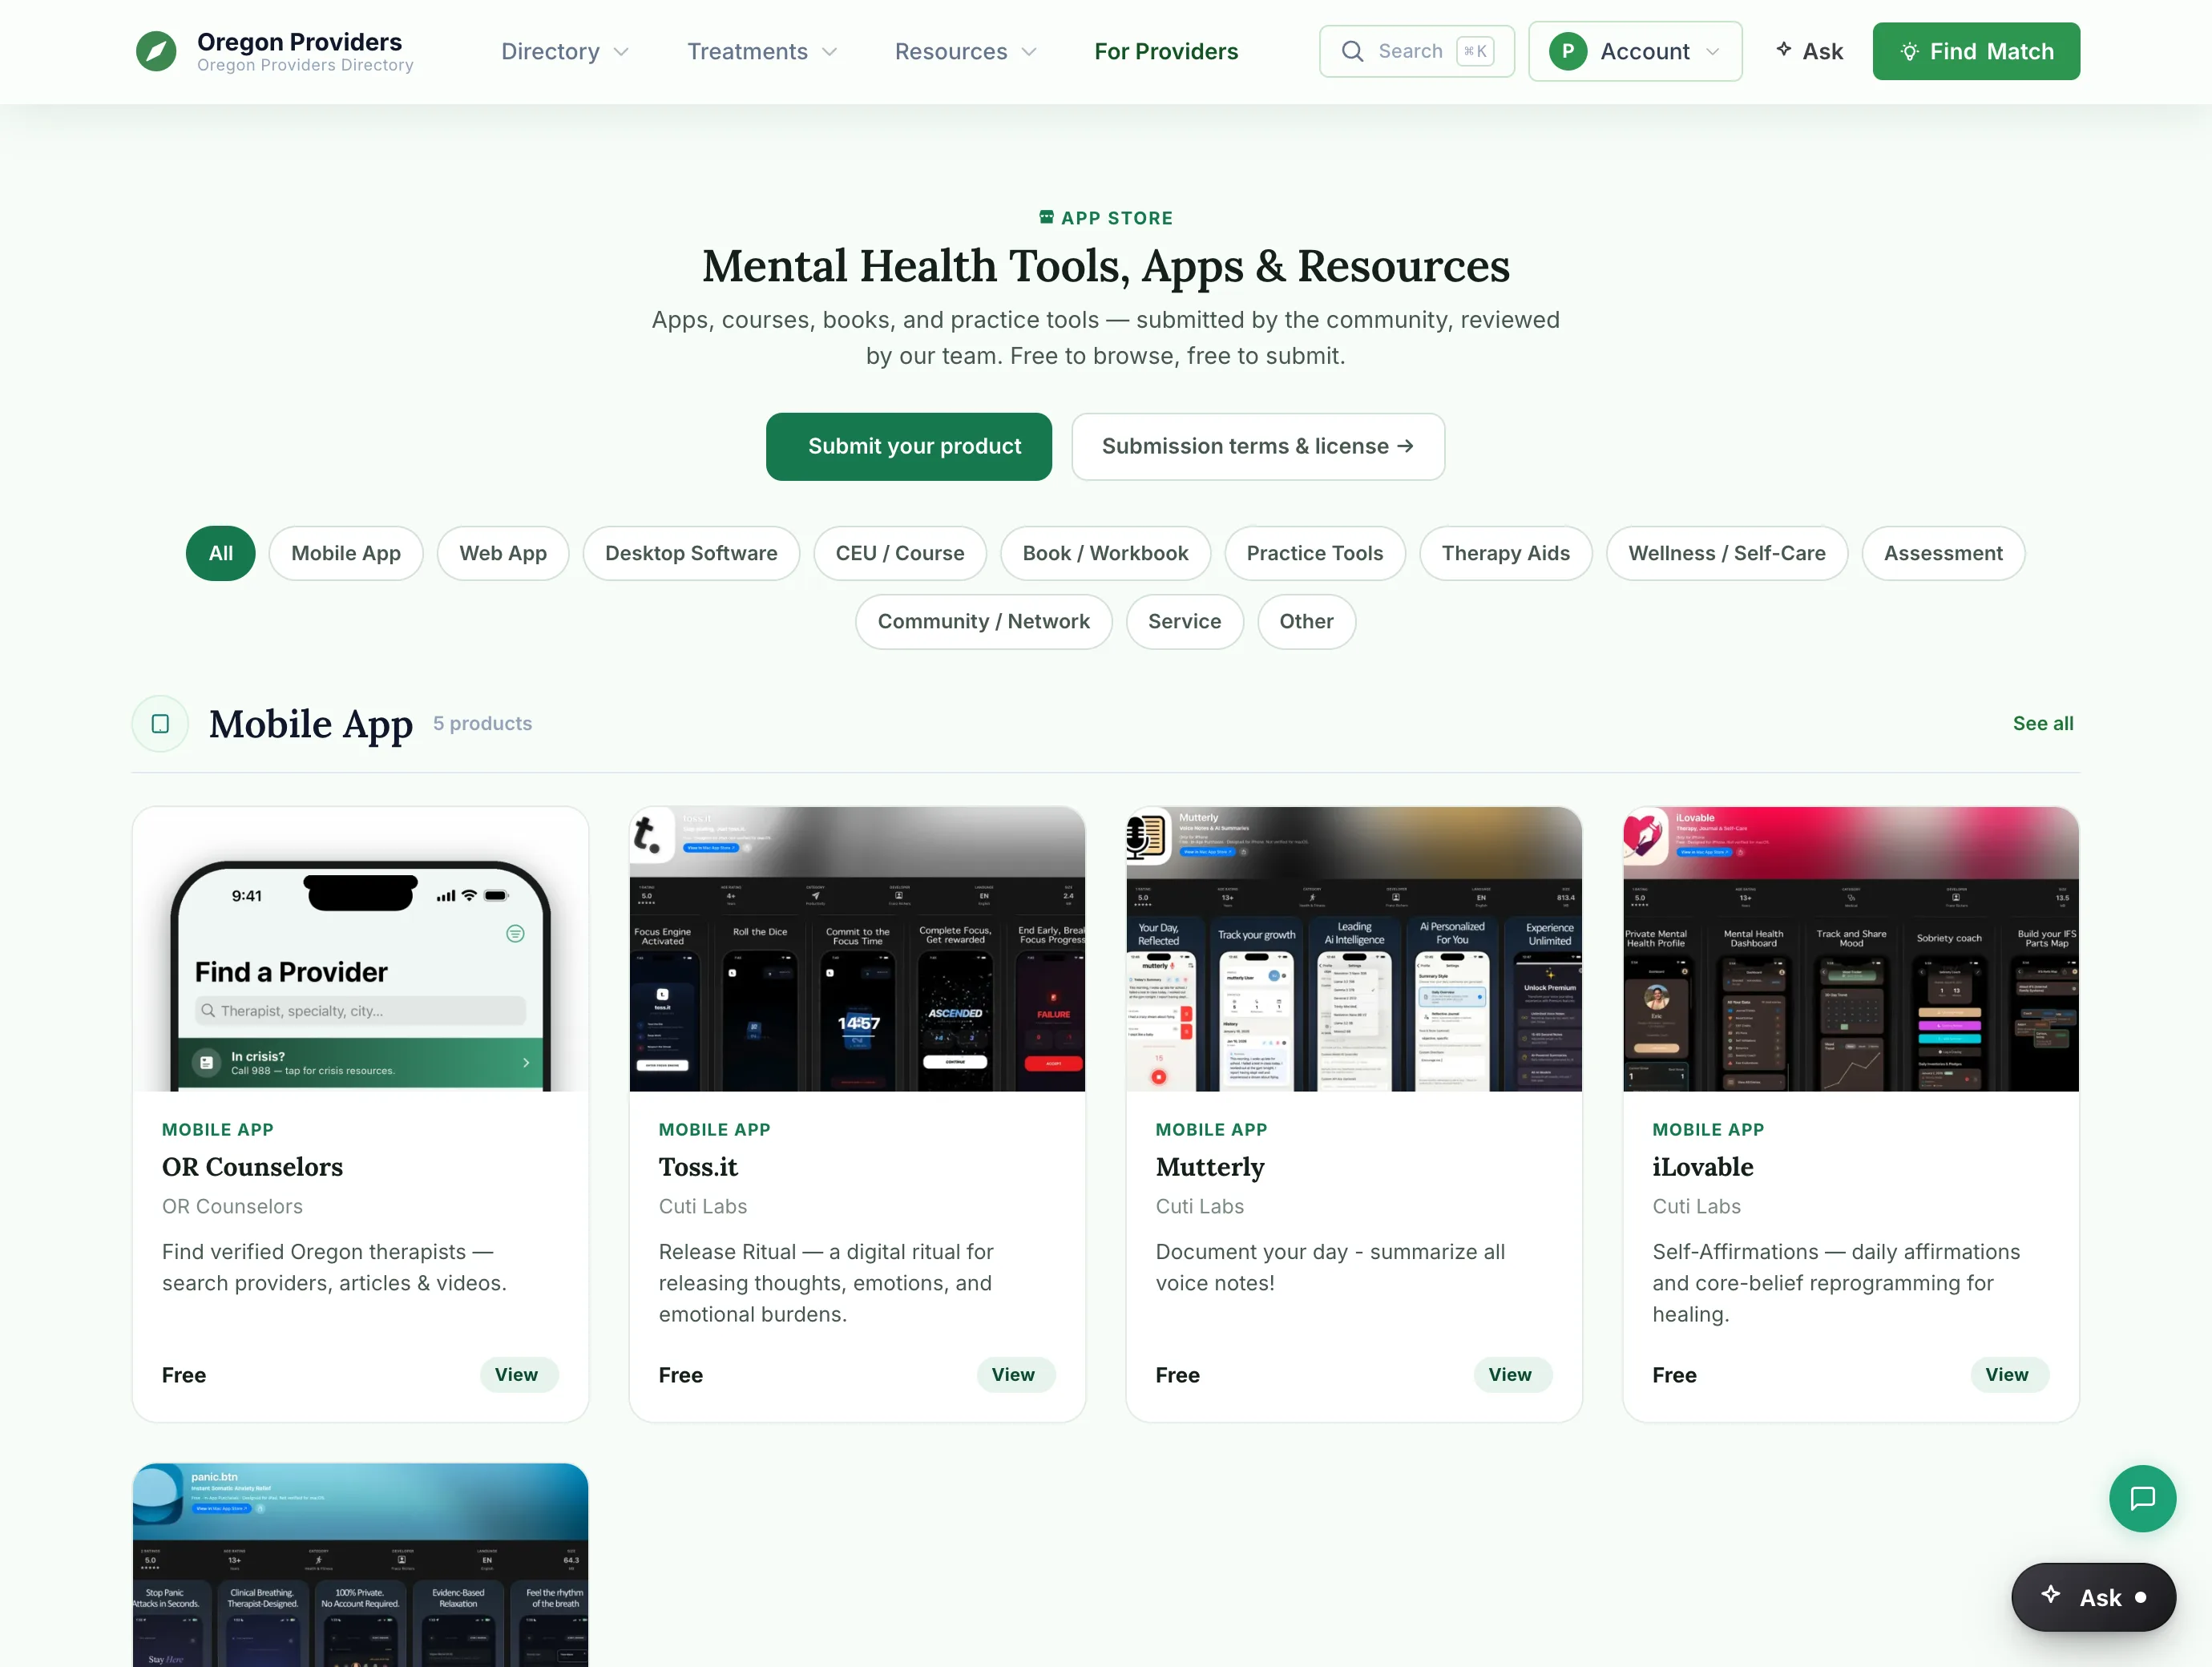
A growing storefront of mobile apps and digital tools built by Oregon providers and partners — mood trackers, guided exercises, practice companions, and more.

The App Store highlights software made by people in the Oregon mental-health community. Each listing credits the provider or organization behind it and links straight to the app. If you're a provider with an app to share, submissions are open and reviewed by our team — there's no fee to list.

The App Store storefront showing a grid of provider-built mental health apps with icons, names, and descriptions
The App Store storefront. Browse provider- and partner-built apps, each linked back to its maker.

For Practice Administrators

If you keep the lights on for a practice, this is built for you. One plan covers your whole group: run as many practice locations as you want, with shared billing and a single dashboard, and pay only for your total member providers. It works the same whether you're a solo practice, a small group, or a team across several offices. Add locations any time from your billing page at no extra cost. And if your providers never touch a login, managed profiles let your intake team run every listing from one account.

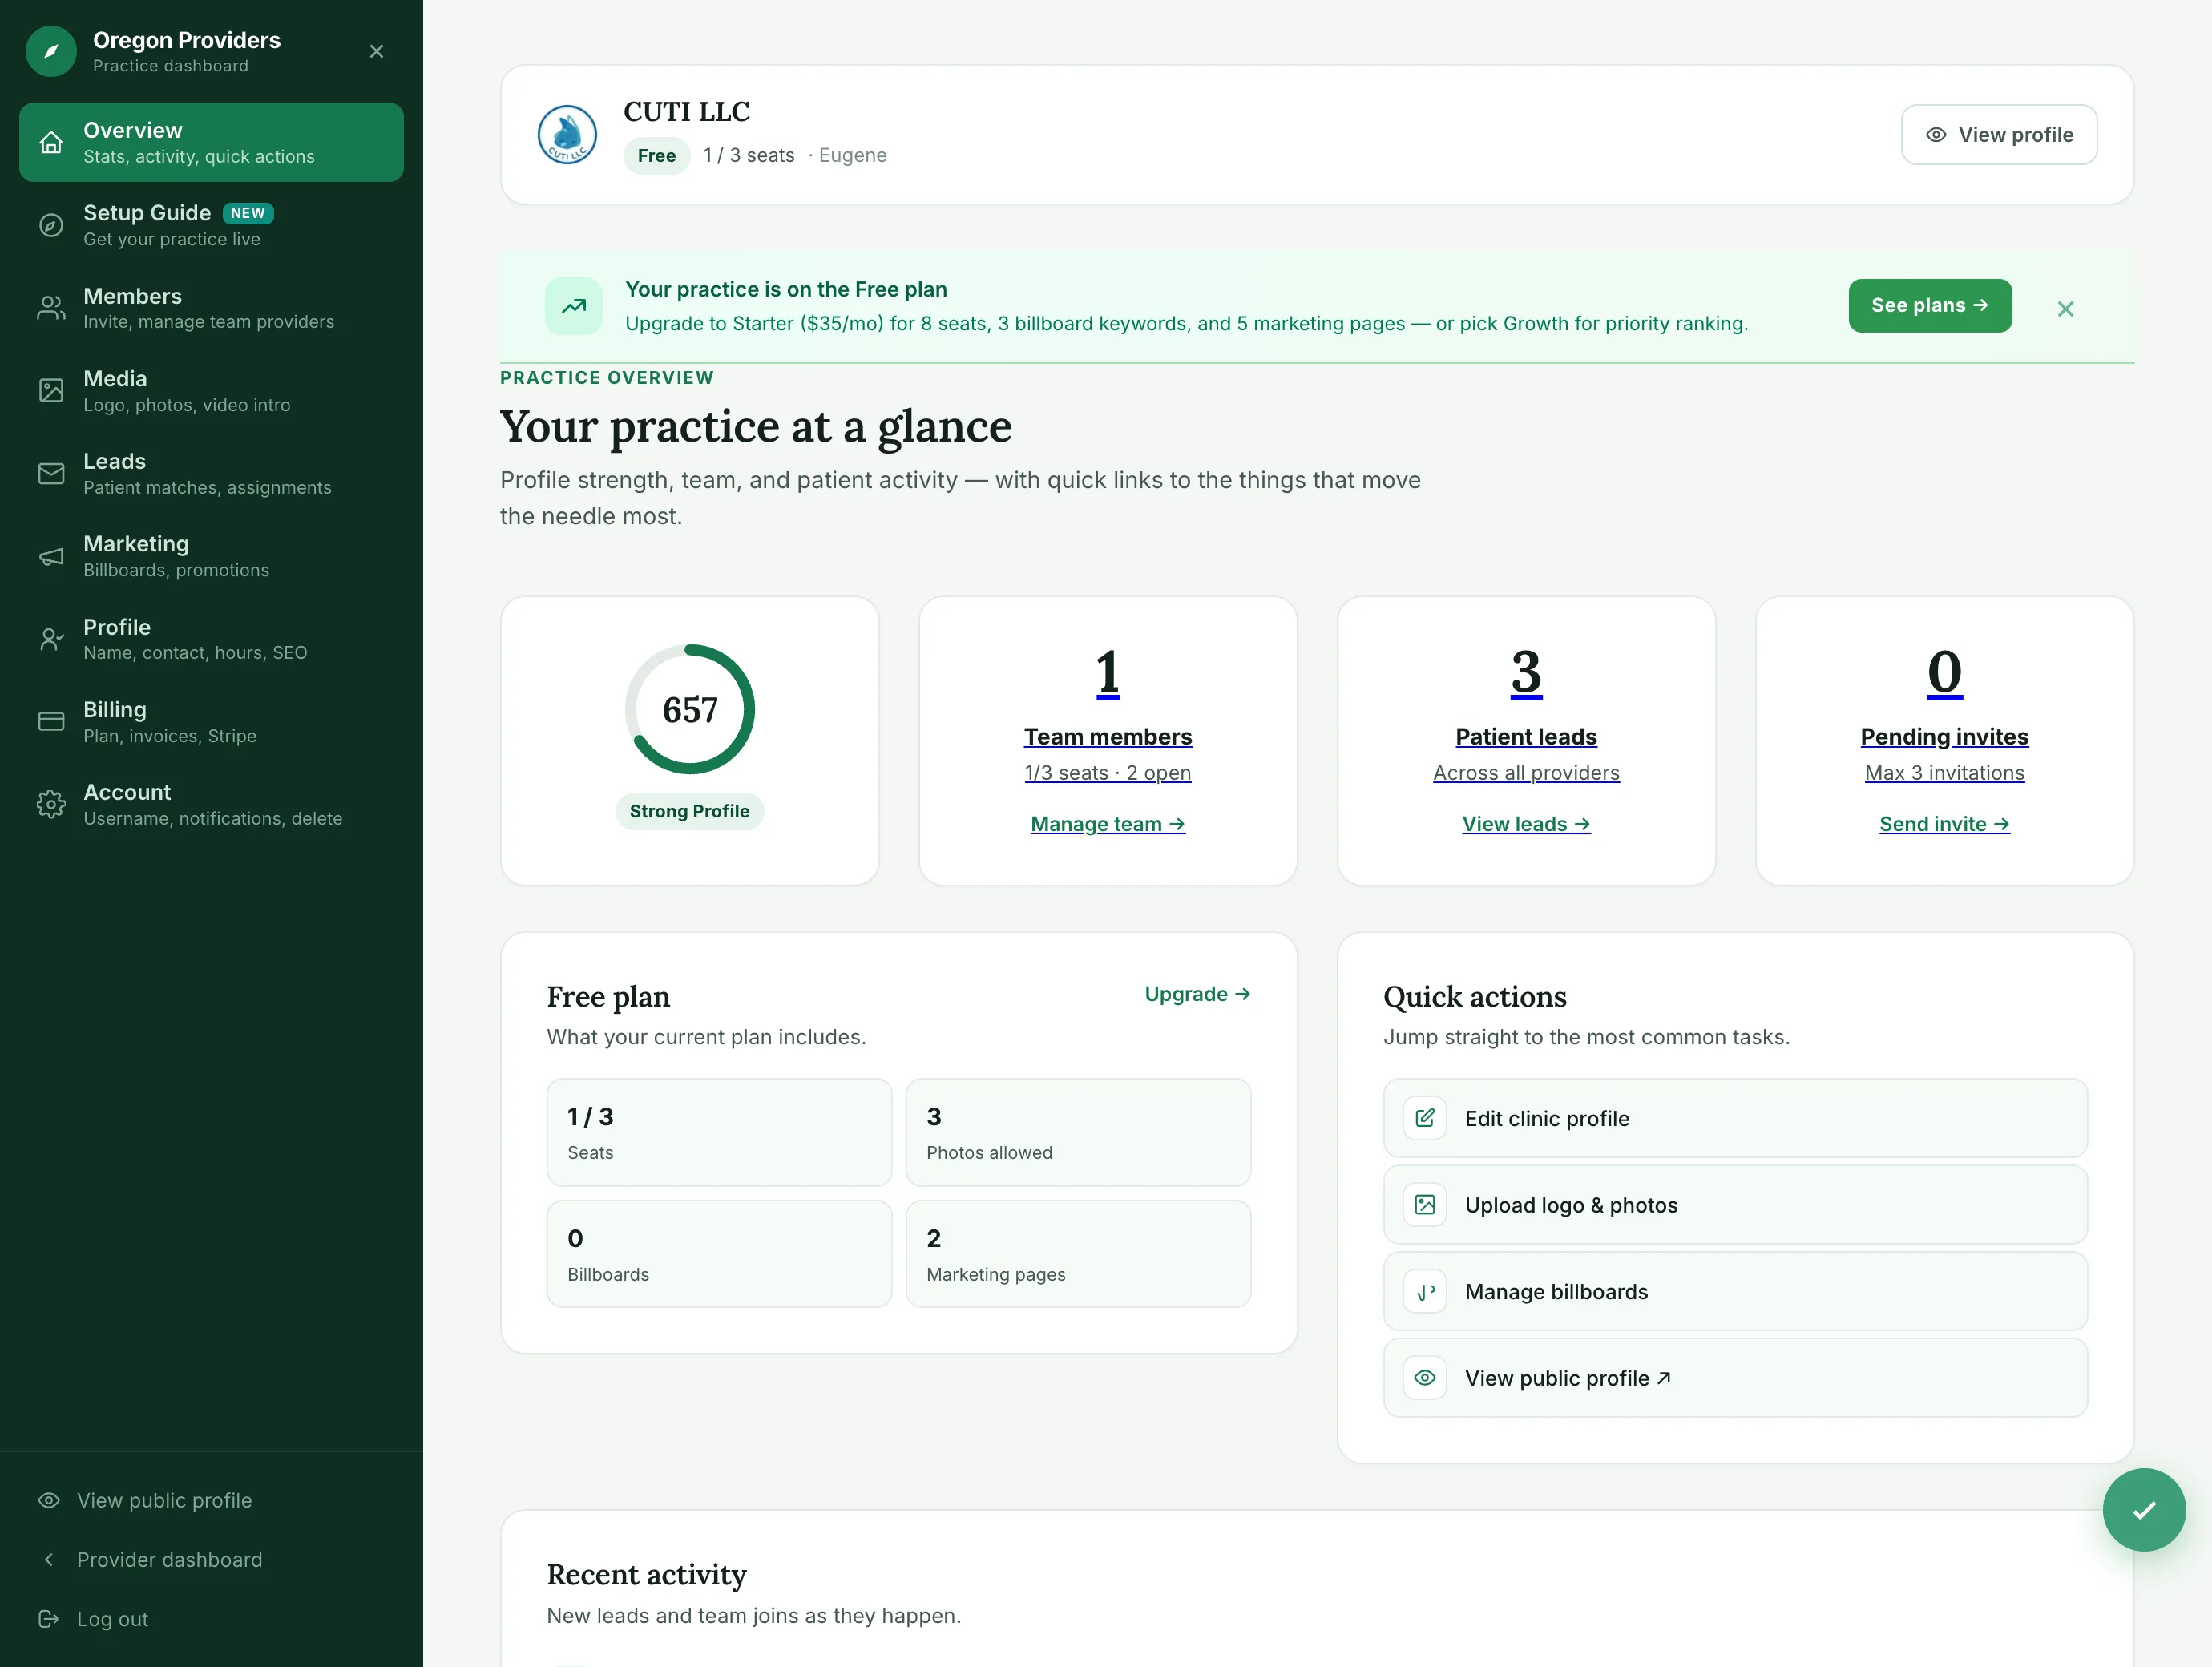
Practice admin dashboard overview with a dark left navigation rail, profile-score circle, and stat cards for team members, leads, and pending invites
The practice dashboard overview. The dark left rail is your control panel; the cards summarize your team, leads, and plan.
  1. Register your practice

    You need a provider profile first (so the practice has an owner). Visit /clinic-register — if you're logged in as a provider, you'll go straight to the practice creation form.

  2. Pick a practice plan

    You pay for people, not pages. Every plan includes unlimited practice locations, and the only thing a tier caps is your total member providers across all of them. Each paid plan also passes its tier down to every provider: Starter ($35/mo, up to 8 members) gives members Basic, Growth ($79/mo, up to 25) gives members Pro, and Enterprise ($149/mo, up to 50) adds priority ranking and dedicated onboarding. One card, one invoice, no matter how many offices you run. A group spread across several locations lists for a single price instead of paying per therapist like the big directories. Compare them at /pricing.

    Practice billing page with plan options (Starter, Growth, Enterprise), current renewal date, and payment method
    Practice billing. Switch plans, update your card, and see the renewal date — one invoice covers everyone.
  3. Invite your team

    From Practice Dashboard → Members, invite providers by email. Invites expire in 14 days and clear themselves from the list once accepted. Every member automatically picks up the practice's tier — for example, Basic under a Starter practice — with nothing extra for them to do.

    Practice members management page listing each provider on the team with their role, join date, and an invite-by-email form
    Members management. Invite by email, track who's pending, and set roles for each provider on your team.
  4. Edit member profiles

    Click Edit on any member card to open their full profile editor — WYSIWYG bio, specialties, modalities, insurance, and location — so you can keep listings polished and consistent across the team. Each provider's blog posts and marketing pages stay under their own control.

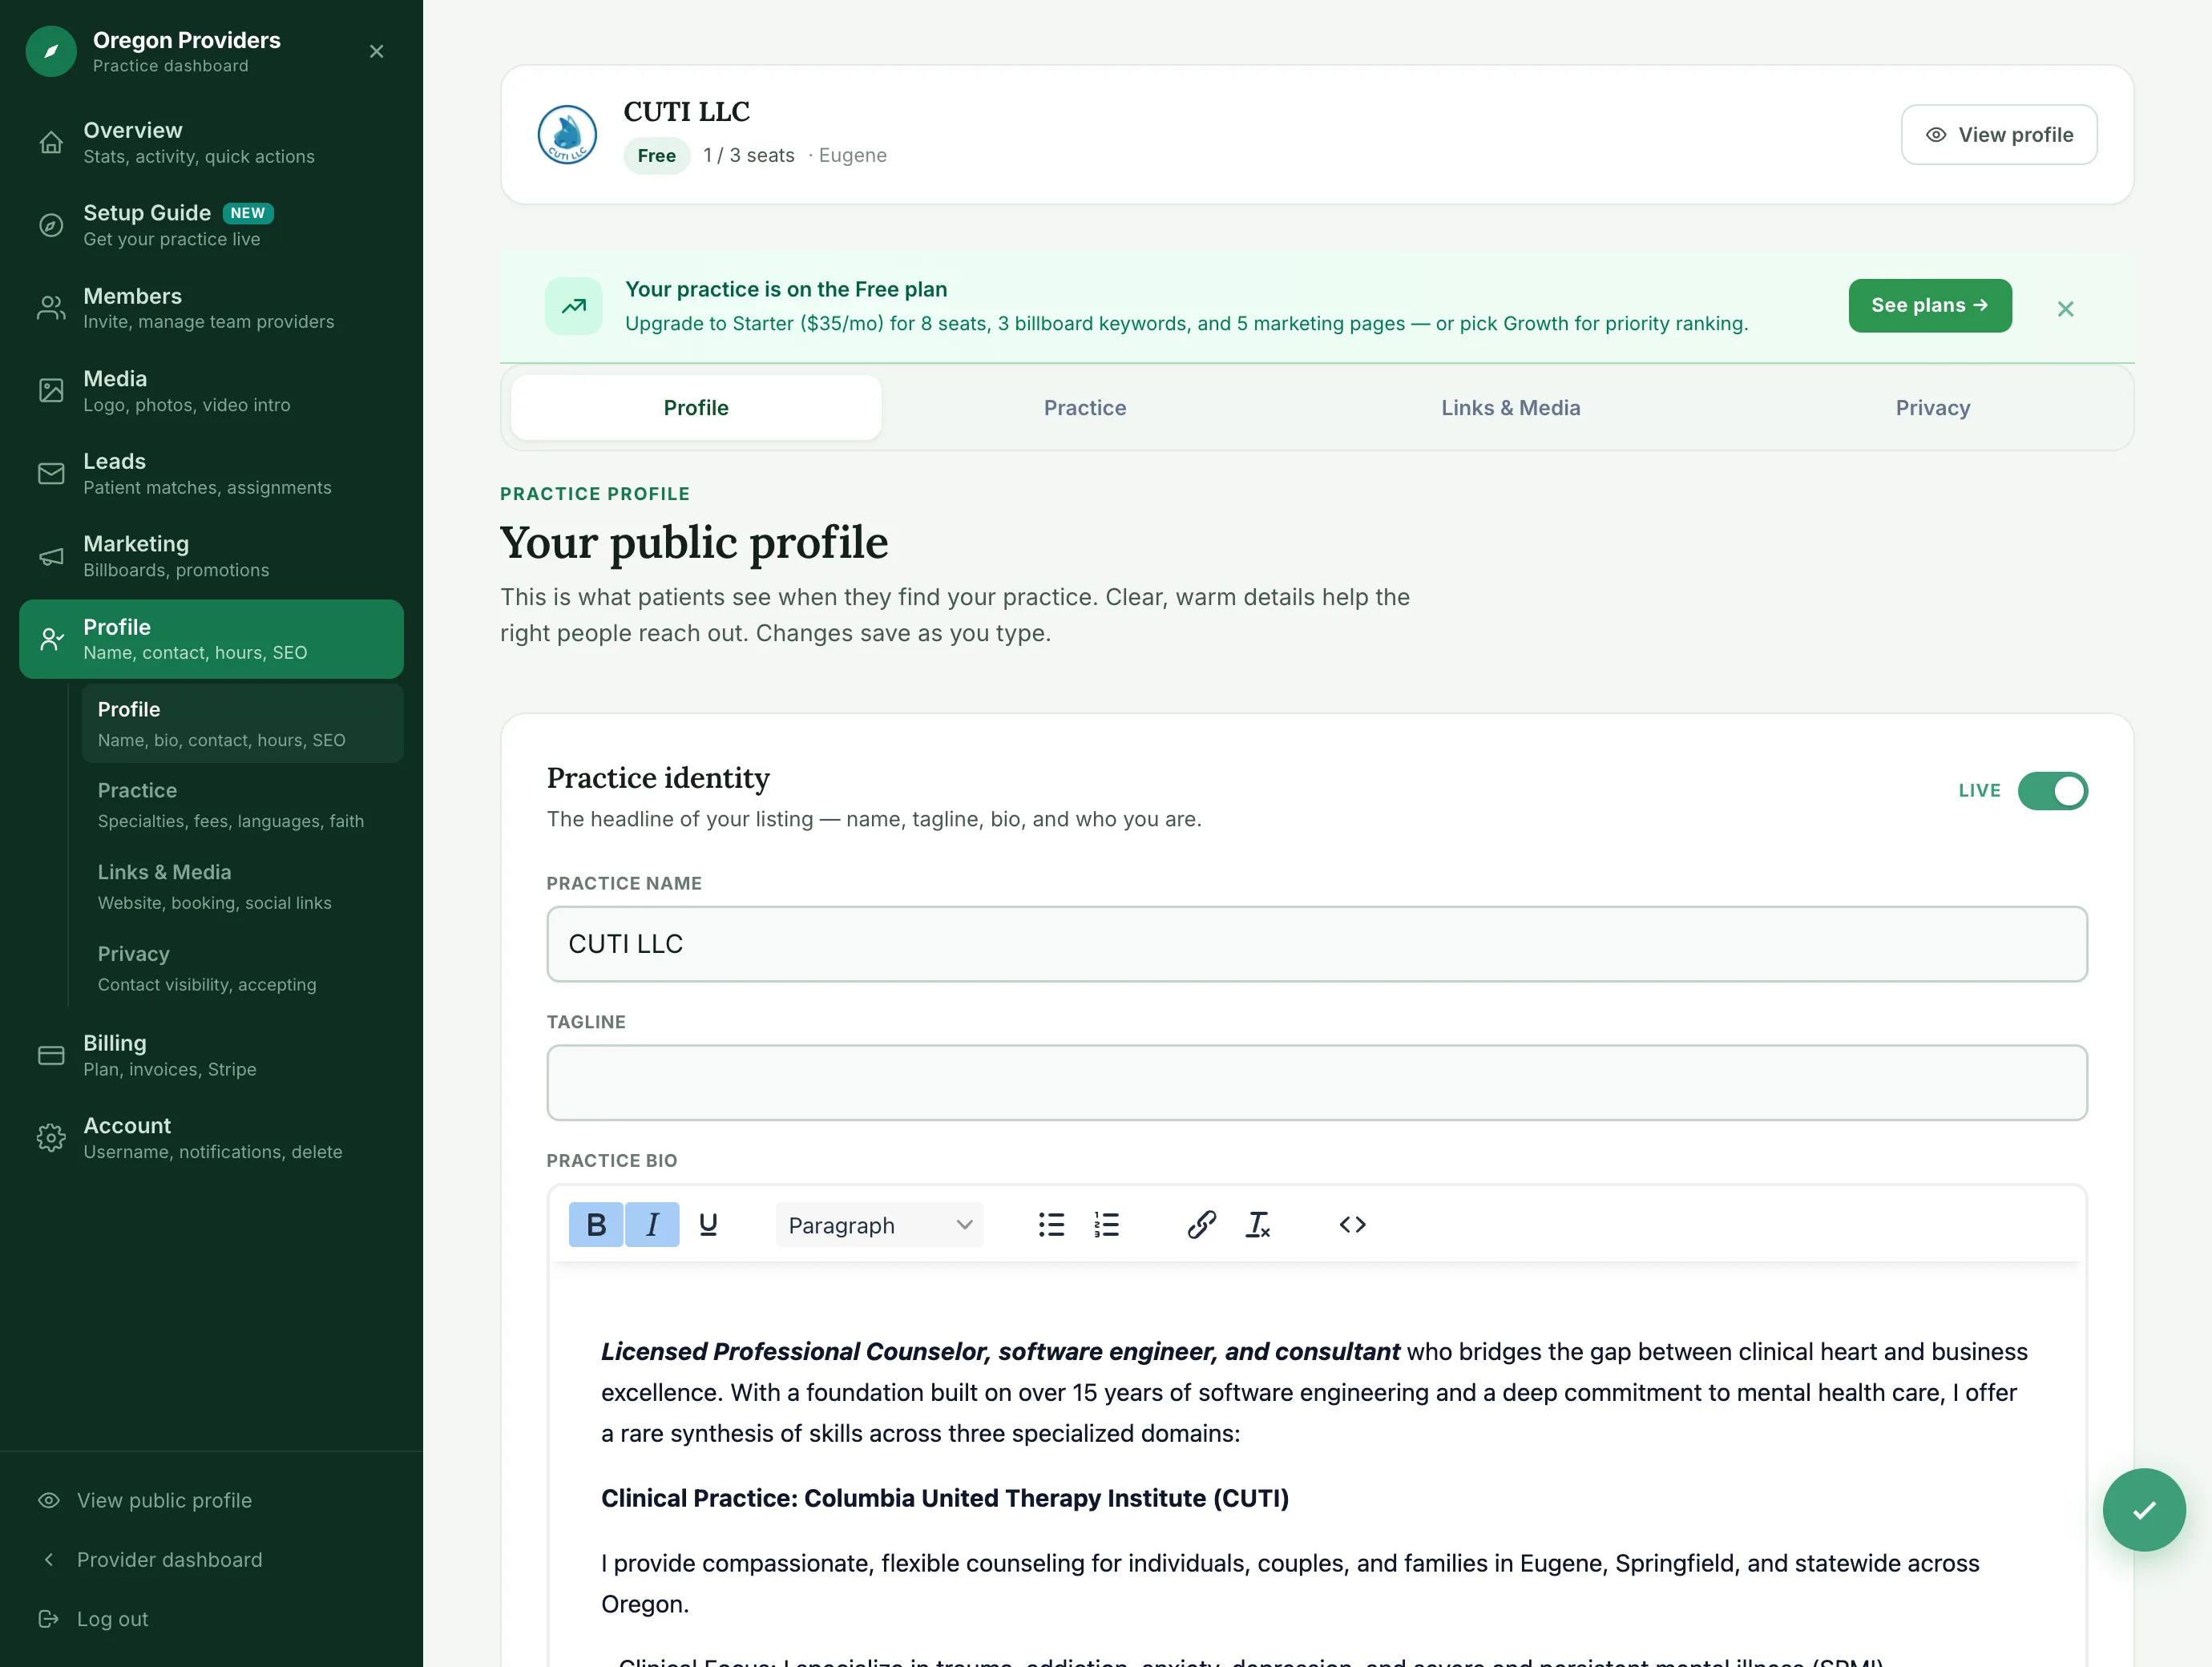
    Practice profile editor showing fields for the practice name, bio, services, insurance, and location with auto-save
    The profile editor. Fields auto-save as you go — a green check confirms each one.
  5. Share billing, analytics, and leads

    One Stripe invoice covers the whole team, and practice-level analytics roll up everyone's stats so you can see the full picture in one place. Free practices get a pooled weekly lead budget (2× your active members); paid practices use per-member Basic or Pro lead quotas.

  6. Run multiple locations on one plan

    Got more than one office? Each location gets its own practice page, and they all share one plan and one member allowance. Add a location from Billing or Account, using "Add another location." There's no extra charge; the only thing your plan caps is the total number of member providers across every location. Your main practice holds the subscription, so you're billed once no matter how many offices you list.

  7. Verify your practice

    Admin-approved practices get a verified badge, higher ranking, and the practice chip on member profiles. Submission is automatic after registration, and approval is usually within 24 hours.

Managed provider profiles: run the whole roster from one login

Some practices route every client inquiry through a central intake team, and their therapists never touch a directory login. Managed profiles are built for exactly that. Your practice creates each provider's profile, keeps it updated, and decides when it goes live. The provider needs no account, no password, and no email setup. New client inquiries go to your practice email (or any lead address you choose per provider). Invited members and managed profiles mix freely on the same roster, so a colleague who wants to run their own listing still can.

  1. Turn on managed profiles

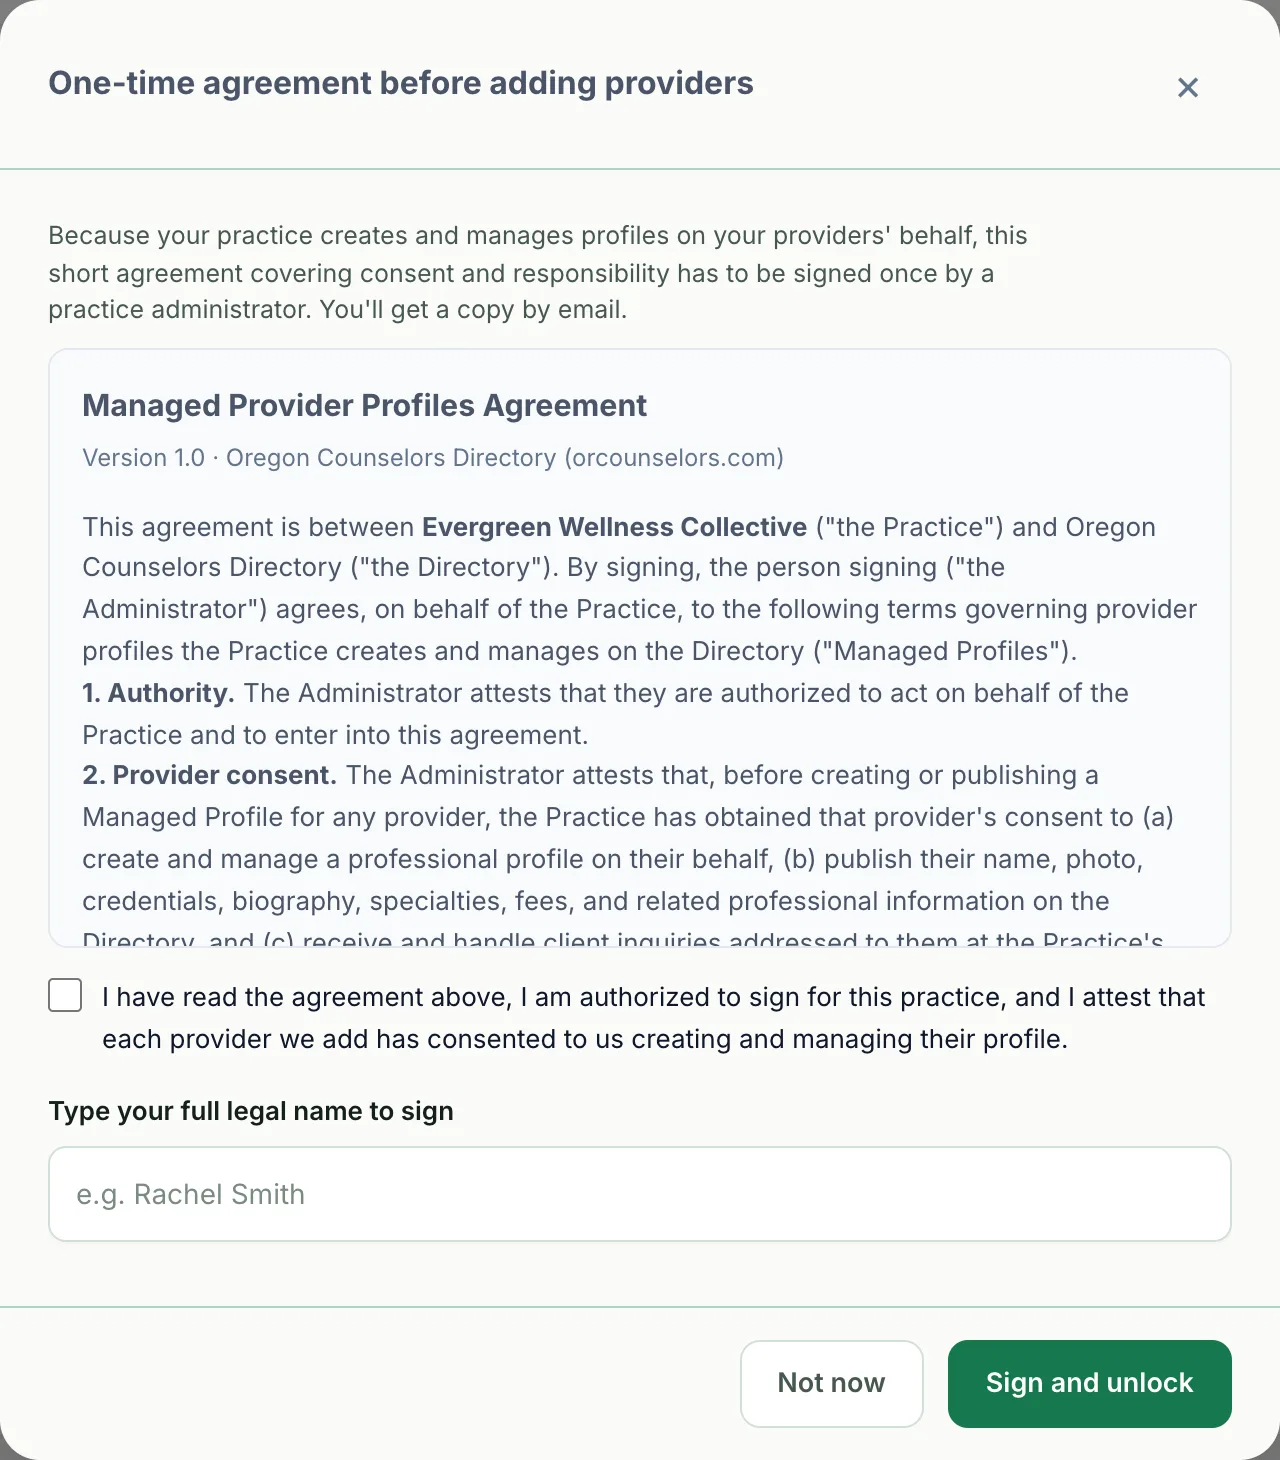
    On Members, click This practice manages member profiles. A practice administrator signs a short one-time agreement covering provider consent and content responsibility. Signing unlocks the Add provider button, and a copy of the signed agreement lands in your inbox.

    One-time managed profiles agreement modal with a scrollable agreement text, consent attestation checkbox, and a typed signature field
    The one-time agreement. Check the attestation, type your full name, and the Add provider button unlocks.
  2. Add a provider in about a minute

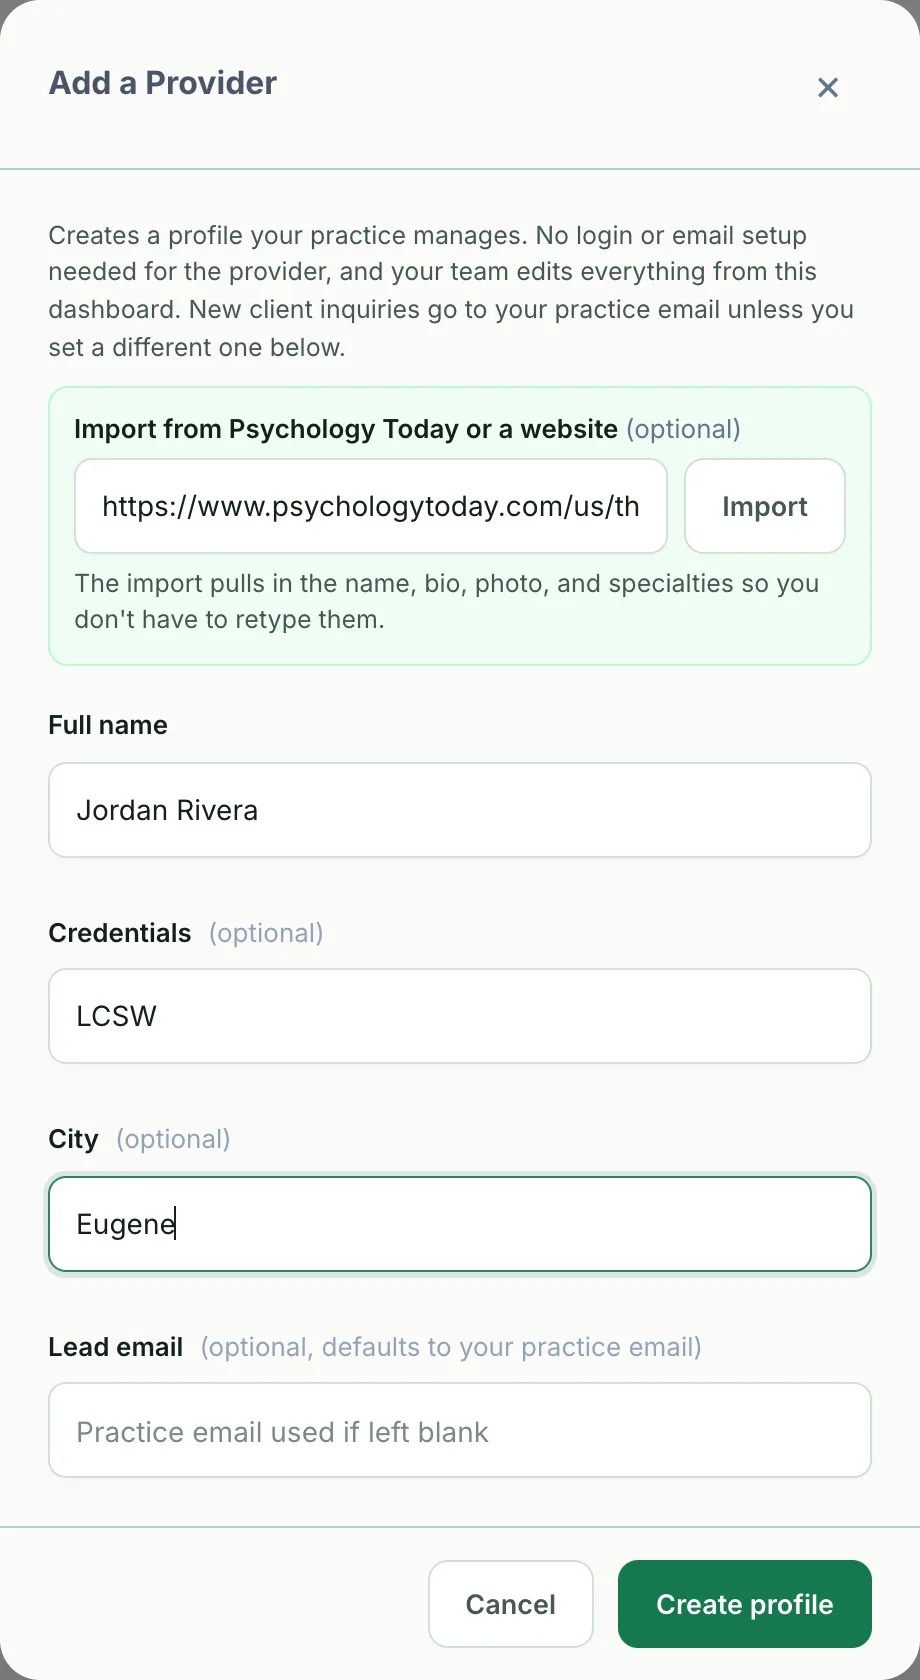
    Add provider asks for a name and city, and that's enough to start. Better: paste the provider's Psychology Today or website URL and the import fills in the full bio, specialties, treatment approaches, insurance, fees, availability, and photo. Everything stays editable, and the import never touches the name, the lead email, or whether the profile is live.

    Add a Provider modal with an import-from-URL field at the top and name, credentials, city, and lead email fields below
    Add a provider. Paste a profile URL to import, or just type a name and fill things in later.
  3. Edit everything from your dashboard

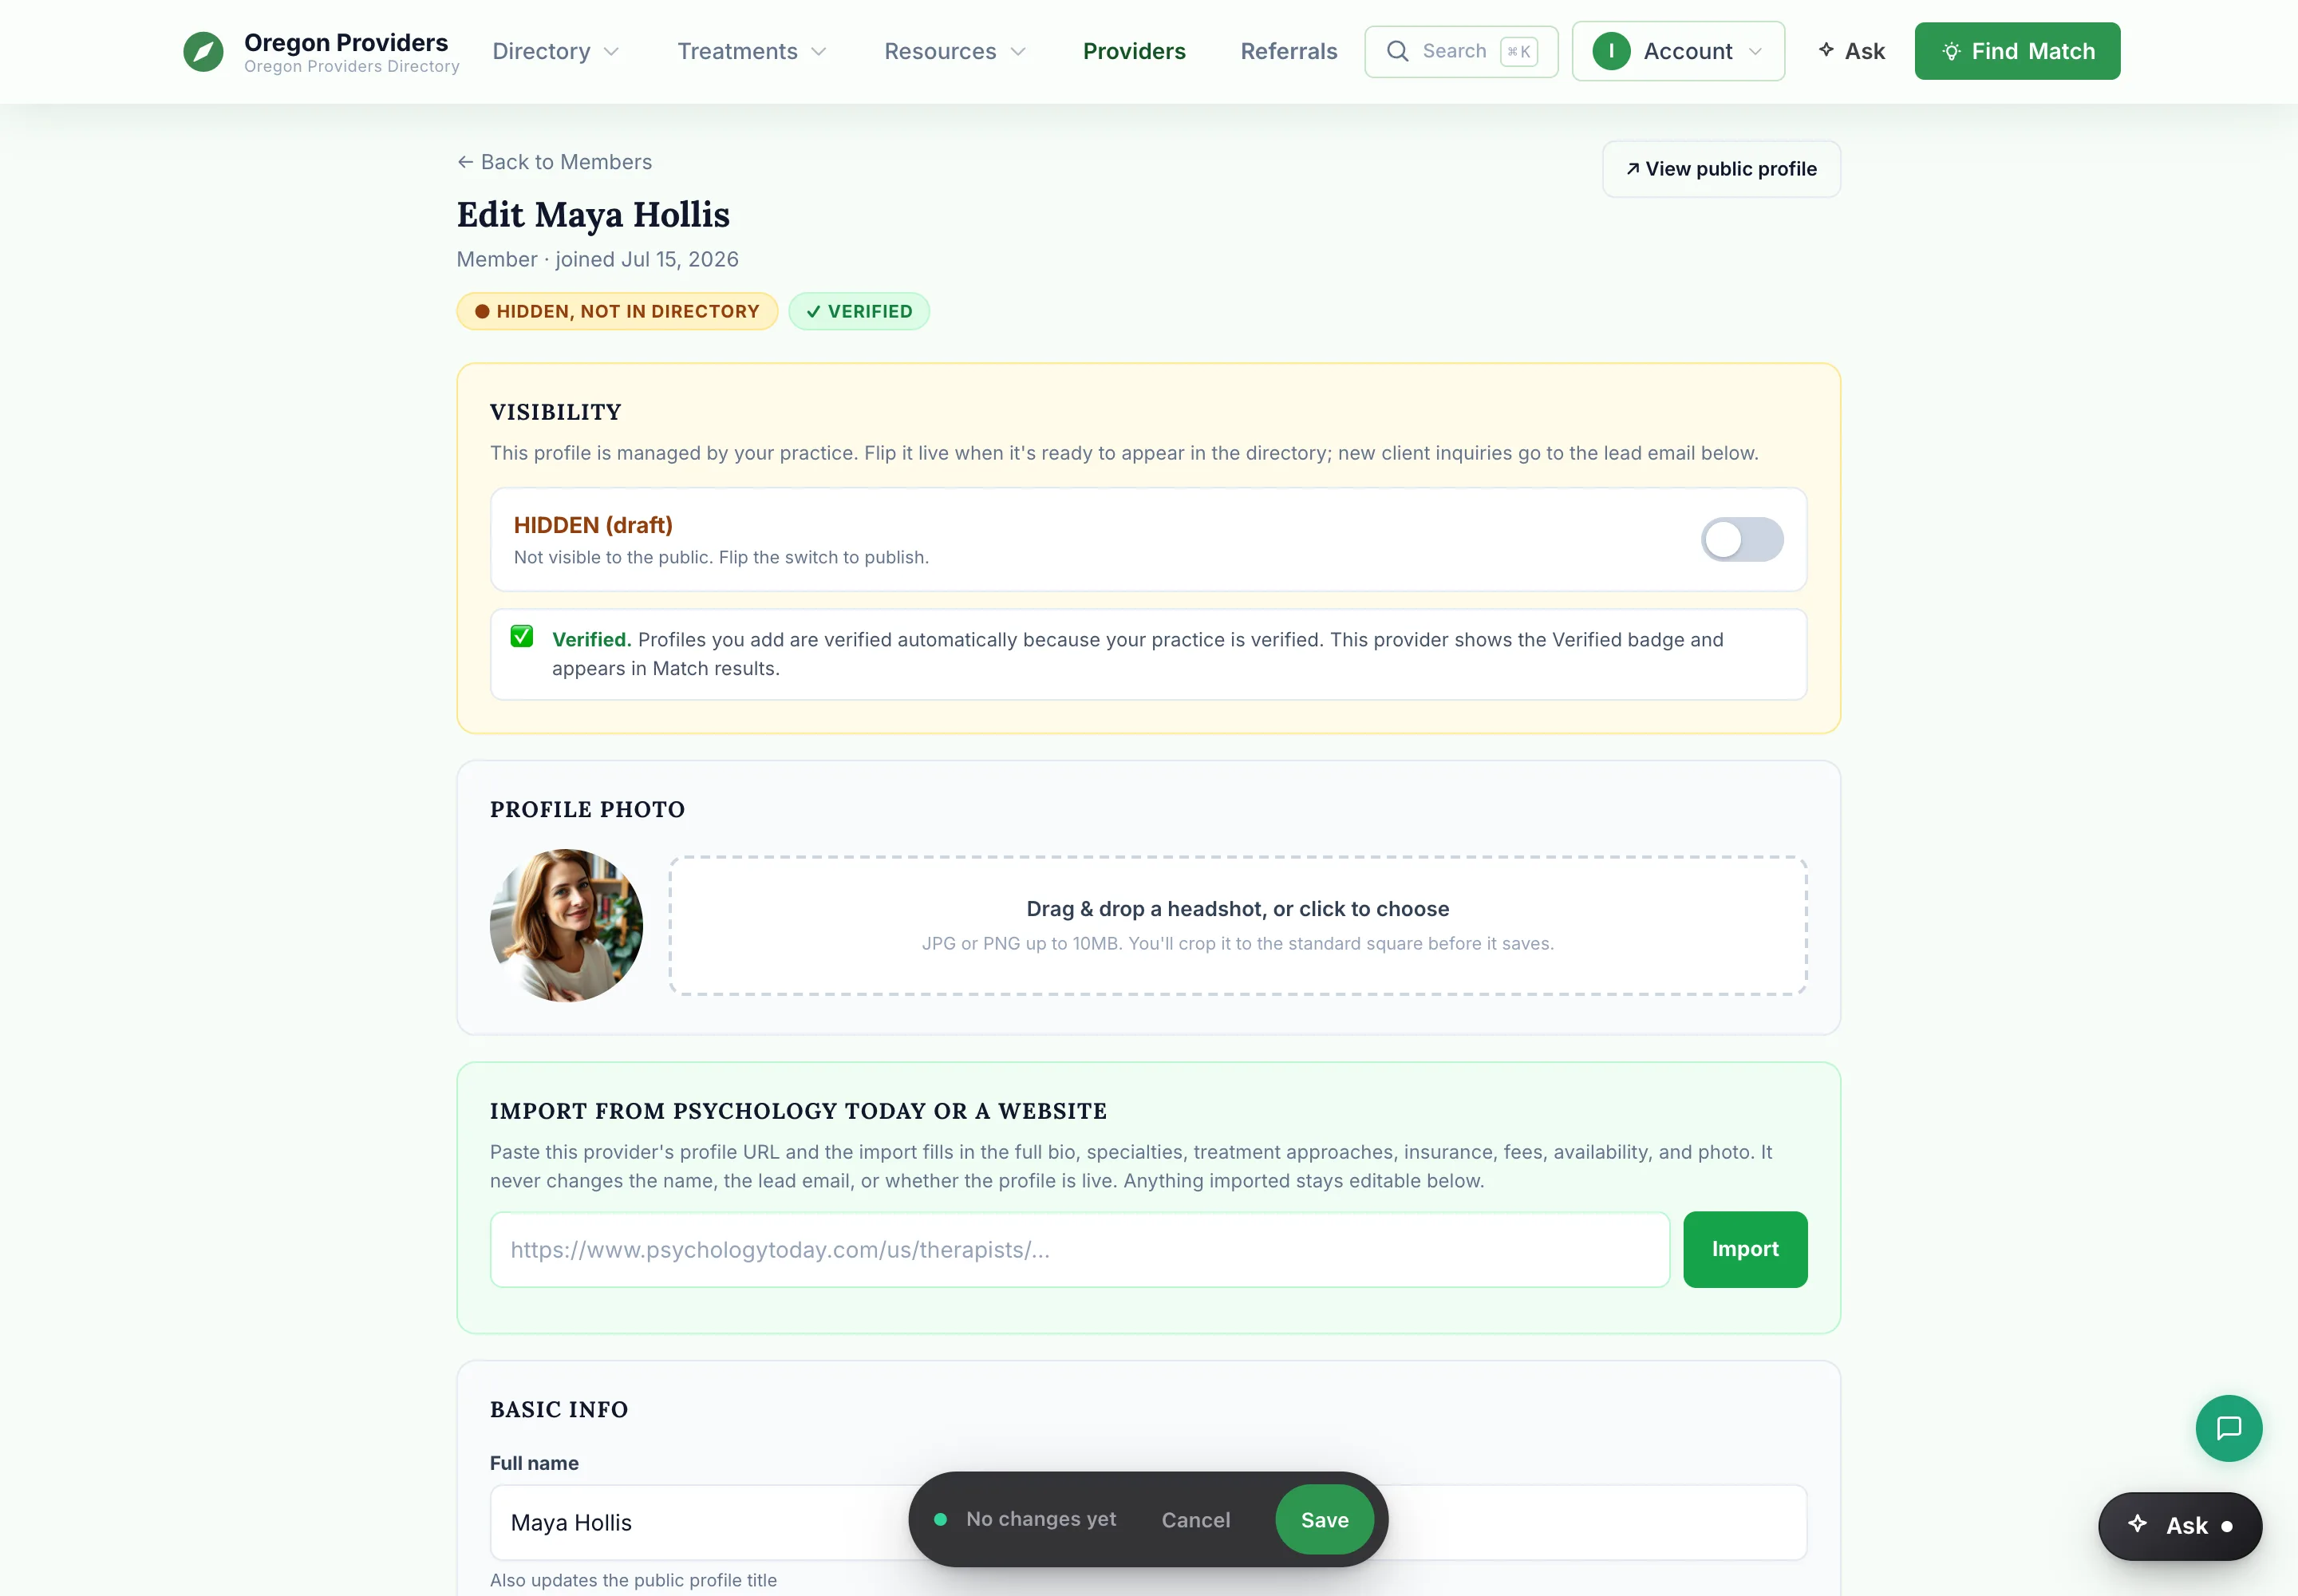
    Each managed profile has a full editor: drag-and-drop headshot with a built-in cropper, WYSIWYG bio, specialties, insurance, fees, and location. A save bar tracks your changes, and you can re-run the import any time to refresh the profile from its source. New profiles start hidden, so nothing appears in the directory until you flip the visibility switch.

    Managed profile editor showing hidden and verified status pills, a visibility switch, a drag-and-drop photo uploader, and an import-from-URL card
    The managed profile editor. Clear hidden/live and verification pills up top, visibility switch, photo uploader, and re-import.
  4. Verification is automatic

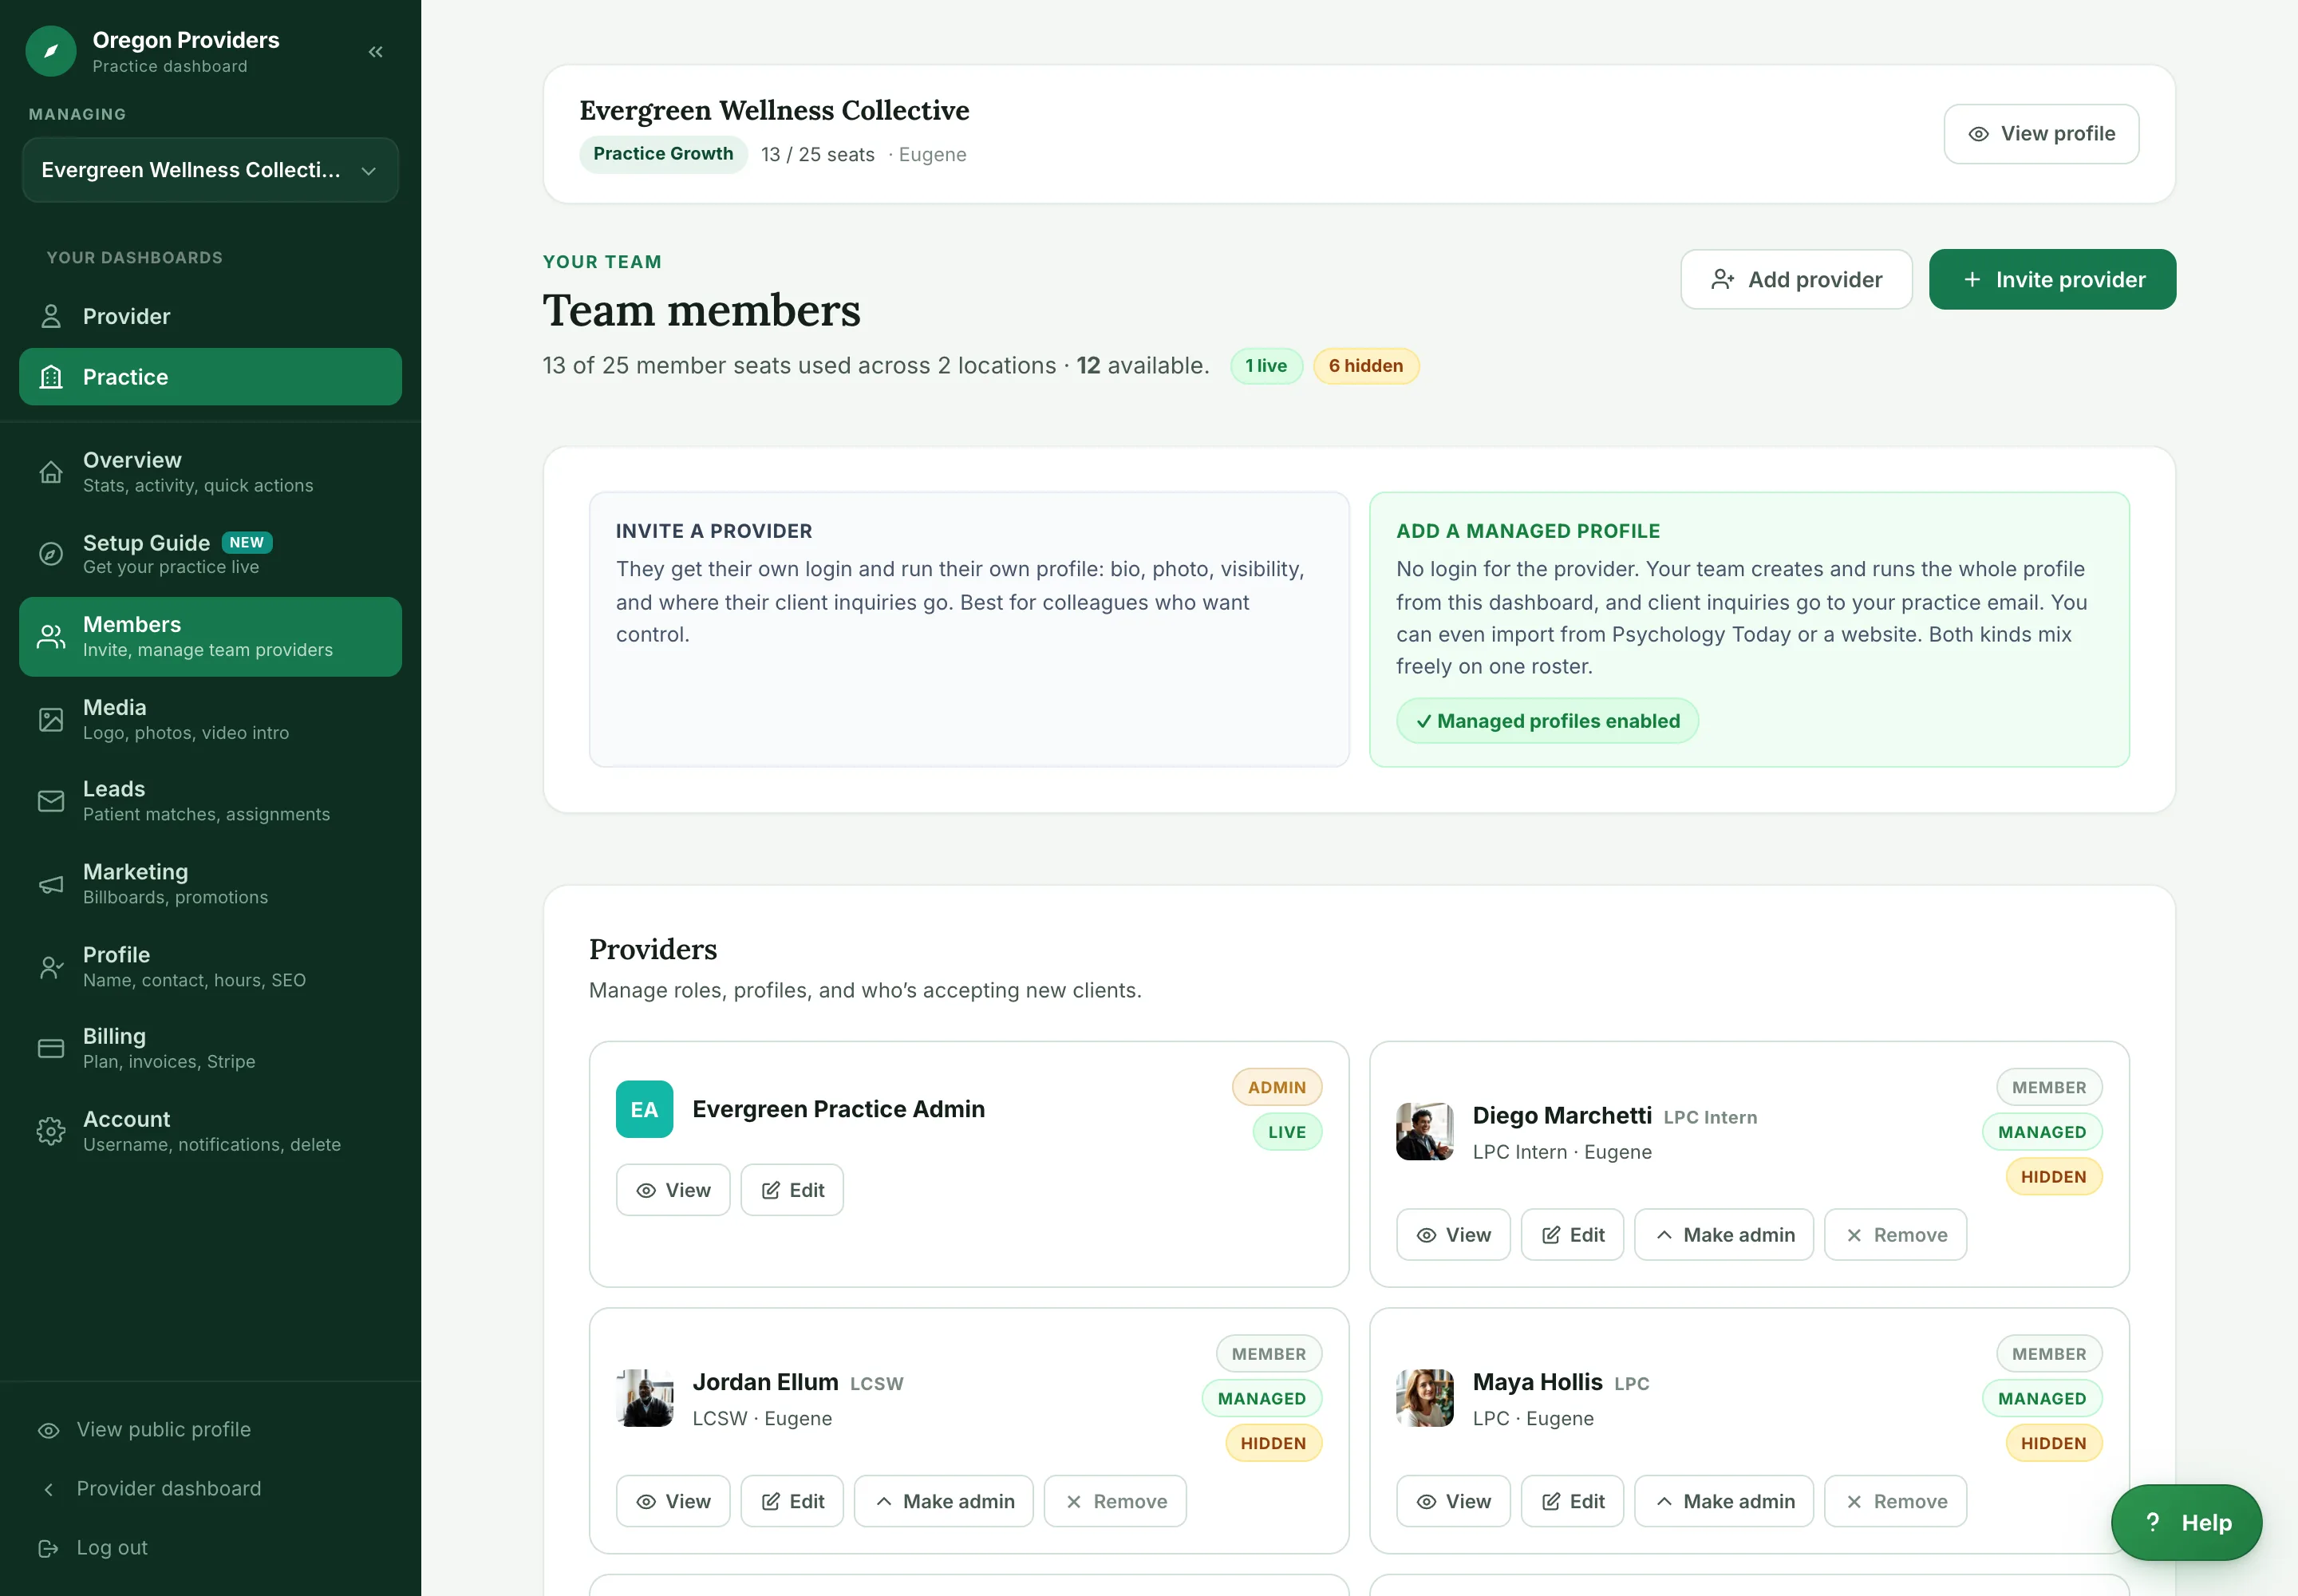
    Once your practice is verified, every profile you add is verified with it. No per-provider paperwork and no waiting. Each profile shows the Verified badge and appears in Match results as soon as you set it live. Your roster shows live and hidden counts at a glance, and every card is labeled Managed or Member so you always know which kind you're looking at.

    Members page with live and hidden count pills, side-by-side cards explaining invited versus managed providers, and a roster of provider cards labeled Managed and Hidden
    The roster. Live/hidden counts up top, and each card labeled so invited members and managed profiles are easy to tell apart.
Detailed practice dashboard walkthrough — every screen explained 9 screens
1

Practice Overview

/clinic-dashboard/overview
Practice Overview screenshot

Top: practice name, tier badge, seats used (e.g. 1 / 3), and primary city. A profile-score circle (out of 1000) and four stat cards: Team Members, Patient Leads, Pending Invites, plus your current plan summary. Quick Actions on the right jump straight to common tasks (edit profile, upload logo & photos, manage billboards, view public profile). The Recent Activity feed at the bottom logs joins, leads, and billing events.

2

Practice Profile Editor

/clinic-dashboard/profile
Practice Profile Editor screenshot

The public-facing practice page editor. Sections: identity (name, tagline, founding year), logo + hero image, contact (phone, email, website, booking URL, social), hours, full bio (WYSIWYG), services offered, treatment approaches, accepted insurance, location with map, and the Accepting-Clients toggle. Same auto-save pattern as the provider profile editor.

3

Members & Team

/clinic-dashboard/members
Members & Team screenshot

List of all providers in the practice. Each card shows name, role (clinic_admin vs member), join date, and claim status. Invite brings up an email form — invites expire in 14 days and disappear from this list when accepted. Admins can edit a member's public profile, change their role, or remove them. The /clinic-dashboard/team URL routes to the same page.

4

Media (Photos & Logo)

/clinic-dashboard/media
Media (Photos & Logo) screenshot

Logo upload (used in the hero + everywhere your practice appears) and a photo gallery for the public page. Drag-and-drop, reorder, and delete. Photo allowance scales with tier — Free 3, Starter 8, Growth 20, Enterprise unlimited. The /clinic-dashboard/photos URL is an alias.

5

Practice Pages

/clinic-dashboard/pages
Practice Pages screenshot

Marketing pages under your practice URL — equivalent to the provider-side marketing pages but owned by the practice. Useful for "About Us", treatment-modality deep-dives, or location pages if you have multiple offices. Allowance: Free 1, Starter 5, Growth 10, Enterprise 25.

6

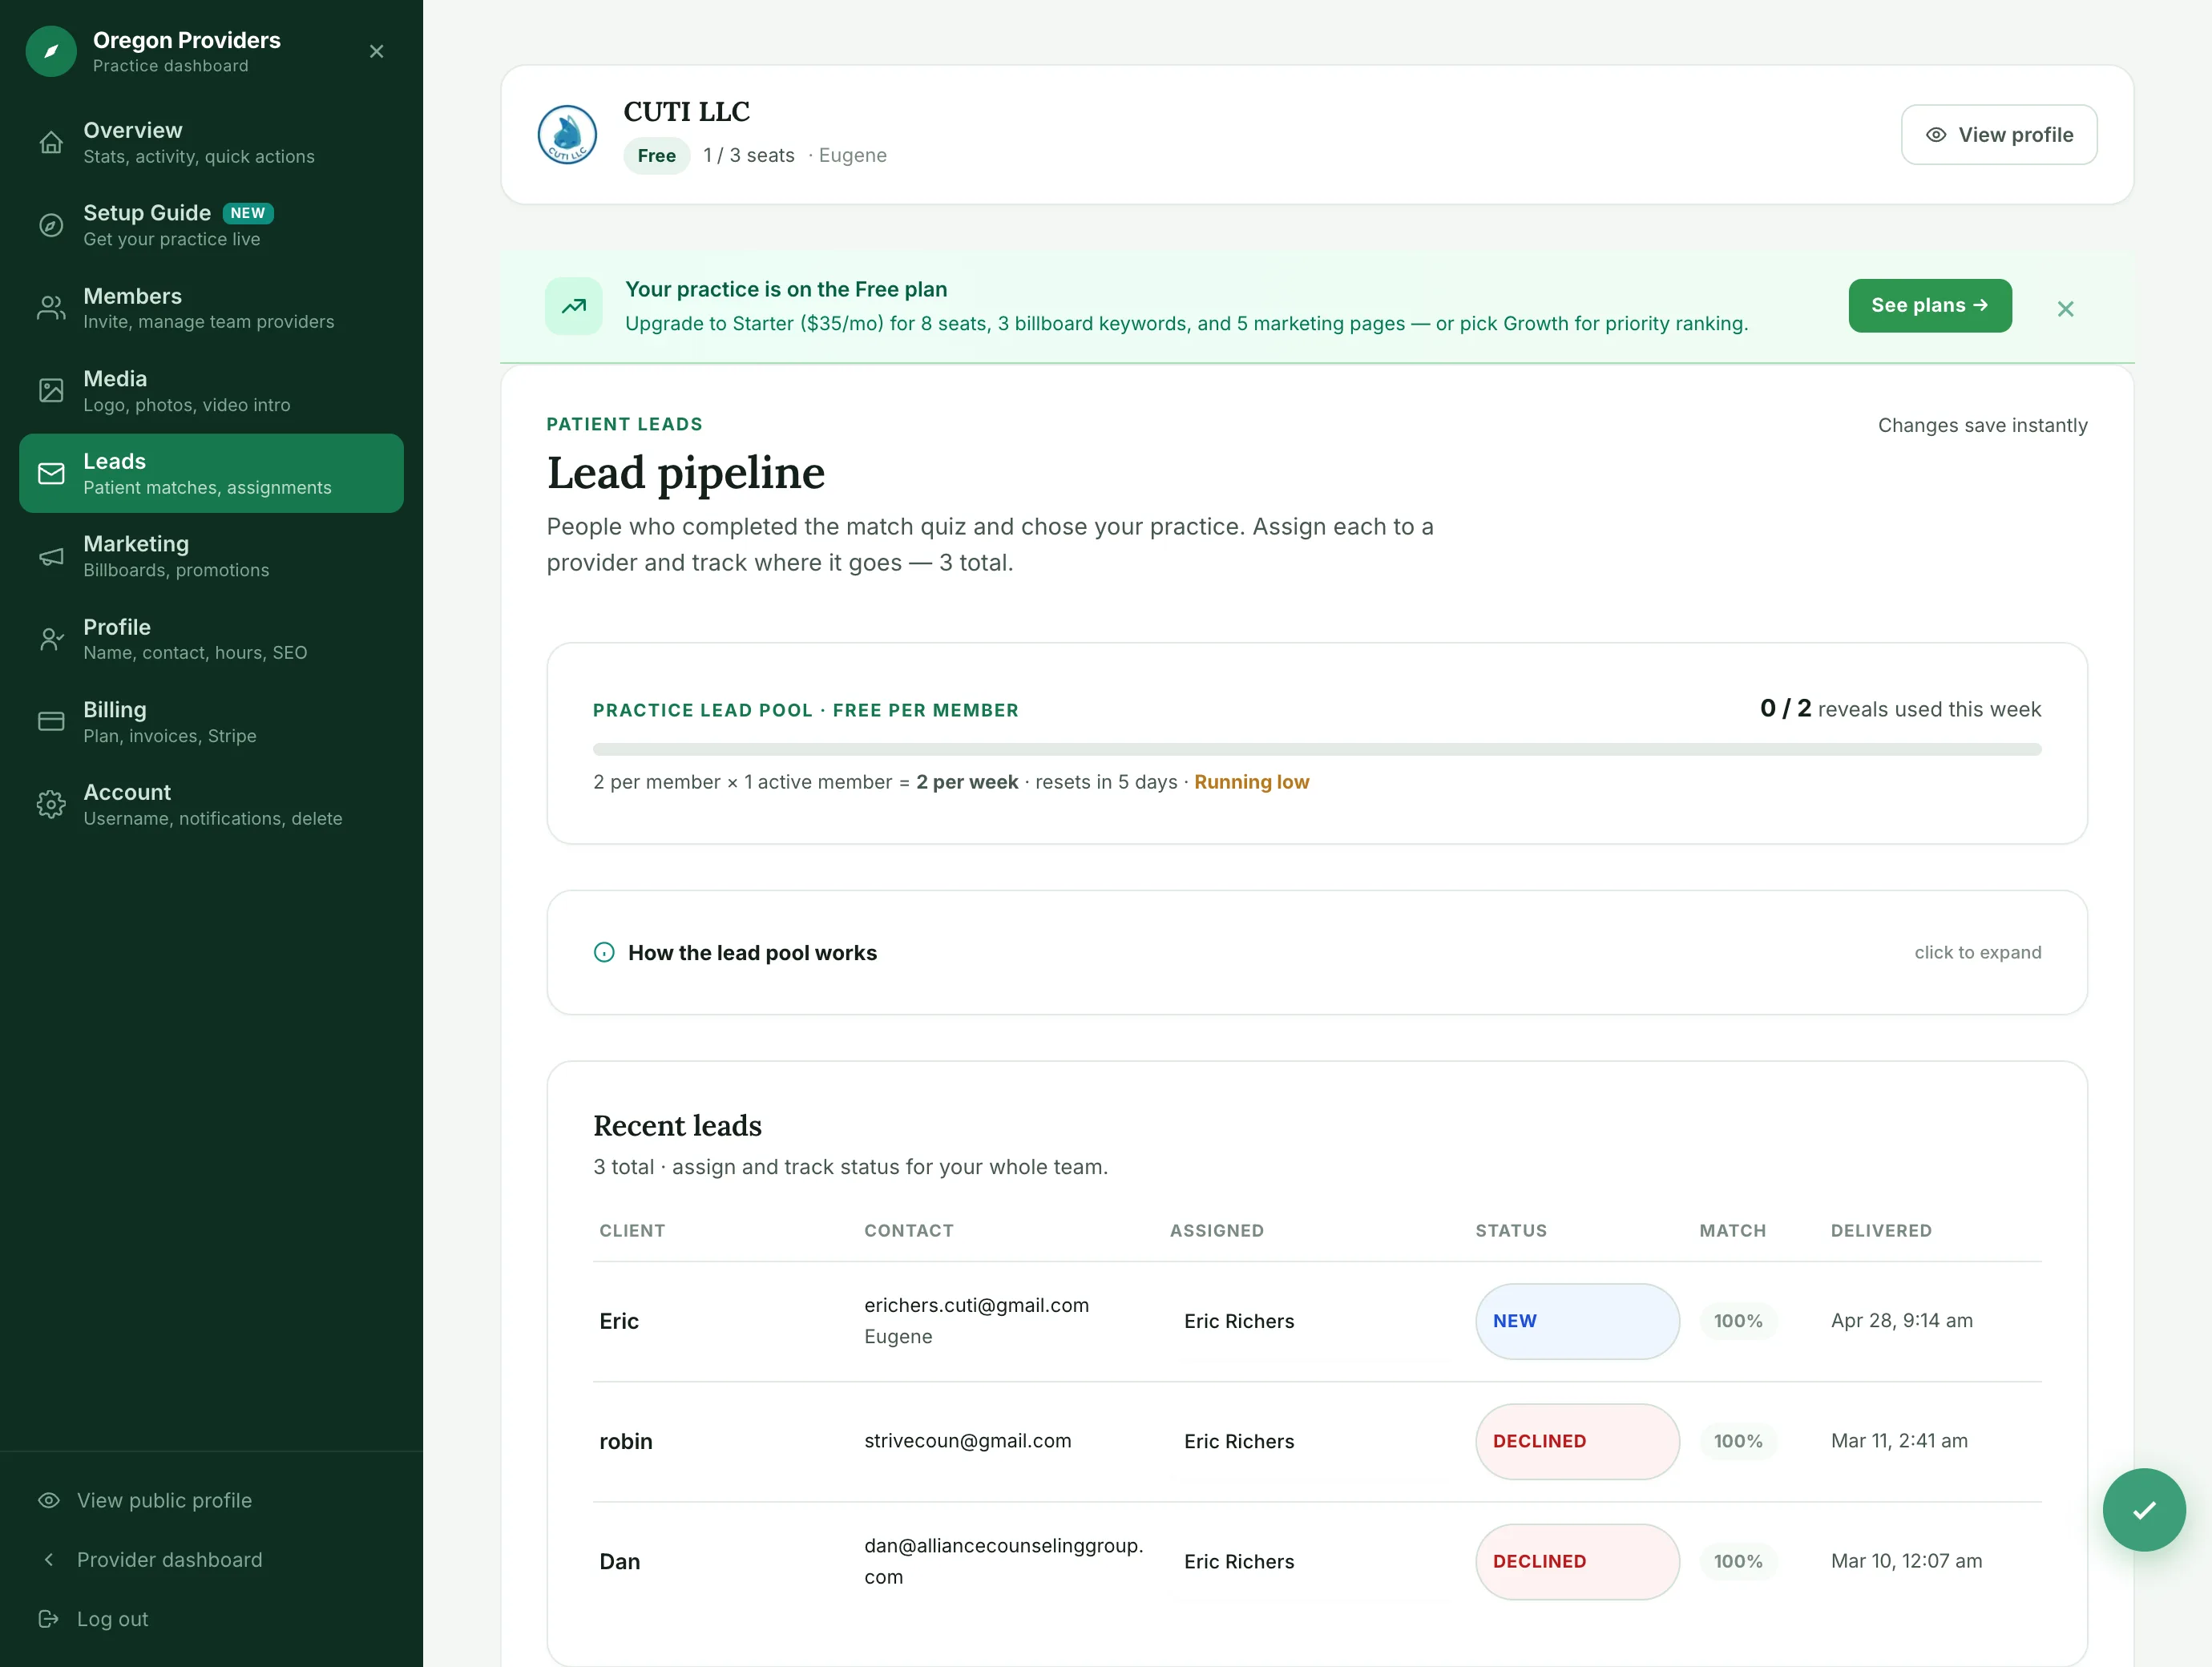
Leads

/clinic-dashboard/leads
Leads screenshot

All patient match requests routed to providers in your practice. Lets you spot members who aren't responding so you can either reassign or coach. Lead allowance: Free practice gets a pooled 2× active-member weekly budget; paid practices use per-member Basic/Pro quotas.

7

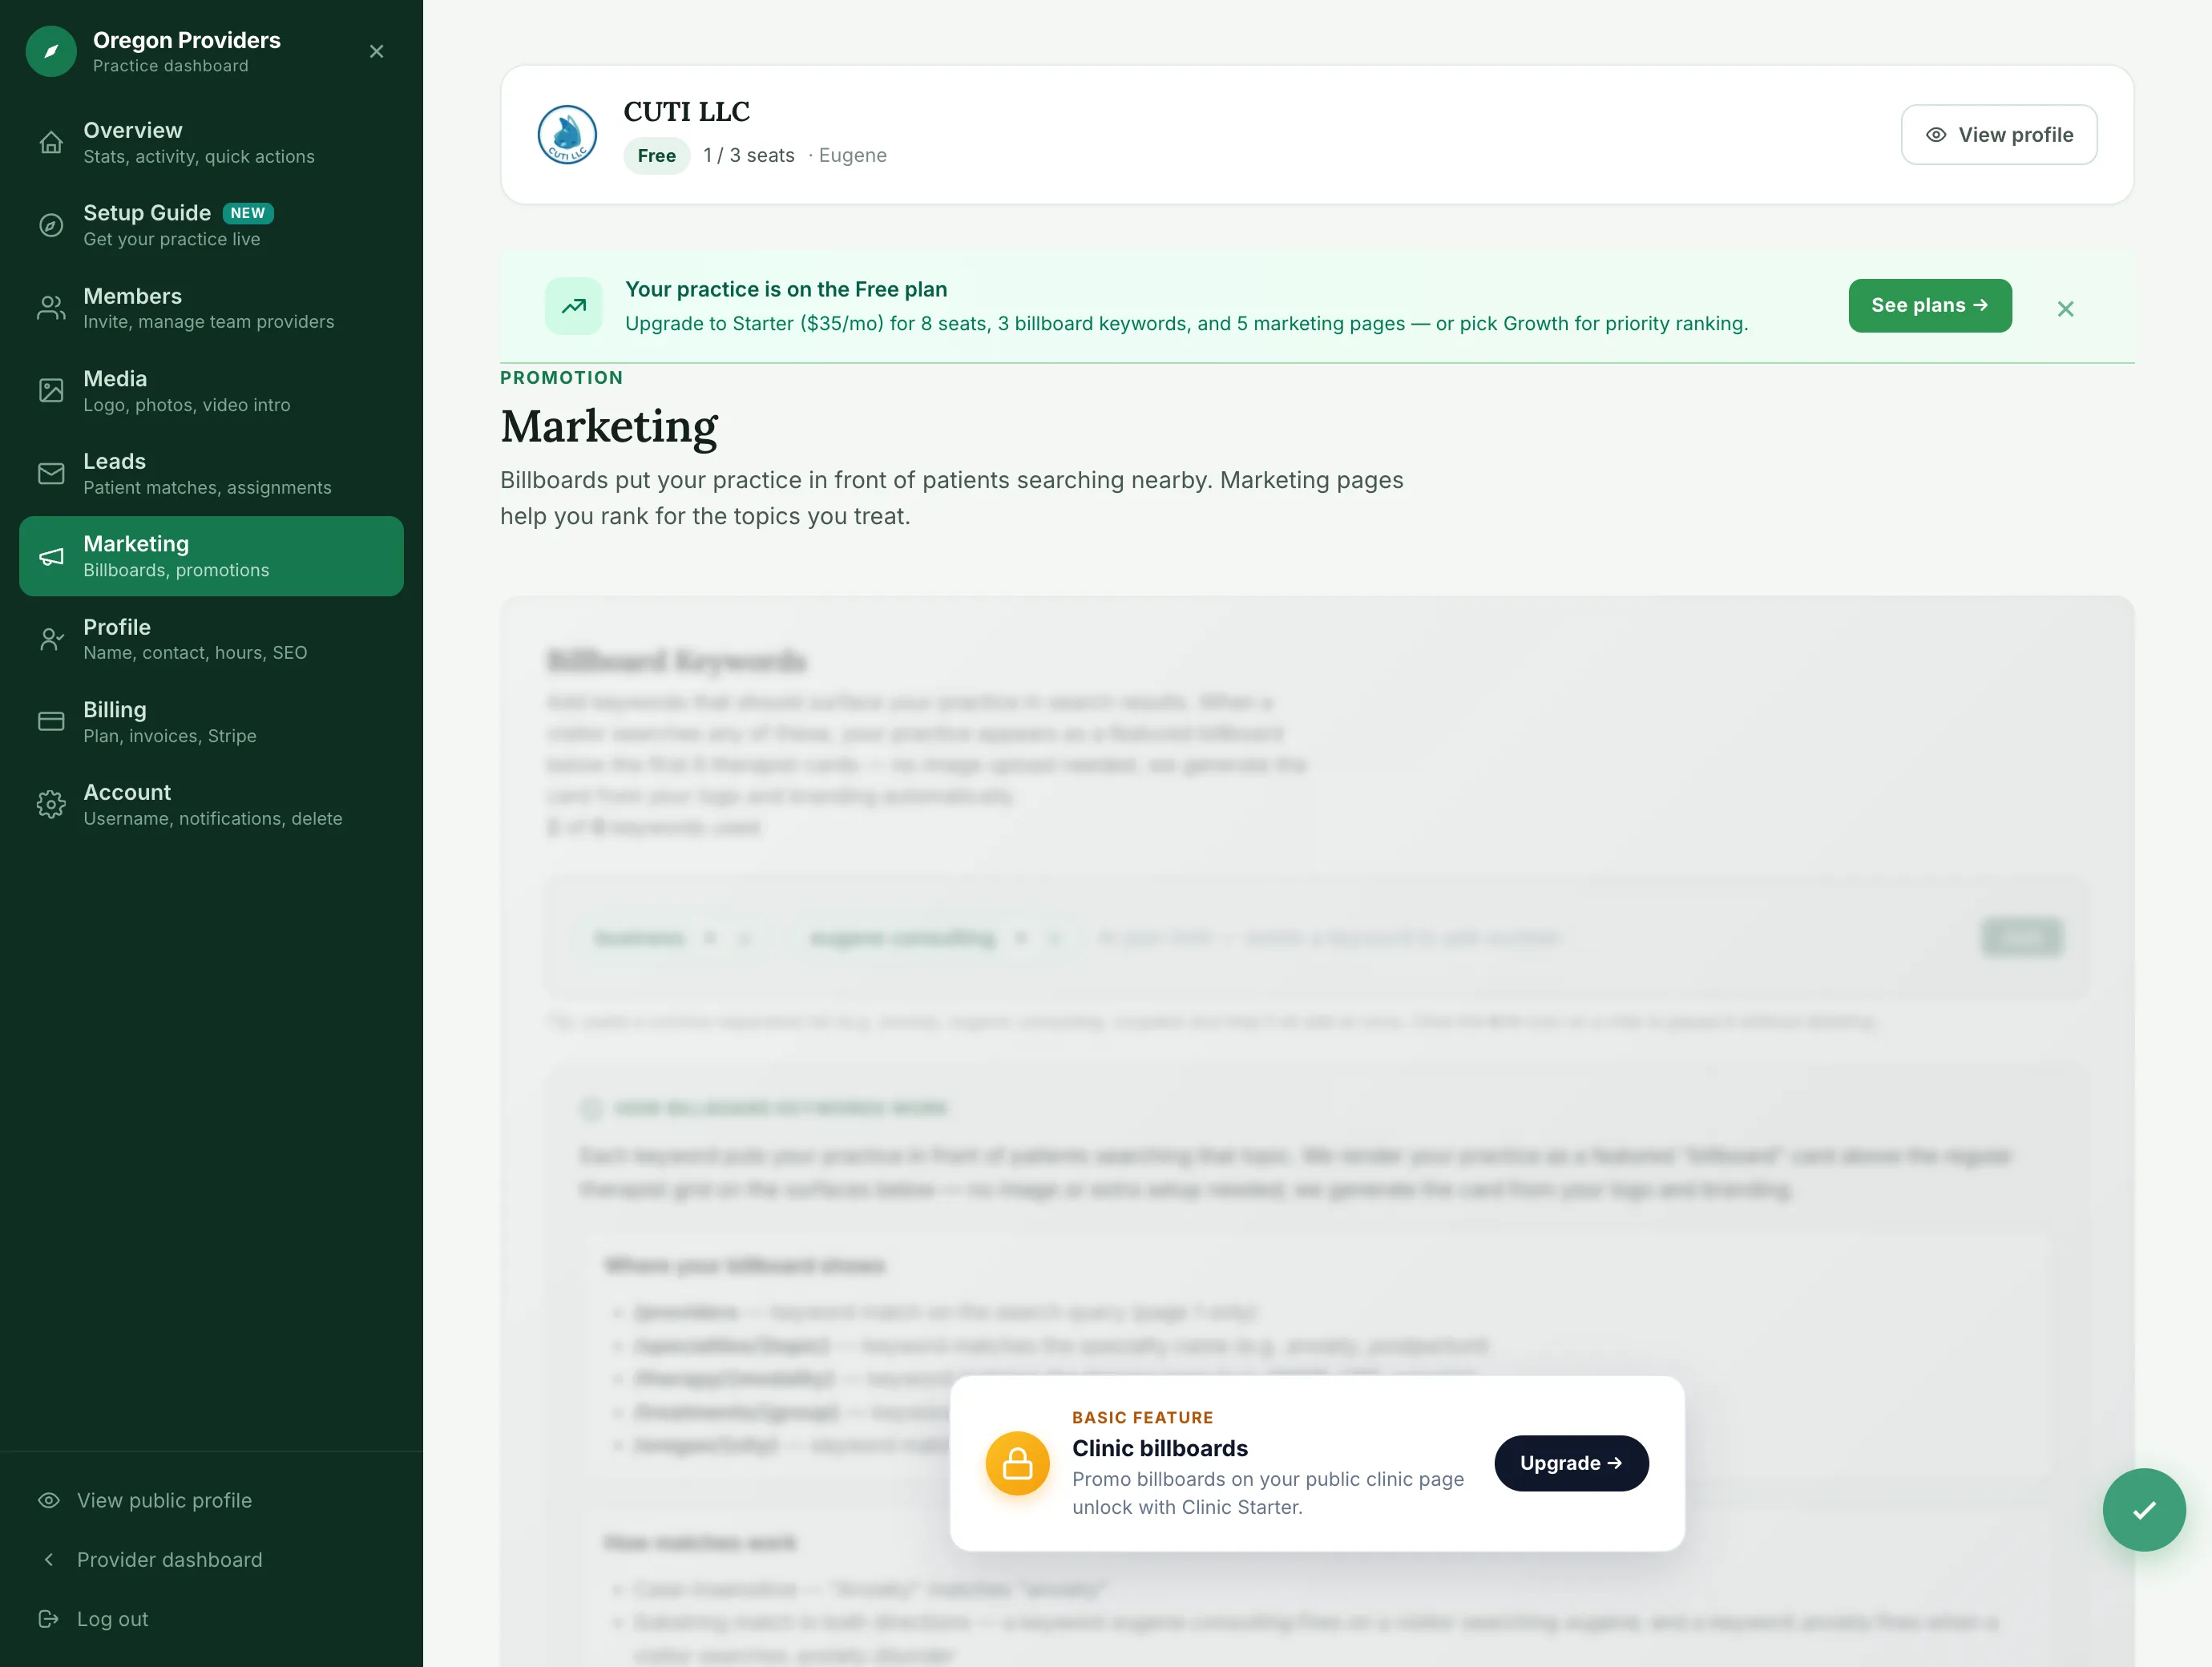
Marketing (Billboards & Promotions)

/clinic-dashboard/marketing
Marketing (Billboards & Promotions) screenshot

Practice-level marketing surfaces: billboards (homepage hero rotation slots), keyword promotions, and analytics on which ad units have driven leads. Available from Starter tier up — 1 billboard on Starter, 3 on Growth, 6 on Enterprise.

8

Billing & Plan

/clinic-dashboard/billing
Billing & Plan screenshot

One Stripe invoice covers every provider on the team. Plan picker (Free / Starter / Growth / Enterprise), current renewal, payment method, and invoice history. Changing tier propagates inherited features (Basic/Pro perks) to every member immediately.

9

Account & Settings

/clinic-dashboard/account
Account & Settings screenshot

Practice-account-level settings: practice login email, notification preferences, and the danger zone (delete practice). Deleting a practice doesn't delete member provider profiles — it just unlinks them so they revert to standalone listings.

For Partners: Community & Content

Partner accounts are for organizations that contribute content (blog posts, guides) or co-promote the directory — community-mental-health orgs, nonprofits, professional networks. Different from providers (you don\'t see leads) and from practices (you don\'t manage providers).

  1. Apply to become a partner

    Visit /partner-register. Tell us about your organization and the kind of content you\'d like to contribute. Approvals are usually within 48 hours.

  2. Set up your partner profile

    Public URL: /partner/your-org-slug. Add a logo, hero image, mission statement, and links. The partner profile is searchable and links back from every post you publish.

  3. Publish posts & guides

    Partner-authored posts appear in the main /blog feed and on your partner profile. Use the same WYSIWYG editor as provider posts — title, summary, tags, featured image, body.

  4. Cross-promote

    Pin your top posts to your partner profile. We surface partner content on relevant hub pages (e.g. a CADC partner\'s posts on /insurance/medicaid).

Detailed partner dashboard walkthrough — every screen explained 4 screens
1

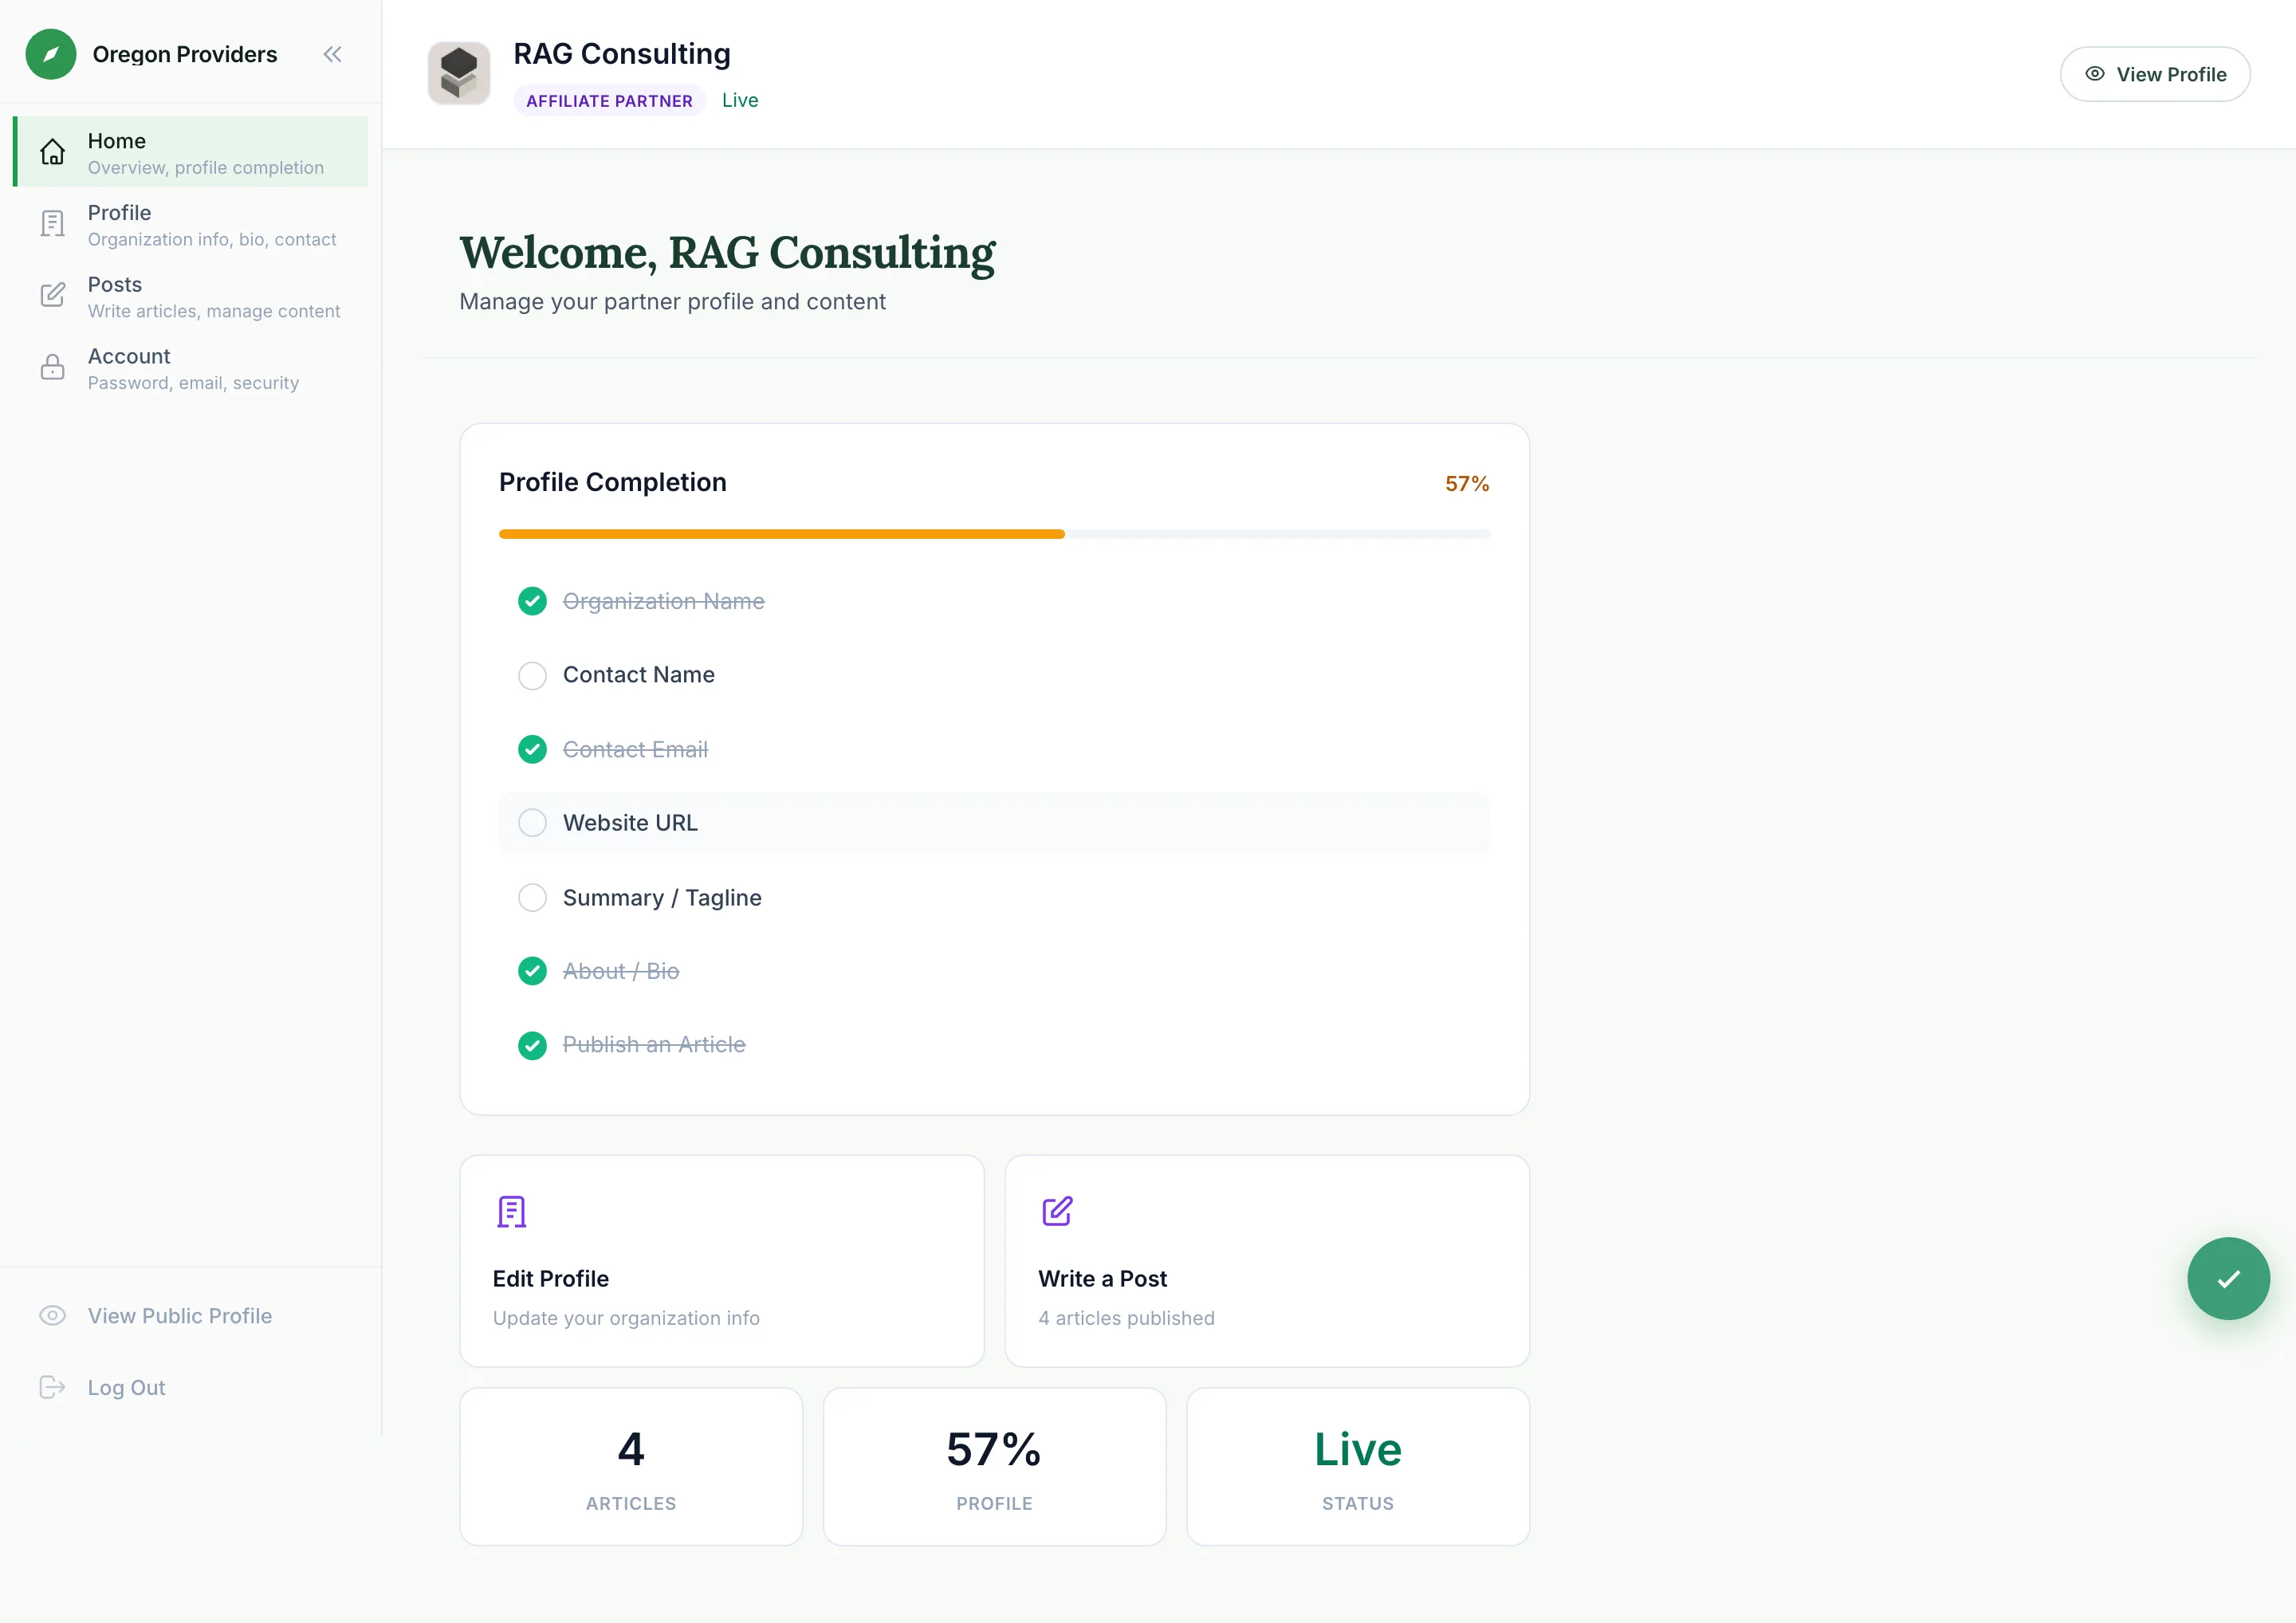
Partner Home

/partner-dashboard/home
Partner Home screenshot

Top: your organization name, partnership-type badge (Affiliate / Content / Community), and Live status. A Profile Completion checklist surfaces the fields you still need to fill — Organization Name, Contact Name, Contact Email, Website URL, Summary, About / Bio, and "publish at least one article" — with a running completion percentage. Below: at-a-glance counts (articles published, profile %, live status) and two quick-action tiles: Edit Profile and Write a Post.

2

Partner Profile Editor

/partner-dashboard/profile
Partner Profile Editor screenshot

Edit your public partner page. Sections: organization identity (name, logo, contact name and email), website URL, short summary / tagline, and full About / Bio in a WYSIWYG editor. Auto-saves on blur, same green-check pattern as the provider editor. The public URL is /partner/your-slug.

3

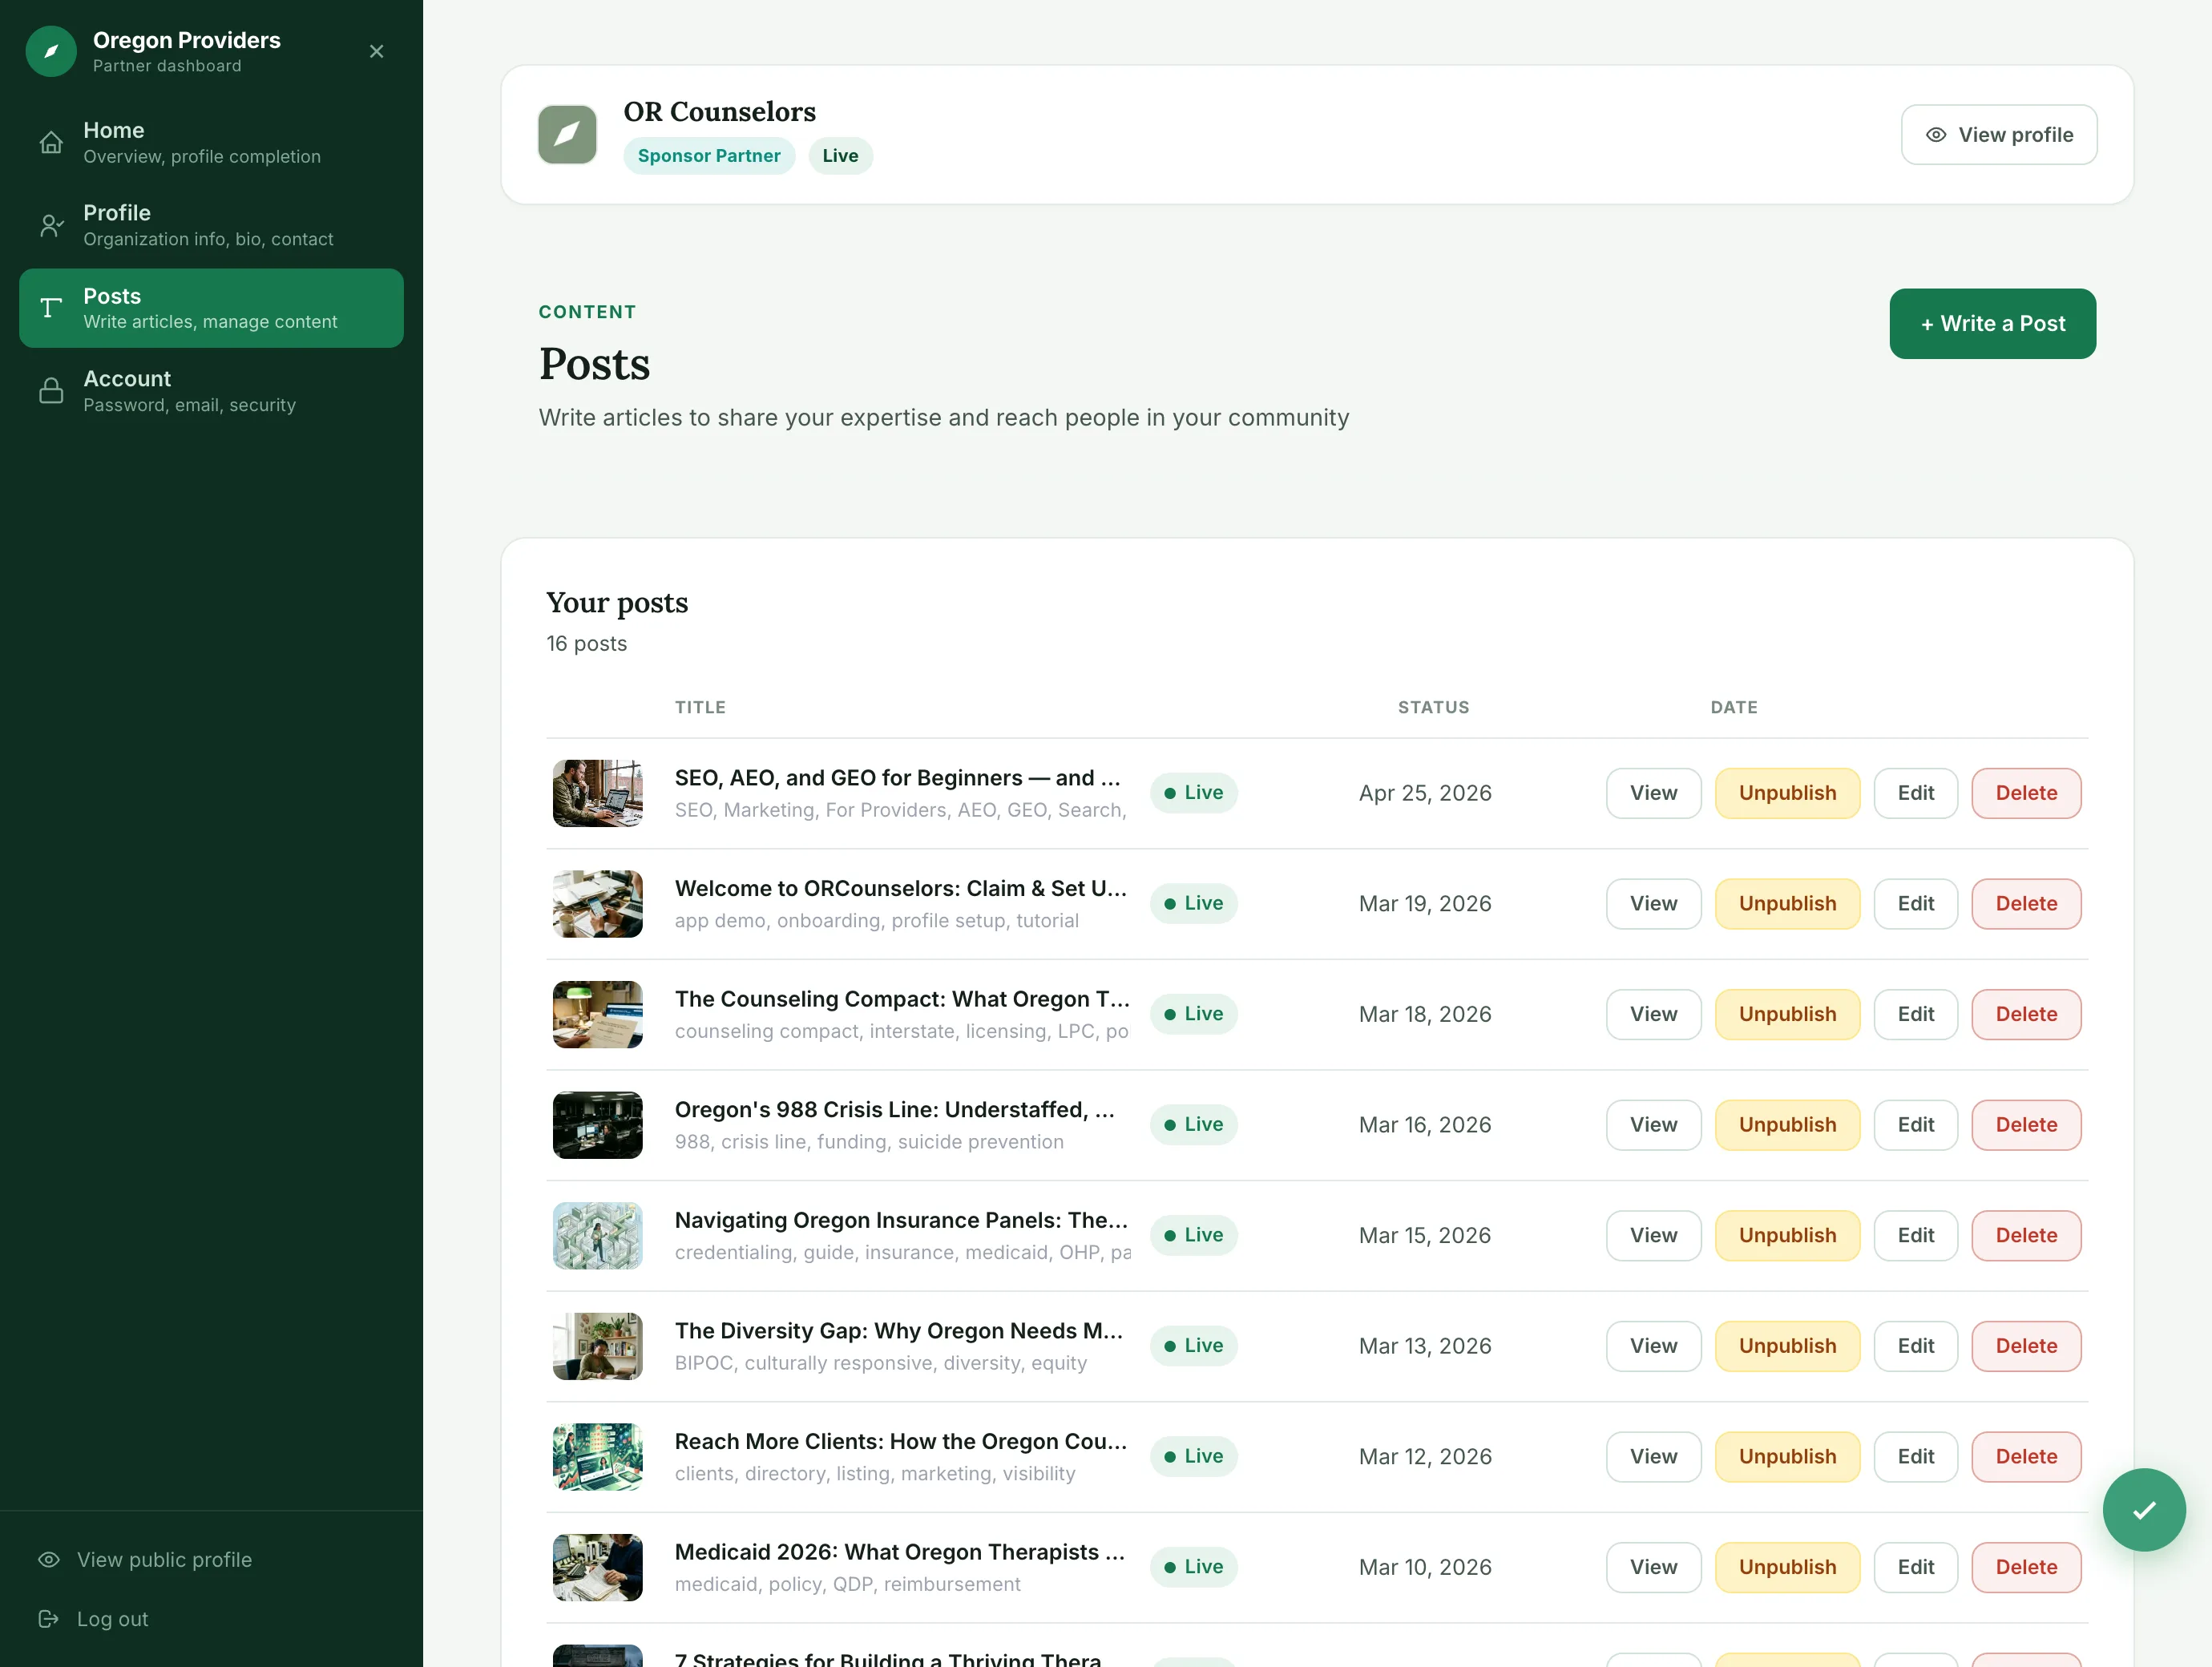
Posts (Articles)

/partner-dashboard/posts
Posts (Articles) screenshot

Publish articles authored by your organization. Posts land in the main /blog feed, on your partner profile, and on related hub pages. Same editor as provider posts — title, summary, tags, featured image, full body, and a published toggle. Drafts and published posts live side-by-side with view counts.

4

Account Settings

/partner-dashboard/account
Account Settings screenshot

Login email, password, and notification preferences for the partner-admin user. This is the user account record — different from "Profile" which is your public organization page.

Pricing at a glance

Start free, upgrade anytime. Full feature tables and the monthly/annual toggle live on the pricing page.

Provider
Free
$0
  • Directory listing
  • 2 marketing pages
  • 2 leads/week
Provider
Basic
$10/mo
  • Verified badge
  • Deep analytics
  • 5 leads/week
Provider
Pro
$25/mo
  • Priority ranking
  • SEO backlink
  • 25 leads/week
Clinic
Starter
$35/mo
  • 8 members, all locations
  • Members get Basic
  • 3 billboards
Clinic
Growth
$79/mo
  • 25 members, all locations
  • Members get Pro
  • 5 billboards
Clinic
Enterprise
$149/mo
  • 50 members, all locations
  • Priority ranking
  • Dedicated onboarding
See full pricing + feature tables →

Privacy & Crisis Resources

We never sell user data and never share anything with providers unless you explicitly send a lead.

  • No data broker sharing. No ad networks. No analytics that identify you personally.
  • Contact forms relay through the server so your email stays private until you choose to share it.
  • Full details: Privacy Policy · HIPAA statement · Terms
  • If you're in crisis: call or text 988 — the Suicide & Crisis Lifeline is free, confidential, and staffed 24/7.

Still stuck?

Check the FAQ or email us — we respond within one business day.

Oregon Cities

Specialties

Therapy Modalities

Alternative Therapies

Oregon Advantage

Oregon leads the nation in access to psychedelic-assisted and integrative mental health therapies.

View all Oregon therapies →